Station Management
REMOTE PLAYER MANAGEMENT
After you've finished building a Campaign you are ready to assign it to a remote SignagePlayer.
We provide several types of SignagePlayers:
- SignagePlayer Desktop version
- SignagePlayer Web version
- SignagePlayer Embedded version
- SignagePlayer Mobile version
The SignagePlayers are developed using an open source framework called FLEX which is available through the publicly available Apache repository. The SignagePlayers runtime is powered by common web technologies including HTML5, Adobe AIR, Adobe Flash, JavaScript, C++ and Java.
|
|
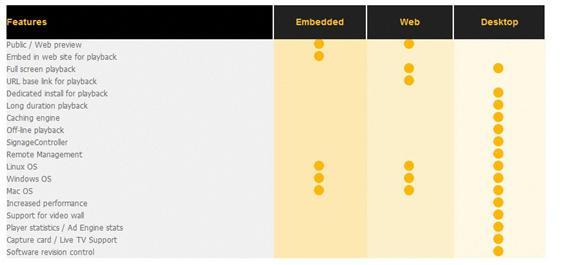
SIGNAGEPLAYER - DESKTOP VERSION
The SignagePlayer Desktop version is our dedicated player. Designed to run on a dedicated computer and always connected to one or more physical screens. The SignagePlayer Desktop version caches all content so it can run offline or when the internet connection is lost. The SignagePlayer Desktop version is remotely managed from the SignageStudio. Some of the remote commands include live snapshots, play, stop push new updates, and software revision control. The SignagePlayer Desktop version is a highly optimized media player.
The mediaBOX, which is the MediaSignage recommended media player device, ships with the SignagePlayer Desktop version pre-installed on it and ready to be registered to an account.
SIGNAGEPLAYER - WEB AND EMBEDDED VERSIONS
The SignagePlayer Web and Embedded versions are lighter versions of the Player. They don't have remote control capability and they are used to preview the presentation, share the presentation with others, or to embed it on to your own website.
Regardless of which version of the player / operating system you are using, when you make a change to your presentation, whenever you decide to push the update; that change will propagate to all Players. MediaSignage uses the "build once and run everywhere" ideology.
For the Web and Embedded Players, the only requirement is you that you need to have Adobe Flash installed.
SIGNAGEPLAYER - MOBILE VERSION
The SignagePlayer mobile version is similar to the SignagePlayer Desktop version. It was designed as a dedicated playback player that can run with or without internet connectivity with full remote control capabilities.
The SignagePlayer mobile version is supported on both Apple iOS as well as Android devices.
STATIONS AREA
To access and control each remote Desktop / Mobile player you have installed, you need to click on the Stations tab from the main navigation menu.
|
|

From the Stations you'll control all dedicated players (Desktop and Mobile).
INSTALLING THE DESKTOP PLAYER
To play a Signage presentation using the Desktop Player, you download it and install it on the same computer directly connected to your Output Screen(s).
Download the SignagePlayer Desktop version and follow the installation wizard to install it.
You can also install Adobe AIR runtime manually; however it is part of the Get Started install process.
|
|
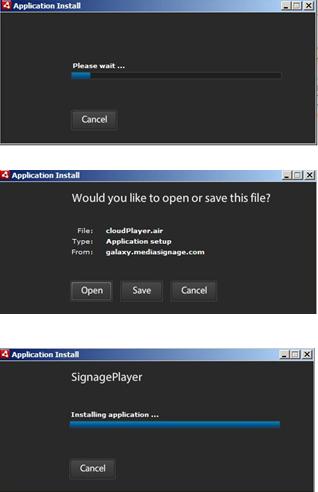
Installing the SignagePlayer Desktop app includes:
- Adobe AIR runtime
- Desktop Player
- SignageController
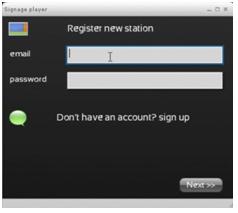
When the Desktop Player comes up you will be prompted you register with the same Username and Password as you've used to create your free account; which is the same account you use to log into the SignageStudio.
Next, click on the Register button and you'll gain access to the SignagePlayer settings.
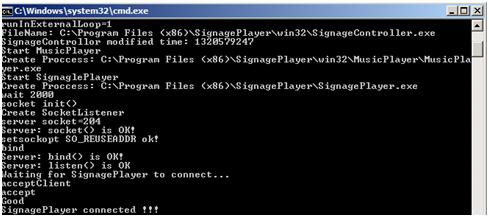
The SignageController is a watchdog application that monitors the health of the SignagePlayer. Its core responsibility is to restart the SignagePlayer and to monitor its working performance.
The SignageController is added to the startup folder and will auto-start upon OS load; it is the SignageController that kick starts the SignagePlayer Desktop version after the OS is loaded. To see the SignageController user interface, click on the "eye" button on the SignagePlayer Desktop toolbar. We will cover the SignageController in more details in a section below.
|
|
|
|
|
|

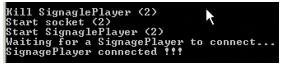
Always make sure the SignageController is connected and running in the background.
To test that the SignageController is working properly, close the SignagePlayer Desktop version; the SignageController internal socket will disconnect and it will re-launch the SignagePlayer.
|
|
Login to the SignageStudio with your login credentials and select the Station navigation tab, select a campaign and a Screen from the designated dropdown lists. For this example, we will set the Station name to My Player.
|
|

In the next Screen choose the Station mode. There are two available Station modes:
- Test Station Mode
- Real Station Mode
|
|
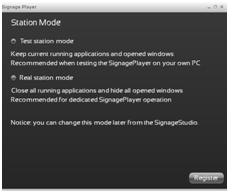
The Test Station Mode: will keep current applications and allow for open windows when testing the SignagePlayer. The test mode is a none aggressive playback mode that will allow to easily switch back to your OS desktop.
Real Station Mode: will force close on all running applications and hide balloon pop up messages including hiding the Taskbar. This mode is recommended for dedicated SignagePlayer operation.
Note: You can change this mode at any time from the SignageStudio.
|
|

SIGNAGECONTROLLER
As mentioned previously, the SignageController is utility installed on the computer running the SignagePlayer Desktop version. It gets installed in your startup folder. This utility was developed in C++ and it adds additional support functionality.
The SignageController ensures the SignagePlayer Desktop version is always running; that it is healthy and has enough working memory. It'll also enable you to remotely manage the player, set up power saving, reboot conditions, run live snap shots and more.
The SignageController will automatically start when you first reboot your computer. It resides in the Startup folder, but you can also start it manually by accessing the startup programs. Start the SignageController by clicking on the SignageController.bat file located in the startup folder.
|
|

Once started, it will minimize itself running as a background process. When the SignageController is working, the SignagePlayer status will change to connected.
|
|
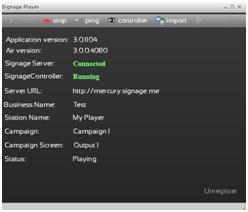
SIGNAGEPLAYER - USER INTERFACE
The Controller button open the SignageController log information.
|
|

START
|
|

The start button allows you to start the player after it has stopped.
STOP
|
|

The stop button allows you to stop the player after it has started.
PING
|
|

You can ping the Server to validate server connection.
SNEAKER NET
|
|

The import button is used to import SignagePlayer data generated by the SignageStudio. This feature is used for Offline updating of the SignagePlayer presentation.
SETTING
|
|

Use the setting button to access the SignagePlayer configuration.
|
|
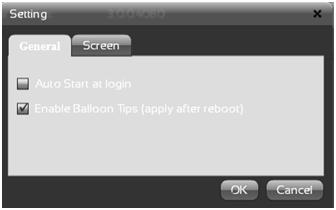
The window contains two tabs:
- General
- Screen
GENERAL TAB
Under the general tab, you'll find two options:
- 1.Auto Start at Login
- 2.Balloon tips (apply after reboot)
|
|
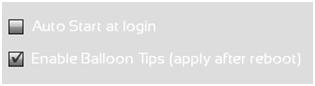
If you enable the Auto Start at Login option, the player will start playing automatically after you Log into your computer.
If you disable the Balloon tips option, the player will remove any OS alert or popup messages which may interfere with the presentation.
SIGNAGEPLAYER - LINUX INSTALL
Ubuntu is a version of Linux, and it's a freely distributed Operating System. It is popular as it saves the license fees associated with the purchase of an Operating System. If you want to download Ubuntu, you can visit the Ubuntu official website: Go to UBUNTU
Ubuntu is an advanced Operating System and not as user friendly as the Windows Operating System. If you aren't too technical you may want to stick with the Microsoft Windows Operating System.
The Linux player has several disadvantages over Windows as it does not support Video hardware acceleration and does not support Live TV / mediaTV. Thus we recommend Windows over Linux.
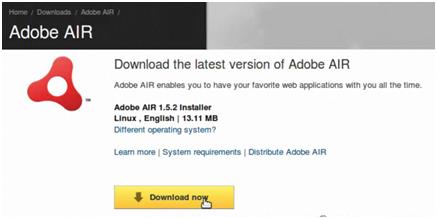
First thing you must do is install the Adobe AIR Runtime (if you don't have it already). You can download it from its official website: Go to Adobe
|
|
For our example we'll save the file to the default directory (which is the Desktop), we'll open an application terminal.
|
|
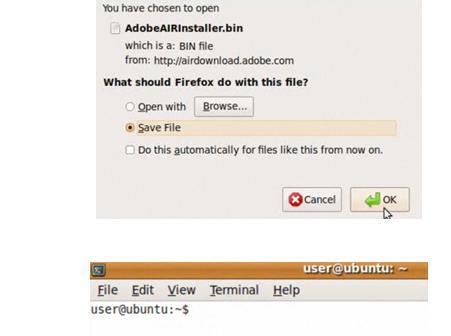
Take the file downloaded (an executable file), and run the installation process.
|
|
At this point, you can download and install the SignagePlayer Desktop version from our website: Get Started
We'll use our default /opt directory for the installation of the SignagePlayer.
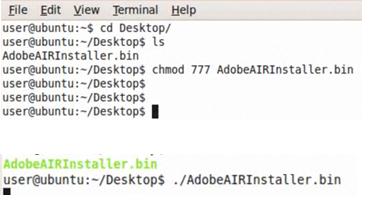
After you've installed both Adobe AIR runtime and the SignagePlayer, change the directory in the application terminal.
|
|
Notice we have a file named install.sh.
|
|

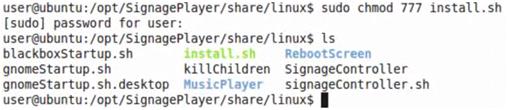
This is an executable file, but it's not marked as executable in the first stage. We're going to change it using the CHMOD command. Remember to perform the command as root.
|
|
The install.sh has turned green as it is now an executable file. Next we run this as executable; also remember to run it as root.
|
|
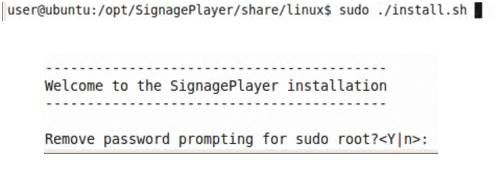
The script is prompting us if it's ok to remove the "password prompting". This is important as it will prevent the OS from waiting on confirmation key every time it loads.
Next provide a valid OS user name, as it will automatically login after OS reboot.
|
|

Next enter YES to "Would you like to auto start the SignagePlayer at boot up?"
|
|

Next, we are prompted if to remove the Gnome panel. Choose YES for a clean window desktop.
|
|

Complete by entering YES to reboot the PC and apply changes.
|
|

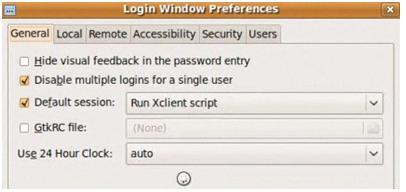
Next we're going to set our Ubuntu machine to automatically LOGIN without prompting us for any USERNAME or PASSWWORD.
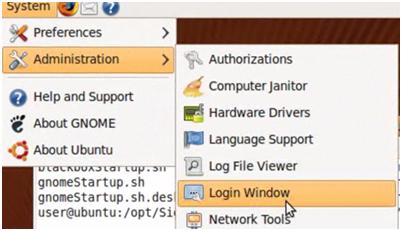
Depending on your configuration, you can go to System - > Administration - > Login window, and set the system automatically login without prompting for any username or password every time you reboot your PC.
|
|
|
|
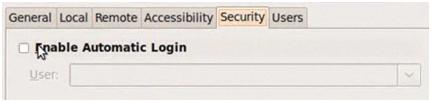
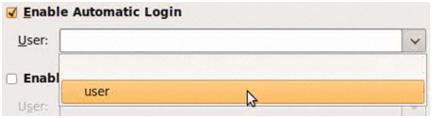
Now click on the Security tab and enable the Automatic Login option.
|
|
Under the dropdown menu you should see the user you've created.
|
|
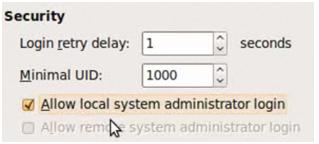
You can also allow local system administration. It is not mandatory, but it will make things easier to manage at the level of the OS.
|
|
Close the window to save the changes.
|
|

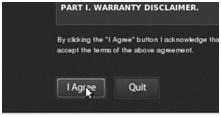
After rebooting, you'll be prompted to agree with the Adobe AIR runtime license agreement. This is a onetime action.
|
|
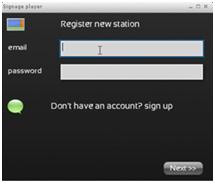
Enter your login credentials, choose a Campaign and a Screen, and select the Register button. This is also a onetime operation and will link the SignagePlayer to a particular account. If you are an Enterprise user, remember to provide an "End user" account info and NOT your enterprise credentials.
|
|
After you've registered the Station, you can click PLAY. The Signage Presentation will begin playing.
ADVANCED SETTINGS - UBUNTU LINUX
RESTORING THE GNOME TASK MANAGER
After the installation is complete, you'll not be able to see the Gnome taskbar on the Desktop. To restore it follow these steps.
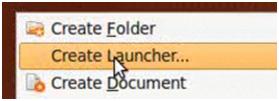
Step 1:
Right click on an empty area of your screen and choose Create Launcher.
|
|
Step 2:
In the next window, choose the following settings and click OK.
|
|

Step 3:
Open the xterm terminal from the Desktop.
|
|
Step 4:
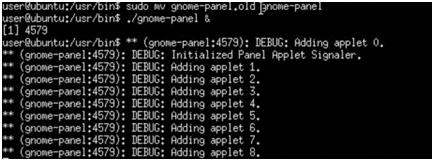
What happened to the gnome panel? It actually cd (changed directory) to /usr/bin and its name was changed to gnome-panel.old
|
|

To bring it back you use the mv command and change its name back to gnome-panel. Remember to do this from root. Make sure you use sudo before mv command.
If you don't want it to run, you can always rename the gnome panel again.
|
|
SIGNAGEPLAYER - LIUX INSTALLATION DETAILS
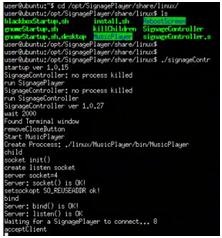
To run the SignagePlayer on an Ubuntu / Linux machine, the SignagePlayer has to run as root. It cannot run as a standard user. Let's look at some of things which were actually modified during the installation.
Use the following command on the terminal: sudo/vi/etc/sudoers. Scroll down and you'll see a new entry added. This was done to remove root password promoting by the OS.
|
|

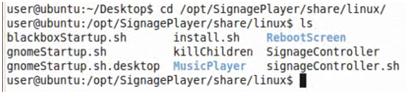
Also if you type the command cd/opt/SignagePlayer/share/linux and ls, you'll see multiple files listed.
|
|

The SignagePlayer Desktop version should never be executed to load directly by a User, instead it is the responsibility of the SignageController to fork the SignagePlayer process. The SignageController has privileges of root and they will pass down the fork tree to the SignagePlayer.
|
|

Always run the executable signageController.sh as root
|
|

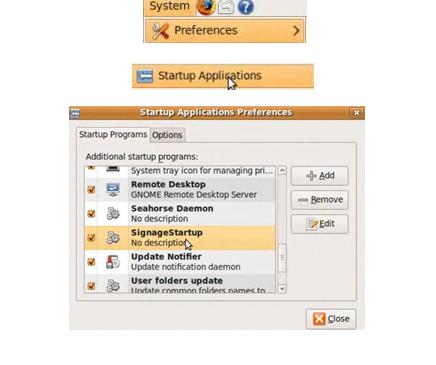
Next we are going to review: How the SignagePlayer automatically starts. Our install script install.sh took care of this task. If you cd to your home directory, and go to the config directory, you'll see a directory called auto start. In this directory we added the SignagePlayer.desktop command. This causes the SignagePlayer to automatically start.
If you want to see this from the GUI, go to System - > Preferences - > Startup applications and see the SignageStartup file listed.
|
|
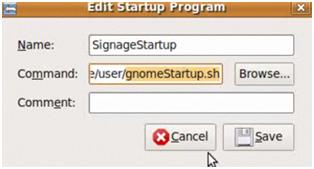
This is how the SignagePlayer to automatically starts upon OS boot up. To get more details, select the SignageStartup file and click the EDIT button.
|
|

You'll see it runs a script named gnomeStartup.sh.
|
|
|
|

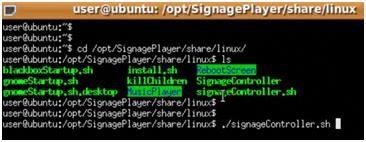
From the startup, it points to this singageController.sh file, which is the proper way you should be executing the SignagePlayer. This is because it takes care of running the SignagePlayer as root (very important). If you run the SignagePlayer not as root, but as a standard user, you may get privilege related errors.
If you want to run the SignagePlayer manually, type the commands cd /opt/SignagePlayer/share/linux, and the ls command, and open the ./signageController.sh file.
|
|
|
|
SIGNAGEPLAYER - MAC INSTALL
In this section we'll cover the Mac mini platform running the SignagePlayer Desktop version.
|
|

The Mac mini is a good solution for running the SignagePlayer; mainly because of its small size and powerful processing unit.
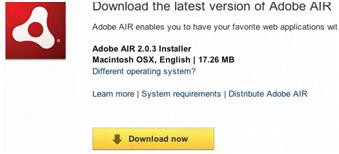
To have the SignagePlayer running on a Mac mini, the first thing you do is to install the Adobe AIR runtime (if you don't have it already). Go to the official website of Adobe AIR and download it. Go to Adobe
|
|
After you downloaded the file, proceed with the installation process.
Next install the SignagePlayer Get Started
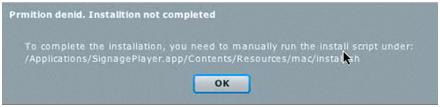
After the installation is complete you will receive a warning letting you know the installation is not yet done. Kick off the install.sh script from a terminal session.
|
|
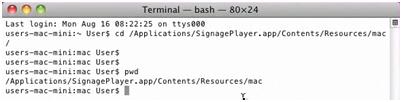
You first open a terminal and run the file to complete the installation. Launch a terminal and cd; change the directory, to the install directory.
|
|
After you changed the directory type the ls command to view its content.
|
|
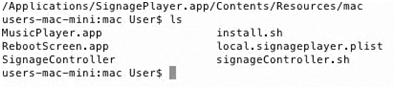
Next, give full permissions to all the files within the directory.
|
|

At this point you may be prompted to enter your admin password. Next, make sure you know which user logs in by default on your Mac. One way of knowing is by typing the echo $USER in the command Terminal.
|
|

User is the actual username in our example. Now you can run the command sudo ./install.sh to start the installation process.
|
|

After pressing ENTER, the first question is if we want to remove the password prompting for the sudo root.
|
|
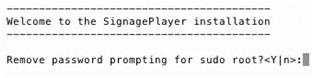
We require root privileges to be able to run the SignagePlayer Desktop version; so choosey / YES
Next, provide username we used to login to the computer.
|
|

The next question is: Would you want to automatically start the SignagePlayer on boot up? Choose y/YES.
|
|

Next, choose y/YES to reboot the computer.
After reboot, you'll see the doc has gone, the top menu bar is gone, and you have a clean Signage Player running.
|
|

INSTALLATION REVIEW - MAC
In this Section we'll discuss some of the changes we've made to the file system and how the install.sh file operates.
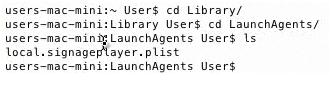
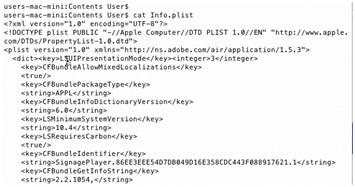
The first thing we'll do is launch the Terminal. Let's see how the SignagePlayer knows to automatically start when you boot up the PC. This is done through a directory called Library /. If you type the command Lunch Agents you'll see a file named local.signageplayer.plist.
|
|
If you cat the file you'll see the content that was injected to auto starts the player.
|
|

The signagecontroller.sh file you see listed above is the batch file that launches the SignageController; which in turn launches the SignagePlayer.
In order to run as root and without having to prompt you for a password every time, the script uses the sudo command.
|
|

If you go to the end of the file, you'll see we made a few entry changes which will actually allow the player to launch without user interaction.
|
|

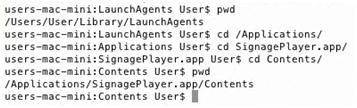
We also hide the menu bar and the doc. First we changed the directory to Applications / SignagePlayer.app / Contents.
|
|
and the file Info.plist was modified.
|
|

In this file you can see the entries which allow you to hide the doc and the menu bar.
|
|
SIGNAGEPLAYER - STATIONS
As soon as you click on the Register button, a new Station will appear in the SignageStudio. It will have a status of Ready and it will be set to accept remote commands from the SignageStudio. A GREEN icon indicates that all is working.
|
|

Now we've installed a Desktop player on a computer and connected the Computer to one or more screens. We can visit the Stations area of the SignageStudio application to control and manage the SignagePlayer Desktop and its content.
After you access the Stations area (by clicking on the Stations button from the main Navigation menu), you'll notice it has three sections:
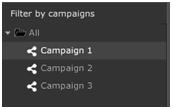
1. Campaigns (on the left side of the interface)
|
|
2. Stations (on the center side of the interface)
|
|

3. Properties panel (on the right side of the interface)
|
|
CAMPAIGNS AREA
In the Campaigns area, you'll see listed a directory of the Campaigns you created. You'll associate a Campaign with a Station using the Station's properties panel.
|
|
STATIONS AREA
In the Stations area, you'll see all your Stations listed; meaning the Computers on which you have installed SignagePlayers (Desktop and Mobile). You can remotely manage the players from this area.
To control the listed players in the Stations section, you'll use the toolbar located on the top of the Stations panel.
|
|

THE PLAY OPTION
To start playing a selected Station, select it in the Stations panel and click on the Play button.
|
|

After you click on the Play button, a new dialog box appears on your Screen.
|
|

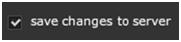
In the dialog box you can choose to save changes to server and to update station/s with changes.
The save changes to server option refers to any change you made to your Campaigns since you last saved. If you enable this option it will save all the changes to the server before the Player starts playing your Campaigns.
The update station/s with changes refers to applying the changes you saved using the first option (to the selected Station). If enabled, this option will update the selected station and all other Stations using the Campaign you've applied changes to.
In the dialog box, you have the option to click on the PLAY button and the Player will start playing immediately, or to click CANCEL and abort the operation.
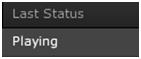
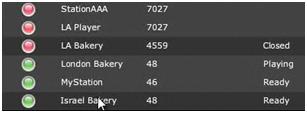
You'll notice after you choose to play a particular Station, its status will change from Ready to Playing.
|
|
THE STOP OPTION
To stop playing a certain Station, first select it in the Stations panel and then click on the STOP button.
|
|

After you click on the Stop button, a dialog box appears on your screen.
|
|
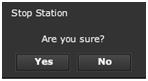
You can click YES to Stop the Station from playing, or NO to cancel the operation. If you click YES, the status of the selected station will immediately change from Playing to Ready.
|
|

PING SIGNAGEPLAYER OPTION
Ping will retrieve the latest statistics from the Player and verify it is alive.
|
|
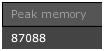
If you click on the ping button you'll notice the Peak memory and other Player statistics will update.
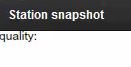
THE SNAPSHOT OPTION
If you click on the Capture button,
|
|

the server will request a real time snapshot from the Station. The station will reply with an image of the current playback state.
|
|
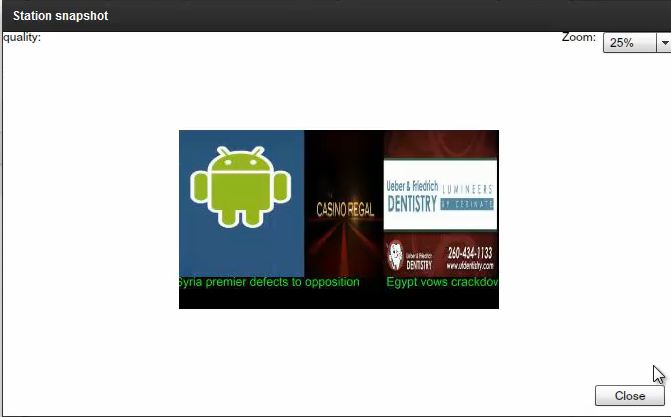
You'll notice the system took a picture of whatever was playing on the Station at that particular moment. You have the option to set a quality of the preview. Higher quality snapshots result in a longer delay between previews.
|
|
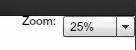
Set a zoom level for the LIVE capture.
|
|
CHECK NEW VERSION
The Check New Version feature
|
|

allows you to propagate MediaSignage latest releases builds to the SignagePlayer. The latest software revision will automatically download and install on the remote SignagePlayer with no user interaction.
REMOTE UPDATES
Clicking on the Updates button
|
|

will save whatever changes you've made in the SignageStudio, and will push it to one or more Stations.
EXPORT DATA
The Export SignagePlayer data
|
|

allows you to export the current campaign bound to a station and all its associated data to a folder. You can later import the data locally on the computer where running the SignagePlayer using a USB drive. This manual update is sometimes referred to as SneakerNet as you need to walk (i.e.: sneakers) to the physical station to perform an action.
This method is mostly used to update your SignagePlayer offline when no internet connection is present at the location.
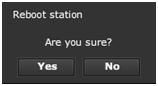
REBOOT STATION
The reboot feature will physically reboot the computer where you have installed the SignagePlayer Desktop version. If you select a Station and click on the reboot button,
|
|

|
|
CLEAR PLAYER CACHING
|
|

Clear caching allows you to remove the local data used by a particular remote Player. In the previous Chapters we mentioned our Signage Platform uses an advanced caching system which allows continuous playback even when the internet connection is interrupted.
When you click on the Clear Player Caching button, a new dialog box appears.
|
|

You can click on YES to CLEAR the caching data remotely or you can choose NO to CANCEL the operation.
DELETING STATION
To DELETE a station, you select it in the Stations directory and click on the Delete button.
|
|

When you click on the delete button, a dialog box will appear on your screen.
|
|
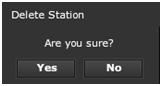
If you choose YES, the selected station will be permanently DELETED. If you choose NO, you CANCEL the operation.
STATIONS AREA - STATISTICS EXPLAINED
Below the toolbar we discussed earlier, is where all your Stations are listed; along with several Statistics for each Station. The Statistics are organized in columns.
Tip: You can click and drag a column's name to change its place in the section. Arrange the columns using your mouse. This applies to all columns found in any section of the SignageStudio.
|
|

We will now discuss each Statistics column from the Stations area.
CONNECTION
In the Connection field, you can check if a Station is connected to the server and if it can be managed from the SignageStudio. The connection is indicated by a colored LED. The LED can have three colors:
- Red
- Green
- Yellow
|
|

The red LED indicates no connection.
The green LED indicates the Station is connected using a Socket.
The yellow LED indicates the Station is connected using HTTP pooling.
CONTROLLER
In the Controller field, you can check if the SignageController of a particular Station is running or not.
|
|

If the SignageController is not running, the status will say not running and you will not be able to take advantage of some features like remote snapshot and computer reboot. In this case, you need to check if the SignagePlayer Desktop version and the SignageController installed correctly on the computer connected to your Screens.
STATION
In the Station field, you'll find the name of the Station.
|
|
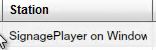
You can change the name of any Station at any time directly from the SignageStudio.
LAST UPDATE
The Last Update field displays the last time the SignagePlayer was updated. Check out this field to know precisely when you updated the selected Station with the latest changes.
LAST STATUS
In the Last Status field, you can check the latest status of a Station. In this column you'll see the last even the SignagePlayer reported back to the server. Remember that if a Player is currently off, the last status will indicate the last reported even prior to losing connection to the server.
|
|

CACHING
In the Caching field, you can see the number of cached resources and the number of resources ready to be cached by the player. In the screen shot below, you'll notice the selected Station has a total of 21 Resources available for caching and all 21 have been cached.
|
|

STARTED
In the Started column, you can see when the SignageController first started.
|
|

RUNNING
In the Running column, you can check how long a particular SignageController has been running. In the image below, the first field indicates the SignageController is not running. The second field indicates around 2 hours and 11 minutes passed since the SignageController associated with the selected Station began working.
|
|

CURRENT MEMORY
The current memoryshows the current volatile memory available on the selected Station.
|
|

PEAK MEMORY
The peak memory field shows the latest amount of memory used by the SignagePlayer on the selected Station.
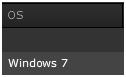
OS
The OS column indicates what Operating System of the selected Station. In the image below, the selected Station uses Windows 7 as the Operating System.
|
|
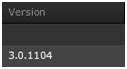
VERSION
The Version field indicates the version of the SignageStudio.
|
|
AIR VERSION
The AIR Version field indicates the SignagePlayer Adobe Integrated runtime version. The AIR version is controlled by MediaSignage, but you are always safe installing the latest version from Adobe; if you wish to do so.
|
|

These are all the columns in the Stations area. You can click on any column title to change the sort order.
|
|

The arrow indicates all the Stations will be listed in an ascending or descending order based on the respective column title.
STATION PROPERTIES PANEL
When you select a Station in the Stations directory, you'll access its properties panel. In this section, we'll discuss each station's property in detail.
|
|
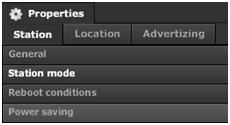
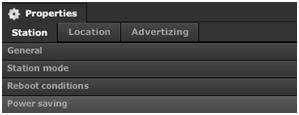
The properties panel of a Station has three main tabs:
-1. Station
-2. Location
-3. Advertising
|
|
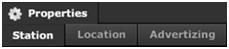
STATION
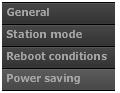
Under the Station tab, there are four categories:
-1. General
-2. Station Mode
-3. Reboot Conditions
-4. Power Saving
|
|
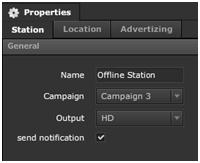
GENERAL
When you click on the General tab (under Station in the properties panel), you'll gain access the following settings:
|
|

- 1. Name
- 2. Campaign
- 3. Output
- 4. Send Notification
|
|
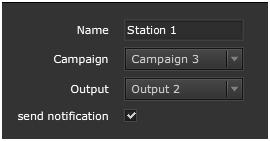
NAME FIELD
To change the name of a Station, first you select it in the Stations directory and type the new name in the Name field located in the properties panel of the selected Station, press enter to complete the process.
|
|

CAMPAIGN
To show your Signage Presentation on a particular Station, you'll select a Campaign that will be played by the SignagePlayer installed at the location. To re-assign a Campaign, first select the Station and choose a Campaign from the dropdown list.
|
|
You can switch between the available Campaigns at any time and assign different Campaigns to the same Station whenever you want. Remember to click File > save and restart player with changes if you wish to apply the changes immediately.
OUTPUT
In the Campaigns Chapter, we discussed creating more than one Output within the same Campaign. If you create more than one Output within a Campaign, you need to choose one from the Output dropdown list to assign it to the selected Campaign.
|
|

You can only assign one Output at a time to a select station.
SEND NOTIFICATION
The send notification feature allows you to receive an email every time a Station goes down.
|
|

To use the send notification feature, you first set up a default email address that will be used by the system to send emails.
Go to File in the main top menu of the SignageStudio interface and choose Setting.
|
|
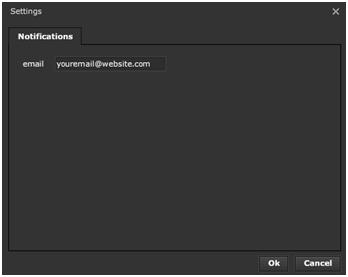
In this window you'll set the email address where you want to receive notifications.
Enter the email address in the email field.
|
|

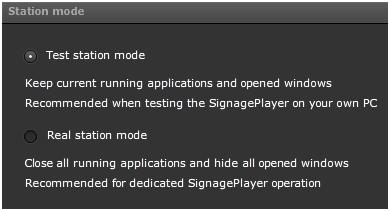
STATION MODE
In Test station mode: All your applications and open widows will keep running. This feature is recommended when testing the SignagePlayer on your own PC.
In Real station mode: All running applications and opened windows will be closed as well as hiding the Task Manager. This option is recommended for dedicated SignagePlayer operation; i.e. you'll only use the computer for playing your Signage Presentation.
To change the Station mode of a particular Station, you select the Station in the Station directory and click on the Station Mode tab, choose either Test Station mode or Real Station mode.
|
|

|
|
REBOOT CONDITIONS
When you select a Station from the Stations directory and click on the Reboot conditions tab, you'll have access to several settings which allow you to control and schedule the rebooting of the selected Station.
These settings are:
1. Reboot Exceed Memory
2. Reboot Every Day
3. Reboot on Error
|
|
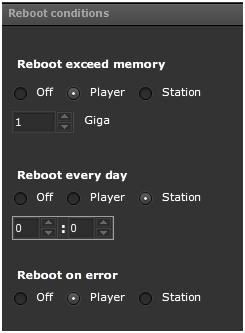
REBOOT EXCEED MEMORY
In the reboot exceed memory section you can program the selected Station (hardware) or the SignagePlayer Desktop version (software),, to reboot if a certain memory threshold is exceeded.
Let's demonstrate how this feature works.
Step 1:
Set a maximum limit for the RAM memory in the Giga field.
|
|
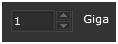
The minimum amount of memory required is 1 GB. You can type a different numerical value or you can use the UP and DOWN arrows keys.
Step 2:
Set the action that will take place if the amount of memory is exceeded.
-1. Off
-2. Player
-3. Station
|
|

If you choose the OFF option, the feature will not be applied.
|
|

Enabling the Player option, will program the SignagePlayer Desktop version to reboot if the amount of memory set at Step 1 is exceeded.
|
|

Enabling the Station option, will program the Station / Computer to reboot if the amount of memory is exceeded.
|
|

REBOOT EVERY DAY
Using the reboot every day option, you can program either the SignagePlayer Desktop version (software) or the Station (hardware) for a daily reboot.
To schedule a particular Station or Player to reboot every day, follow the next steps:
Step 1:
In the designated field, set a time when you would like the Player or the Station to reboot.
|
|

In the first field enter the hour and in the second one enter the minutes. You can also use the UP and DOWN arrows keys to set the time. In the image above, the reboot will take place every day at 23:59 hours.
Step 2:
Set the action to take place when the time is reached. You have three choices:
-1. Off
-2. Player r
-3. Station
|
|

If you choose the OFF option, the feature will not take effect.
|
|

Enabling the Player option, will program the SignagePlayer Desktop version to reboot every day when the time is reached.
|
|

Enabling the Station option, will program the Station / Computer to reboot every day when the time is reached.
REBOOT ON ERROR
Using the reboot on error option, you can program either the SignagePlayer Desktop version or the Station which runs the Player to reboot every time an error occurs.
Set the action to take place if an error occurs while playing the presentation.
Just as in the above cases of rebooting, you have three choices:
1. Off
2. Player
3. Station
|
|

If you choose the OFF option, the feature will not be used.
|
|

Enabling the Player option will program the SignagePlayer to reboot if a certain error occurs.
|
|

Enabling the Station option, will program the Station / Computer to reboot if a certain error occurs.
|
|

POWER SAVING
If you click on the Power Saving tab, you'll gain access to a section of the properties panel where you can control when Stations and Monitors turns ON or OFF To save energy.
|
|
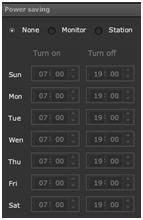
To schedule a monitor or station to turn ON or OFF at a particular day and at a certain time, follow the next steps.
STEP 1:
Select one of the two available options, either the Monitor or the Station.
|
|

STEP 2:
If you select the Station in Step 1, you can choose each day of the week and at what time the selected Station turns OFF. A Station cannot be turned ON remotely from the SignageStudio, but it can be physically set to turn ON if the BIOS of the computer support it.
|
|
If you select the Monitor in Step 1, you can set a day and time the monitor of the selected Station will turn ON or OFF (go into standby mode).
EXAMPLE 1: Schedule a Station to turn OFF
Select the day and the time you want the selected Station to turn OFF. We'll set the selected Station to turn OFF every day at 19:00 hours.
|
|
EXAMPLE 2: Schedule a Monitor to turn ON or OFF
Select the day and the time you want the Monitor of the selected Station to turn ON or OFF.
In our example, we will set the monitor to turn ON every weekday at 10:00 AM and on weekends at 11:00 AM. We'll also set the monitor to turn OFF every weekday at 19:00 hours and on weekends at 21:00 hours.
This is what the configuration should look:
|
|
ADVANED POWER SAVING OPTIONS
In this section we'll discuss how you can physically set the PC to run your Signage Presentation to turn back ON. Setting your physical SignagePlayer computer to Turn OFF every night will save on energy and will increase the lifespan of the PC.
If your BIOS support it, you can physically set your SignagePlayer PC to automatically turn back ON in case there is a power failure or if an alarm is set for that purpose.
BIOS SETTINGS
The first thing you do is to boot your PC. Press the DELETE key or the F2 key (depending on your PC) to go in to the BIOS. When you are inside the PC BIOS, enter the Standard CMOS Features.
|
|

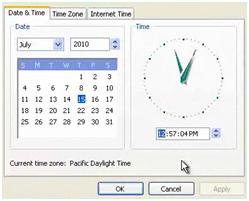
Confirm that the date and time are correct; this step is important.
|
|

Next, go to the Power Management Setup.
|
|

Under the Power Management Setup, you set the PowerOn after Pwer-fail setting to ON.
|
|
This will allow the system to come back ON if there is a power failure. If you have this option in your BIOS make sure it's enabled.
Next, select the Power-ON by Alarm option.
|
|

This option needs to be enabled if you want the machine to automatically turn back ON in any day and at any time. If you set the Power-ON by Alarm to ON, you can set the date to 0 or every day, depending on your BIOS version. This setting will enable the Computer to turn itself back ON every day. Also you can set the Resume Time or the Alarm Time to specify the time when you want the Computer to turn back ON.
|
|

We've seen how you can set the Computer to Turn Back ON at a certain time and date. If you want to set the machine to Turn OFF, you can do it remotely, directly from the SignageStudio as we've discussed earlier.
You should check the date and time set for the operating system. Make sure the time and date set on your Operating System matches the time and date set on the BIOS.
|
|
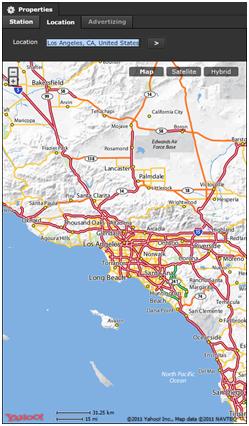
1. LOCATION
If you click on the Location tab
|
|

in the properties panel of a selected Station, you can associate a location to that particular Station. This feature is useful when you're planning to allow advertisers to play ads on your Station.
We'll discuss more on Advertising, on the Incoming and Outgoing ads in another chapter, but for now we will demonstrate how the Location feature works.
Let's say, for example, you have a Station located in Los Angeles, USA. To save the location and associate it with your Station, you enter the address or zip code in the Location field
|
|

Next, click on the right arrow key or press ENTER on your keyboard to search for the map of LA. If you typed the correct data, you'll immediately see (just below the Location field), a map of the city and surrounding area.
|
|
LOCATION MAP CONTROLS
After you've entered an address or zip code in the Location field, you can control the map of that location in several ways.
1.TYPE OF MAPS
There are three different types of representation you can choose from:
1. Map
2. Satellite
3. Hybrid (map and satellite)
|
|

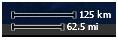
2. THE ZOOM FEATURE
You can zoom in or out of the mapping representation, using the zoom buttons located on the top left side of the map.
|
|

If you click on the Minus (-) sign, it will zoom out of the map. If you click on the plus (+) sign you'll zoom into the respective map.
You can also left click with your mouse on a particular area of the map, and it will zoom in to that respective area. If you click several times, it will keep zooming into that area.
Every time you use the zoom feature, you'll see in the bottom left corner of the map how the scale representation changes. It will show the zoom distance in miles and kilometers.
|
|
3. DRAGGING THE MAP
You can use your mouse to drag the map around, to view other locations. Click and hold the left button of your mouse and then drag the map around.
ADVERTISING
The last tab in the Properties panel of a Station is the Advertising tab. In the Advertising section you'll access several settings regarding the mediaADNET and the Advertising engine.
|
|
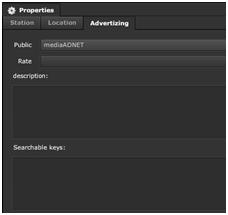
We will discuss more about this feature in another chapter, but to summarize; here you'll be able to choose if a certain Station is public or not; meaning it can or cannot be found by advertisers who want to buy advertising space. You can choose what rates you are charging so you decide how much advertisers should pay you for allowing them to play ads on your screens.
REMOTE UPDATES
There are several ways to update the remote SignagePlayers.
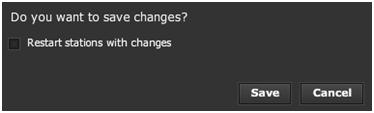
1. THE SAVE DIALOG
The easiest way to update all your remote Players is through the SAVE dialog. Click on FILE and then choose SAVE (upload) from the main Menu of the SignageStudio user interface .
|
|

After you choose SAVE, a new dialog box appears.
|
|

In this dialog box, you can enable the Restart stations with changes option. Enabling this option, will synchronize all Stations and update them with the latest changes you made inside the SignageStudio. Every single Station, every single SignagePlayer Desktop version installed anywhere in the world and is connected to the SignageStudio, will reboot and play with the latest changes you made to your Signage Presentations.
If you leave this option disabled, the system will save the changes to the server but it will not propagate them to your Stations; until the next player reboot.
Using the SAVE dialog is efficient if you have a smaller network. If you have a larger deployment, it can be hard to manage all the SignagePlayer and update every single one of them with the SAVE dialog.
2. THE UPDATE BUTTON
Another option is to save the changes using the SAVE dialog, but leaving the Restart stations with changes option disabled.
|
|
This way, we are saving the entire configuration to the server but we are not updating each Player installed on location. If you want to apply the latest changes only to a specific player, select it and click on the update feature from the Stations toolbar.
|
|

|
|

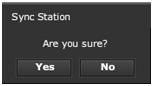
You can choose YES to update/synchronize the selected Station, or you can choose NO and CANCEL the operation.
You can also select multiple Stations by holding down the Ctrl key on Windows and select each Station with your mouse.
|
|
|
|

to apply the latest changes only to the selected Stations.
Another option is holding down the Shift key on Windows and with the left mouse you can select a series of Players from the Station's directory. Use the Ctrl key to select or deselect Stations.
Once you selected the Stations, you can click on any of the available buttons in the Stations toolbar and the operation you choose will affect only the selected Stations.
|
|

One import thing to remember is to always SAVE the changes to the server before updating the selected Player or Players.
Let's say for example we make a change to a particular Campaign.
|
|

next, we go back to Stations, select one or more Stations and click on the update button.
|
|

Choose YES on the Sync Station dialog.
|
|
Even if we clicked on YES, the updates are not going to be reflected on the selected Players because we never saved the changes. Anytime you change something in the SignageStudio you must remember to choose SAVE (upload) from the File menu to first save the changes to the Server.
|
|

Only after you've saved the changes to the server can you select one or more Stations and click on the Update button
|
|

to update the Stations.
3. THE PLAY BUTTONAnother way to update the remote Players is to select them and click on the Play button.
|
|

|
|
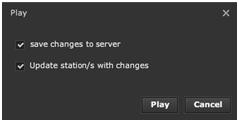
You have two options:
-1. Save Changes to Server
-2. Update Station/s with Changes
If you enable the Save changes to server option, the system will save whatever changes you have made to your presentation to the server.
It will do this before it instructs the selected Player/s to restart.
You may sometimes notice this option is not available.
|
|
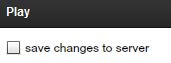
This is because you didn't make any new changes to the presentation. If you go back and make any change to the Presentation, after you click on the Play button, you'll notice the option becomes available.
|
|
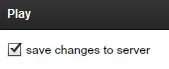
If you enable the Update station/s with changes option, the system will tell each remote SignagePlayer to contact the server and see if there are any changes made, before it starts playing.
|
|

If the option is disabled, the system will simply instruct all the selected Players to start playing.
4. Closing the SignagePlayer on location
Another option you can use is to update the SignagePlayer by physically closing it
|
|

If you close the SignagePlayer Desktop version, the SignageController will restart it. As soon as it comes back on, it will contact the server again and it will stream down the latest changes. If for some reason the internet is not available, the Player will load the cached content.
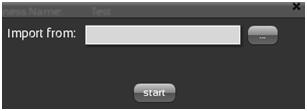
OFFLINE UPDATER (SNEAKERNET)
The Offline updater allows you to physically take your Signage Presentation from the SignageStudio and update the SignagePlayer Desktop version that doesn't have an internet connection on location.
This is very useful if you have for example a billboard and you physically go to you billboard once a week, have a USB flash drive prepared, and update the Signage Presentation manually.
For the next example, we have a Station that is Offline.
|
|

We are going to update this Station without connecting to the internet.
We will take the entire Signage Presentation that supposed to run at this particular Station, we copy it into a Flash drive and manually update the content at the location.
Note: To update offline a Station, the SignagePlayer Desktop version needs to be registered at least once, when you install the SignagePlayer Desktop version, the Station had to be connected to the internet. After that, the internet connection is preferable but not mandatory.
Step 1Assign a Campaign and an Output to the Station that is currently offline. Everything that resides in this Campaign, every resource, every file and the entire Campaign and Output Screen configuration will be exported to a dedicated folder.
Assign a Campaign and an Output to the Station that is currently offline.
|
|
Click on the Export SignagePlayer data button
|
|

Here you can see how all the resources, the global data; outputs data that have been exported.
|
|
|
|

to search for a location on your computer or external drive. Once you defined a location, the path to that location will be visible in the export window. We will choose for this example to save the data on a new folder named Player 1, on the Desktop and then copy the data on to a USB Flash Drive.
|
|
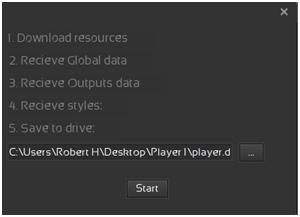
Step 3Click on the START button
|
|

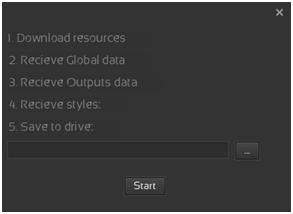
to begin exporting the SignagePlayer data. There are five operations to complete:
- 1. Download Resources
- 2. Receive Global data
- 3. Receive Outputs data
- 4. Receive styles
- 5. Save to drive
If all the operations are completed successfully, you'll get a message telling you that the player.data folder is ready to be imported from SignagePlayers.
Step 4
After the exporting process has finished you can go to the newly created player.data folder.
|
|
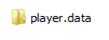
Notice the player.data folder contains two main folders:
|
|
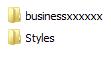
The xxxxx from the business folder will be replaced with the number associated to your business. If you like to check that the number is correct, you can access Help -- > About in the main menu of the SignageStudio application and you can see the business number displayed in the About box.
These folders contain all the data that is necessary if you decide to copy the same configurations, the same settings, the same presentations you have on the SignageStudio and use them on a different computer that has the SignagePlayer Desktop version installed.
We will open for example a persistent.xml file from the businessxxxxxx folder using the Adobe Dreamweaver editor.
|
|
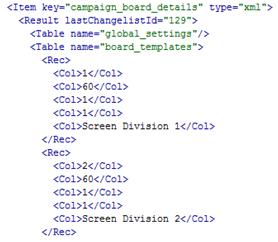
Notice that the file contains xml data regarding all sections of your Signage Presentation like the Screen Divisions illustrated above. You can manually make changes to the XML file and save them for later use if you like. This is an advanced feature of the SignageStudio so make sure that you know what you are doing when editing xml files outside the Studio.
Step 5Now that you have exported and saved the SignagePlayer data, to use that data on a computer that has the SignagePlayer Desktop version installed but no internet connection, you import it locally, using the SignagePlayer Desktop interface.
First, copy all the data from the Flash Drive to the Computer on location.
Import the SignagePlayer data physically by opening the SignagePlayer Desktop version and click on the Import button.
|
|

|
|
Click on the browse button and search for the player.data folder.
Click the START button to import the data into this SignagePlayer.
|
|

A message will let you know that the Import process is completed and the Player will reboot to load the new data.
|
|

Notice that the Signage Server is not connected, the Station is still offline
|
|

but the SignagePlayer Desktop version is running the latest Signage Presentation we've configured and imported physically on the machine.
WEB AND EMBEDDED SIGNAGEPLAYERS
The SignagePlayer Web and Embedded versions are lighter versions of the player. They don't have remote control capability and they are used mostly either to preview the presentation or to embed it on to your own website.
Remember regardless of which player version you are using, the SignagePlayer Desktop version, Web player, embedded or even mobile; when you make a change to your Signage Presentation, that change will propagate to all the Players.
WEB PLAYER
Unlike the SignagePlayer Desktop version, the SignagePlayer Web version doesn't need require an installation. To work, the SignagePlayer Web version needs to run in a Web browser and Adobe Flash must be installed on the computer that will run the Player. Also, make sure window popup is enabled to open the Web Player.
You can use the Web Player to preview the Signage Presentation while you are working on it.
1. Using the main Navigation menu of the SignageStudio.
In the main navigation menu of the SignageStudio, located on the top left side of the user interface, you'll find the Player button.
|
|

When you click on the Player button, a drop down menu will appear. The dropdown menu contains two options:
- Player Preview
- Install AIR Player
|
|
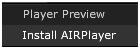
If you click on the Install SignagePlayer Desktop version button, it will take you to our download page.
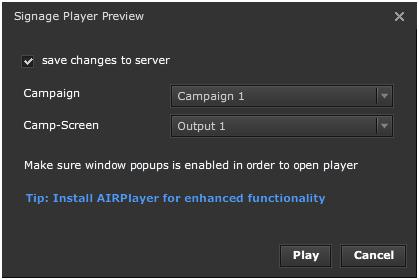
If you click on the Player Preview button, a new window dialog will appear:
|
|
|
|
When you make changes to any part of your Signage Presentation, after you click on the Player Preview button, you have the option to enable the "save changes to server" option. Enabling this option will have your latest changes saved on to the server, before the Web Player is launched.
CAMPAIGN
|
|

To preview a Presentation you first select a Campaign. If you created multiple Campaigns, you'll see a dropdown list containing all your Campaigns.
CAMPAIN-SCREEN
|
|

After you selected a Campaign, you also need to select a Campaign-Screen or Output associated for that Campaign. If you created more than one Campaign-Screens, you'll have it available in the dropdown list.
|
|
After you selected a Campaign and a Campaign-Screen, you may click on the Play button. You also have the option to cancel the operation by clicking on the Cancel button.
|
|

After you click on the Play button, a new dialog box will appear.
If you enable the Restart station with changes option, the system will restart all of your remote Players and update them automatically with the latest changes you've made to your Presentation. Next, the default Web Browser will launch and the SignagePlayer Web version will load.
|
|
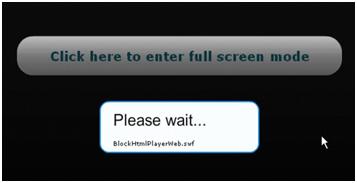
After the Web Player has finished loading, your Signage Presentation will start playing inside your Web Browser.
1. Click on the dedicated button located in the middle of the Screen to enter Full Screen mode. In Full Screen mode, the Web Player will occupy the whole screen.
|
|

While you are playing your Signage Presentation in Full Screen mode, you can press the Escape key on your keyboard to exit Full Screen mode.
2. Click on the Preview in External Browser button
To preview a presentation using the Web Player, you can also use the Preview in External Browser button,
|
|

located in the Outputs area of the Campaign section. If you click on this button, your default browser will launch and play the selected Campaign associated with the Output screen.
3. Using an automatically generated web link.
Another option is the SignagePlayer Web version with generated link. Any person with access to the link can view your presentation; the same Presentation that's running at the physical Output Screens is now available on the Web. It can be accessed at any time using any flash powered Web Browser.
You have three options to generate the link for your Web Player:
- The first option is to run the Player using the main navigation menu or the Preview in External Browser option, as we discussed earlier, and simply copy the link from the Web Browser.
|
|

- The second option is to use the SignagePlayer button from the Outputs area of the Campaign section of the SignageStudio.
|
|

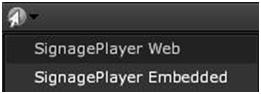
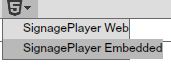
If you click on SignagePlayer button, you'll get a dropdown menu; choose SignagePlayer Web and a new window will appear.
|
|
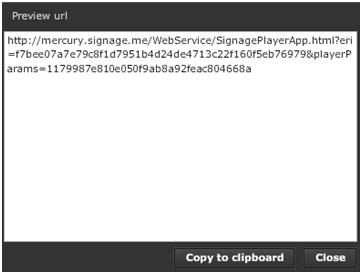
This is the Preview URL window. It allows you to Copy the URL to your clipboard and play your Signage Presentation. You can send this URL to anyone. Whenever you update this particular Campaign, it will automatically propagate and Play the latest version of the Presentation.
Remember when we used the Player Preview from the main navigation menu, the system asked us which Campaign and which Screen to preview? However when you click on the SignagePlayer button from the Outputs area
|
|

SIGNAGEPLAYER EMBEDDED VERSION
We covered the SignagePlayer Desktop version and the SignagePlayer Web version. The SignagePlayer Embedded version is designed to be embedded inside an HTML website.
You'll access the SignagePlayer embedded version by selecting a Campaign and clicking on the SignagePlayer button from the Outputs area.
|
|

After you click on the SignagePlayer button, you choose the SignagePlayer embedded. When you do so, a new window will appear.
|
|
|
|

This is an HTML snippet. You can copy the code to your clipboard, paste it into your website, and have the same SignageStudio presentation playing embedded inside an Adobe Flash powered browser.
Notice the HTML code has Width and Height parameters. These are not available options for the Web Player, because using the Web Player will allow you to play your Signage Presentation in Full Screen, or at the full width and height of your desktop area.
Using the embedded version, allows you to play your Signage Presentations inside an embedded webpage or an HTML page, so you need to define the Width and Height for the Signage Presentation
WIDTH AND HEIGHT OF EMBEDDED PLAYER
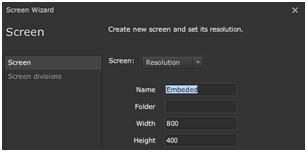
Let's say you want the embedded Presentation to have a size of 800 x 400 pixels.
|
|

Assuming you have already build an HD Screen of 1920 x 1080 pixels for your Campaign, you can follow the next steps to setup a Screen and assign it to that Campaign to be played within the SignagePlayer embedded version.
Step 1:
In the Screens area of the SignageStudio, add a new Screen
|
|

and set the resolution to 800 x 400 pixels.
|
|
Step 2:
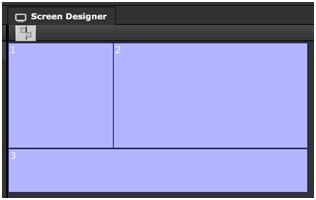
Add a Screen Division and draw a configuration which will be played by the Embedded Player.
|
|
Step 3:
Switch back to the Campaign section, select a Campaign and a Timeline and add a new Output to the existing Campaign.
|
|

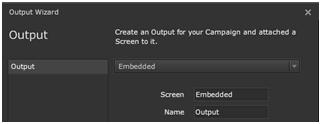
When the Output Wizard opens, choose the embedded screen we've created earlier.
|
|
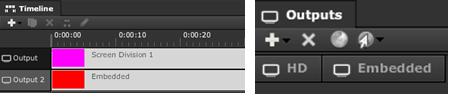
At this point, we've created a second Output which has been added to the Campaign on to the selected Timeline. We will rename the two Outputs to HD and Embedded to keep things well organized.
|
|
Tip: When you are working with the SignageStudio, try to keep things organized. Assign proper names to the components, use folders and subfolders, make sure you manage the entire workflow.
Step 4:
Assign the Channels associated with the Embedded Output.
|
|
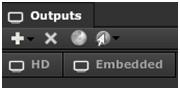
At this point, we have two Outputs named HD and Embedded. The HD Output is set to a resolution of 1920 x 1080 pixels and the Embedded Output is 800 x 400 pixels.
Step 5:
Select the Embedded Output by clicking on its corresponding tab in the Outputs area and then click on the SignagePlayer button.
|
|

|
|
Step 6:
Select the SignagePlayer Embedded option.
|
|
Step 7:
Now you can copy the HTML code from the snippet and paste it onto a Webpage.
The presentation we've set in the above example will play at a resolution of 800 x 600 pixels, which will correspond to the resolution we have in the HTML code. Of course, you can set a different resolution in the HTML code, but it should match the resolution of the Output Screen you've set in the SignageStudio to avoid content skewing.
Step 8:
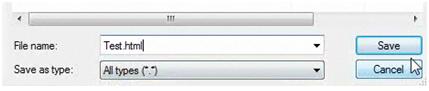
We will use the Notepad application to demonstrate how to use the HTML code of the Embedded Player.
Open Notepad.exe paste the HTML code from the Embedded Player snippet, then save the file with any type of name. Make sure you add the .html extension.
|
|
Step 9:After you've saved the HTML file, you can open it and watch the Signage Presentation embedded on the basic Web page we've created in our example.,
|
|
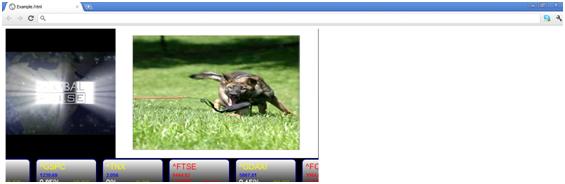
You can use the embedded version of the SignagePlayer on more complex websites. In our example we created a simple, basic webpage using Notepad, just to demonstrate how you can use the embedded player. You should definitely take advantage of the embedded version; it is a very useful and quick way to enrich your website. You can actually create banners and dynamic content that you can put on your website.
The SignagePlayer Embedded version can even be used with touch screens or mouse / keyboard inputs to present interactive UI to an end user; resembling Kiosk functionality. Remember to enable Kiosk mode at the campaign and resource level to enable user interaction.
SERVER CONNECTIONS (ADVANCED)
In this section we'll discuss how to connect the SignagePlayer Desktop version to the mediaCLOUD. There are two different ways to connect the player to the backend servers:
-1. Connection via sockets
-2. Connection via HTTP polling
LIVE SOCKET
When you have installed a SignagePlayer Desktop version and set the SignageController to auto start, you'll see the SignageController status as "Running" under the Stations.
|
|

And while the SignageController is working; you still need to enable proper internet / intranet connectivity so you can connect to the mediaCLOUD backend servers.
The SignagePlayer communication is done from the SignageStudio application to the mediaCLOUD servers over HTTP over port 80.
|
|
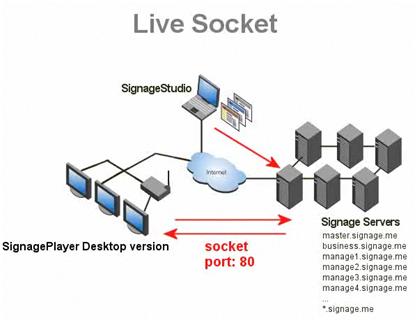
If you look at the above diagram, you can see any command sent from your machine, form the SignageStudio, will first reach our Servers over port 80 using standard HTTP protocol. From this point, the transmission of any command will propagate from the Server to the SignagePlayers installed on the field.
The communication between the SignagePlayers and the mediaCLOUD server farm on the other hand, can be done via real time sockets or HTTP.
Using sockets is the default behavior and this is how we try and connect the Servers with the SignagePlayer Desktop versions. Sockets will allow you real live connection, so anytime you do a Stop or Play or any type of command from the SignageStudio, the command will propagate immediately to the selected Players. This is because you have a live connection between your SignagePlayer and the mediaCLOUD.
HTTP POLLING
Under a firewalled environment where socket connection may be blocked, you may not be able to connect with the socket connection; thus the SignagePlayer Desktop player will fall back on port 80 HTTP polling.
|
|

One drawback of using the HTTP protocol is you don't have a live connection like you would in the case of using sockets. If for example, you give a Stop command from the SignageStudio to our Servers, this command will not reach our Servers right away.
|
|

With the HTTP protocol, the SignagePlayer Desktop versions poll our Servers every 60 seconds.
|
|
This means if you sent a Stop command, a Play command, and a Screen Capture command in sequence, only the last command (which in this case will be the Screen Capture), will get sent to the SignagePlayer, and only within a 60 second duration window.
Live socket and HTTP connections are both supported but the live socket is preferred if you can add rules to your firewall to access our specific servers.
If you are having issues connecting to our server, it would be safe to assume you must have a local firewall.
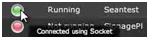
The SignageStudio Stations will indicate the status of each remote player:
Yellow: connected via PollingGreen: connected via live socketRed: not connected at all
To allow access to our servers be sure to open port 80 of both type socket and http to *.signage.me of inbound and outbound.
For explicit:
master . signage . me business . signage . me neptune . signage . me galaxy . signage . me mercury . signage . me venus . signage . me
But note that servers are often edited, so *.signage.me will allow for greater flexibility.
CONNECTION INDICATORS
If you are using a Socket connection, under Stations you'll notice a green LED light in the Connection field. The green light indicates you're connected with the Signage SignagePlayer Desktop version using Socket.
|
|
If you see a yellow LED light
|
|

it means you're using the backup HTTP protocol; so you may want to investigate why.
Possible causes are:- A Firewall is installed on the actual Operating System of the SignagePlayer
- You have a Firewall within your Network or on the Router
- You have a proxy installed
- Enhanced network security settings
- Other settings
You might want to investigate other options preventing a connection using a Socket, but if don't mind using the HTTP Protocol and wait between each command, we fully support this option as an alternative to a Socket connection.
One thing to keep in mind: If you're using the HTTP protocol, it can actually take up to 5 minutes to update the Status of the SignagePlayer from yellow to red if you have a disconnect; with the a socket connection you would not experience such long delays in updates.
Copyrights MediaSignage© Inc