REMOTETOUCH COMPONENT
THE REMOTE TOUCH WITH MOBILE COMPONENT
In this Chapter, we will discuss remote touch. Remote touch is actually an incredible feature, because it allows you to connect a digital signage with your audience's mobile devices. For instance, if a customer walks into a store, he or she can pull out their mobile device, like an iPhone or an android or even an iPad, and as long as the device is online, he or she can take their device, point it at the screen, and scan a QR code. As soon as he or she scans a QR code, the phone or whatever device he or she is holding can bind to that screen, and he or she can start managing that screen.
In other words, he or she can select which product to see, he or she can flip through items, and he or she can essentially change the presentation through their handheld device.
Another great feature of remote touch is the ability for you to create completely customizable HTML and JavaScript pages. The HTML and JavaScript pages will load on your customer's handheld devices. For example, if you want to create a JavaScript slider, if you want to create drop-down menus, or whatever kind of navigation system you want to create you can do so on your customer's handheld devices. That is to say, this would be the page, which opens when they scan the QR. These pages are created via HTML, which are very simple to create. You don't have to be a programmer to create simple HTML pages, you don't need any JavaScript if you don't want to, and you can simply take this HTML page, upload it to a web hosting company like "Go Daddy" and simply link to it. This allows you to create a fully customizable experience for your audience.
By the end of this Chapter, you will be able to deploy Digital Signage in your business and better yet, you will be able to have your customer's interact with your signage through their mobile devices. Let us begin.
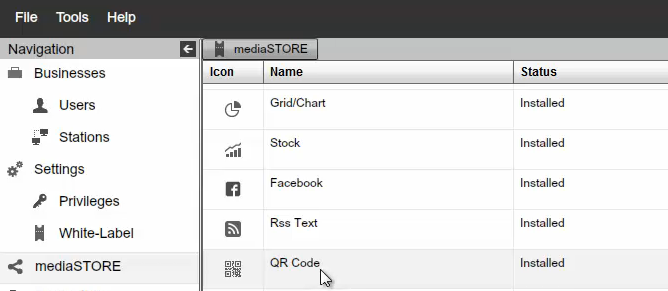
The first thing we need to do is log into your enterprise account. This feature is the part of the enterprise edition, and we need to enable the feature for our customers. What we need to do is go to mediaSTORE" and make sure that the QR code is part of the installed components.
|
|
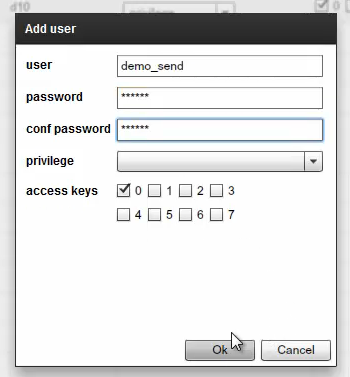
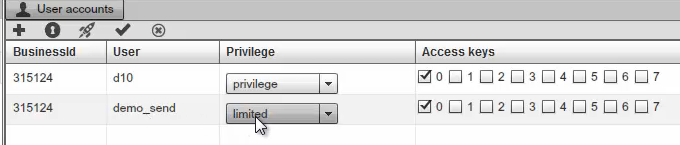
Next, we switch back to users. We want to create a user that has no permissions and no privileges except a single permission or a simple privilege, which is to actually send a command. This is for security reasons. If, for example, somebody finds a user name or a password of that particular user, he or she would not be able to do anything since we will use that particular user as the account that is actually going to send a JavaScript command. For now, just know that the first thing we need to do is setup a limited user that has no special privileges except to send commands. We will call it demo_send" since this user will be able to send commands. We'll give it a simple password 123123" and click on OK.
|
|
Then we will switch to Privileges, add a new set of privileges, and call this limited", while making sure we take all the privileges off; therefore, limited will not be able to do anything.
|
|
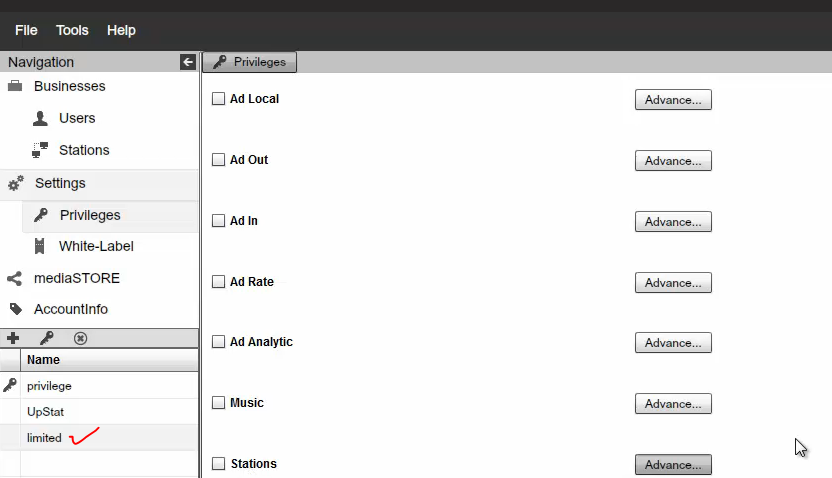
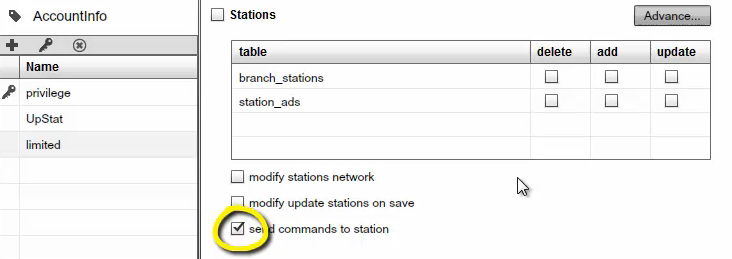
The only single feature or privilege we are going to enable limited is the ability to send commands, under Stations.
|
|
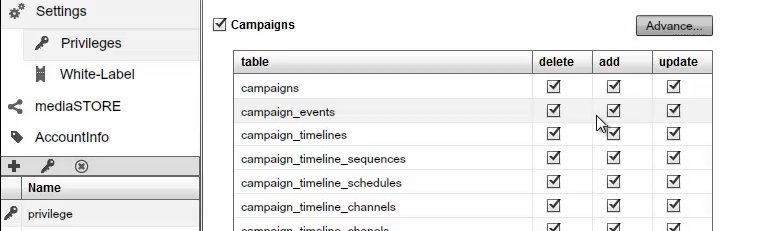
This is the only single privilege limited can do. After we save the work, we will switch to privilege, which is our default "privilege" set, and we will make sure we enable the event system. Under Campaigns, make sure you bold the event's system.
|
|
Remember, this setting is NOT for the limited privileges. This is for the full privilege set.
To recap, for our default privilege system with full control, we have enabled the event system, and we created the limited privilege set, which has no special privilege within the system (other than to send commands).
Next, we'll switch back to users, select our demo_send" user that is not going to have much control or much power, and we are going to make sure to give it the limited privilege set.Therefore, this particular user can only do whatever we allow him to do, which is to send commands. Click on save to complete the action.
|
|
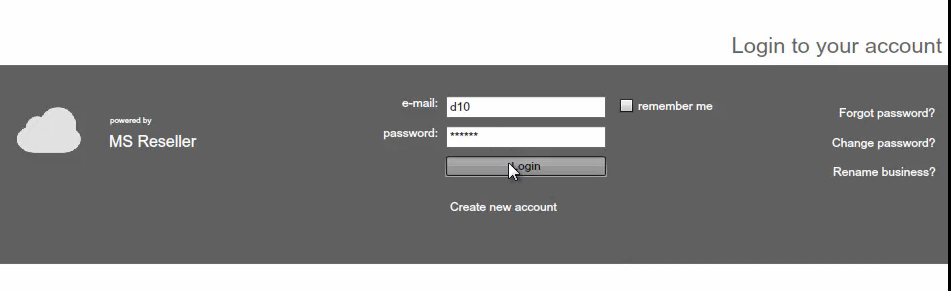
By now, we are finished with the enterprise studio. We can sign-in to the SignageStudio. Here is the SignageSstudio. We are going to login with the standard user that has all the privileges.
|
|
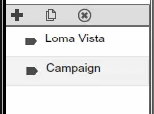
We have a campaign called "Campaign", and we will use this campaign to create our configuration for our remote touch.
|
|
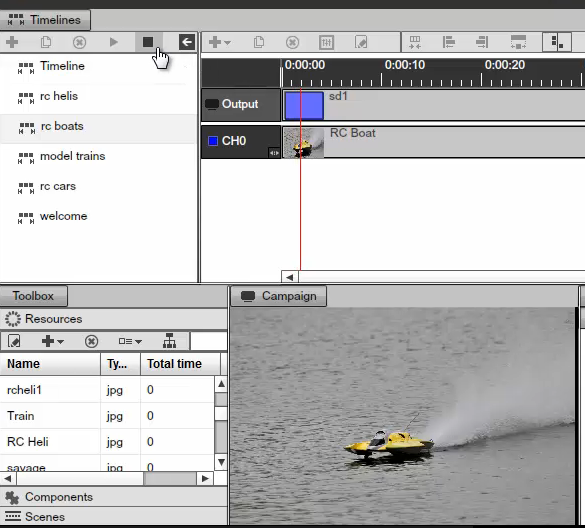
The first thing we need do is decide which content or which timelines we want to expose to our audience. To accomplish this, we will create several timelines and we will allow our visitors the freedom to select these timelines through product selection using a JavaScript slider. We will call the first timeline "RC helis" and just do a full screen. We will add another one called "RC boats", and just a full screen. We will add another one called "model trains", and the last one we call, "RC planes".
|
|
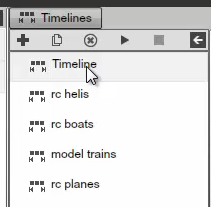
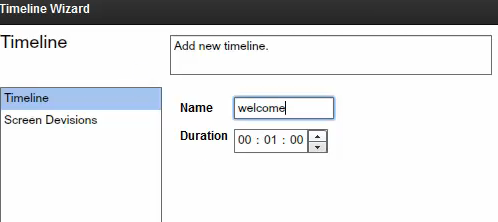
Therefore, we have a default timeline, which is going to play on a regular basis. Yet, when a person scans a QR code, he or she will be able to select particular timelines through a JavaScript slide. In addition, as soon as the person scans the QR, we also present to him or her the welcome screen. Hence, we will setup a timeline for that too, and we will call it "Welcome".
|
|
To recap, we have the general presentation "Timeline" that is going to run on regular basis. Then we have four timelines in which our visitor is going to be able to select which is going to be "RC helis", "RC boats", "trains" and "plains". As soon as he or she scans the QR, before he or she even makes a selection sequence and make sure that we remove all the timelines from the regular playback. We do this because, on regular playback, we don't want any of these timelines to play. We simply want the regular timeline to play, but none of the RC or the welcome timelines.
|
|
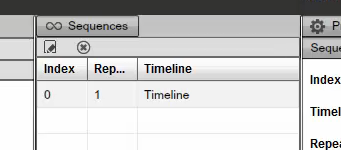
This is fairly straightforward. We are going to be playing timeline one repeatedly in a continuous mode until a selection is made through QR. In our demo, this will be the default timeline. It is going to play if nothing is selected through QR.
|
|
Then we will add full screen on "RC boats", only an image on the "model trains", again just a full screen image and the welcome timeline.
|
|
|
|

|
|
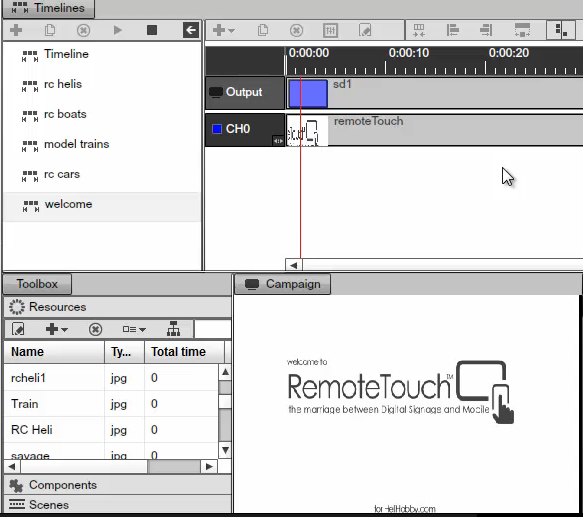
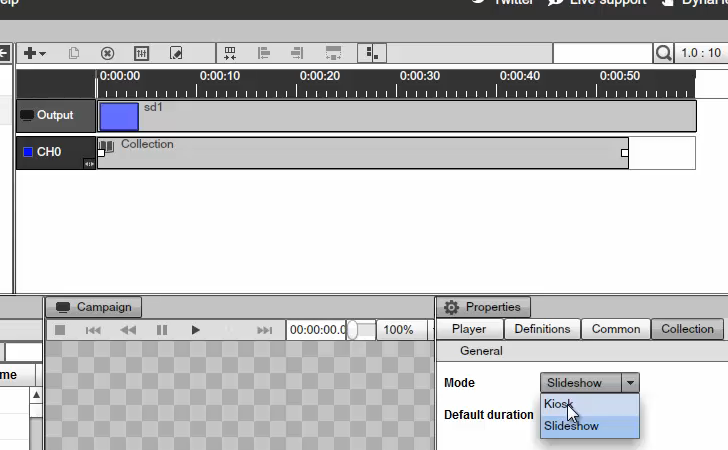
Therefore, the welcome timeline is the timeline that is going to play as soon as a customer scans a QR. Next, to configure the collection for the "RC helis", we first double click the collection, go to the properties and select Kiosk not Slideshow.
|
|
Next, we go to items and we start dragging and dropping all the images that we want to become part of the collection. We want a total of four images.
|
|
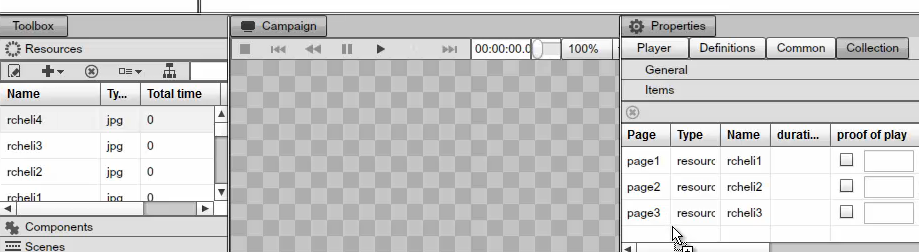
Next, we will switch to events under the collection, and we will add two events. You can name these events anything you want, but you need to remember the name, because you actually have to reference these names later when we build the HTML page. We will add the first event, "next", and the second one "previous". As a result, this collection is going to be listening to the string event "next" and it is going to be listening to the "previous" event. If it receives the "next" event, it's going to move to the next item in collection, which is off course, the next image. In addition, we are going to set to the previous as well. Therefore, it is going to flip through different products and images that we have under item's tab.
|
|
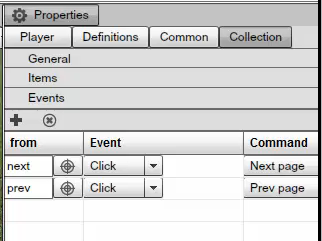
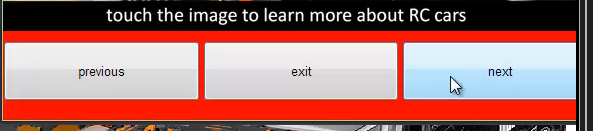
Now that our collection is setup for our "RC helis" timeline, let's go and setup the same collection for "RC cars". Again, set it to Kiosk; look for some cars images, and add the two events, "next" and "previous". Therefore, the collections, "RC cars" and "RC helis" collections are listening for the same string events, "next" and "previous". The commands they are going to execute upon this event, again, they are going to be in next and previous. This will be a good time to save our work, click on file, and save.
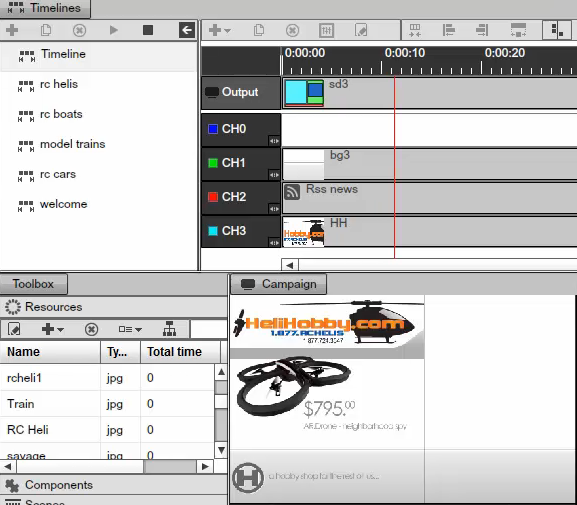
Now, let us go ahead and switch to our main timeline. You will notice if we select the screen division configuration, we did not do anything on the channel zero.
|
|
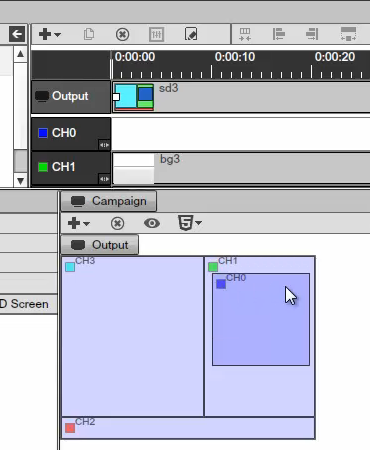
Moving along, if we click on PLAY, you will notice everything is setup and we have an image and some RSS. Notice we have no content on the right channel, on the blue channel.
|
|

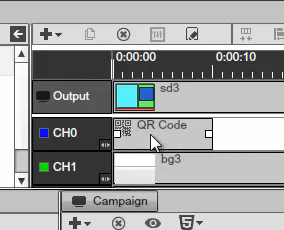
We did this on purpose, because we wanted to show you how to configure the QR. Next, switch to components, select the QR component, then drag and drop it to channel zero.
|
|
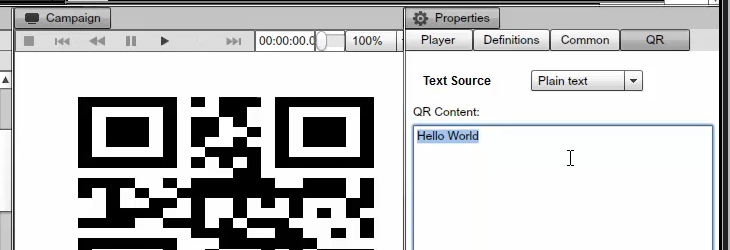
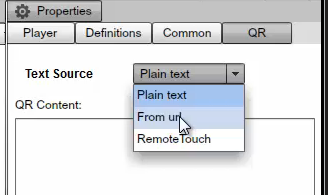
You will double click the QR code component to load its properties. Notice we are presented with few options. You can, of course, type a text. This will be standard vanilla QR --nothing special about it. It's going to display anything on the screen we put in here.
|
|
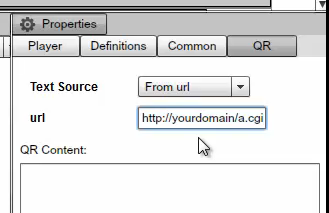
However, we can choose a couple more options. We have the ability to go from the url. This is actually a powerful concept.
|
|
|
|
However, this is not what we are going to do. We are going to use the remote touch option.
|
|
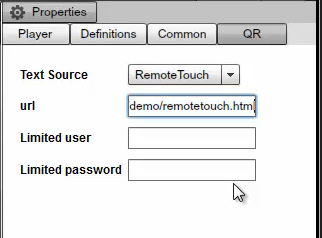
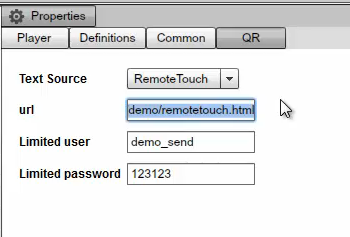
Notice when we switch to Remote Touch by default we are already getting a url that is going to be used. This is a demo url we provide for you. It is actually a nice update you can use for just a demo to enable you to learn about the system and gives you an opportunity to play around with it. Then once you are done playing with the system, you actually want to deploy it.
At this point, you go and provide your own url and build your own HTML page. We will show you how to do this in a second. For now, we are going to leave everything as a default.
Next, we need to provide the user name and password. This will be the limited user name and the limited password we created earlier. Remember earlier we created a user named called demo_send", we are now going to put demo_send" username and the password 123123" we created earlier during the beginning of this Chapter.
|
|
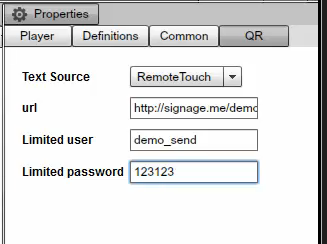
Remember, this is the user that cannot do much except send commands. Now to finalize our work, we have to actually configure the campaign itself to support the QR event. Therefore, we will switch to our campaign, we will select our campaign, which is just called "campaign", select the events tab in the Properties panel and we will go and add events right here using the plus (+)sign just like before.
|
|
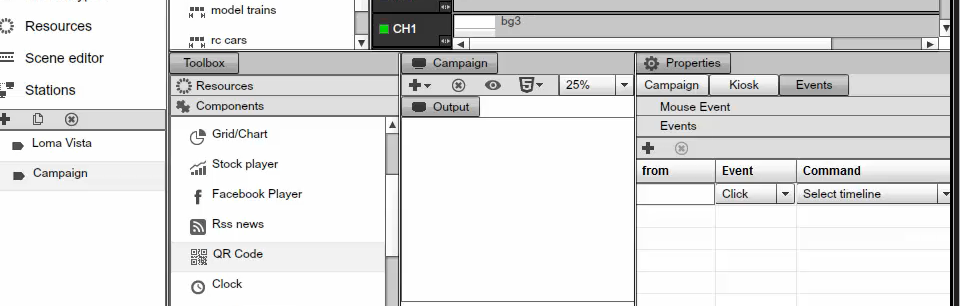
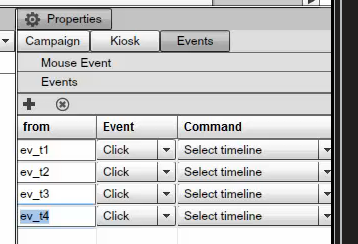
You can name these events anything you want, but remember, you must know the event's names. You need to remember the event names, because you will need to reference these strings later in the JavaScript and in the HTML file. Let's add four events; event for timeline one, event for timeline two, for timeline three, and for timeline four.
|
|
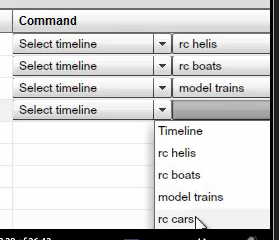
Next, we need to choose what is going to happen once this event is triggered. For event 1, what we will do is select timeline and we will select the "RC helis". For timeline 2, we will select our "boats", and for timeline 3, we will select our "trains". Finally, for timeline 4 we will select our cars.
|
|
Of course, this is completely up to you. You can configure this any way you like. Now we will add another event. We will name this "event welcome", and this will trigger as soon as somebody scans the QR. We will set this as our welcome timeline.
|
|

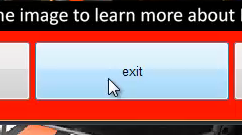
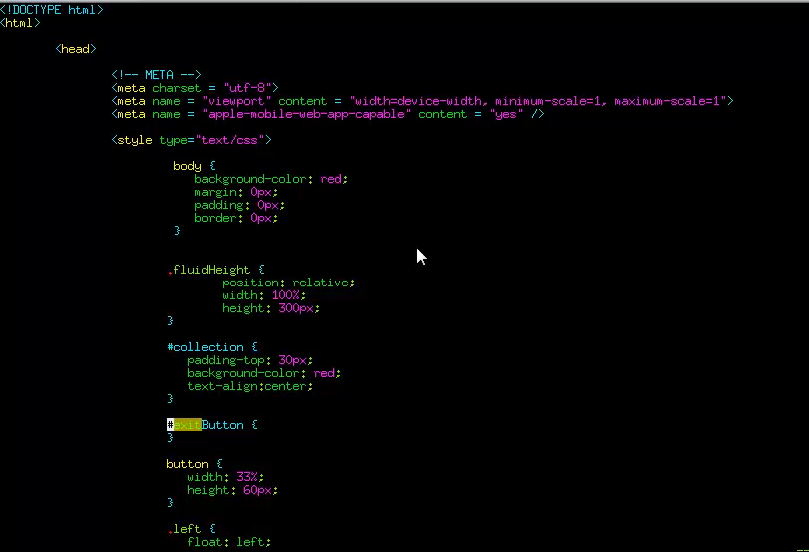
Now, we will add one last event and call it "exitButton" event. That will give the customer the option to exit the presentation if he like. And if he does exit we are not going to select the timeline but it will resume the normal presentation which in our case is going to be the timeline highlighted below.
|
|
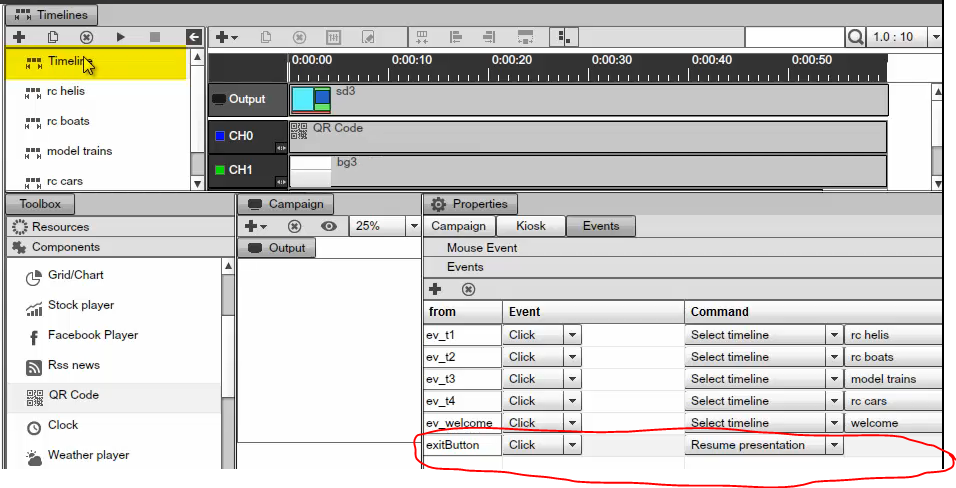
We have set up everything we needed, and everything is ready to go. We have six events, we have four events for actual specific timeline selection, we have the event for the welcome, which is going to trigger as soon as somebody scans the QR code on the screen, and we have an event for the exit if the customer decides he or she wants to exit. Therefore, normal presentation is going to resume in that case. Before we test it, we want to cover one more thing, and that is the last option.
|
|
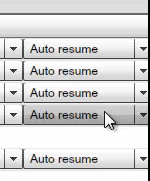
As you can see, the option is by default set to auto and resume. This means if a customer selects, for example, the "RC helis", this timeline is set to a one-minute event, which means the timeline is going to play for one minute. Once it's over it is going to go back to the regular sequence, which is just a single timeline --our default timeline. You also have the option to set the manual resume. This would come into play if you have additional buttons the customer can navigate.
|
|
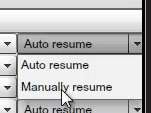
For example, if you have a menu or some kind of navigation system, the manual resume is used to navigate from one page to the next page. Nevertheless, by default, if you set the auto resume it is automatically going to play the one timeline "RC helis" for one minute. Then when that is over it is going to go back to the regular timeline. This gives other customers an opportunity to control the screen. Next, we have the presentation running; you can see the important part of it, which is the QR code.
|
|
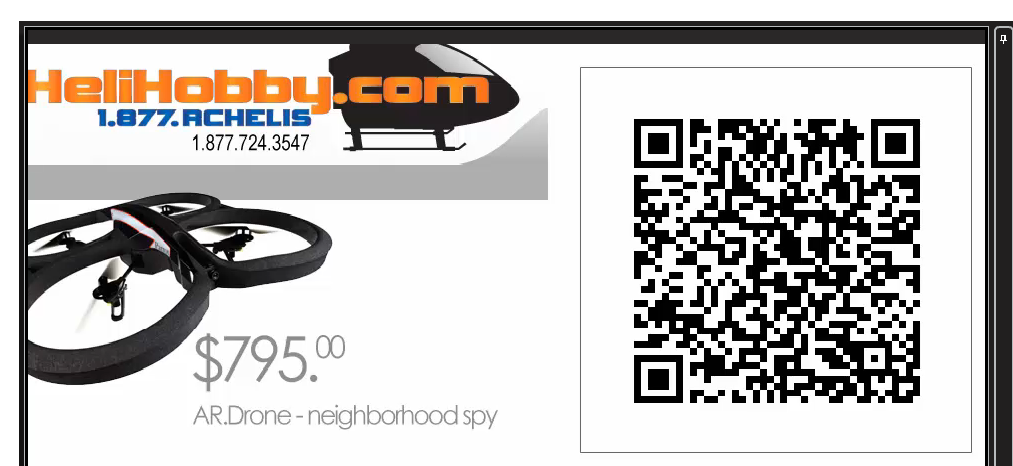
Now, to move on with our demo, we are going to take a cell phone and scan the QR code. As soon as we automatically scan the QR with the phone, we receive the welcome screen.
|
|
For our demo, we will use a browser window. You see this exact thing on a mobile phone, the same you see on an iPhone, and the exact thing you will see on an android.
|
|
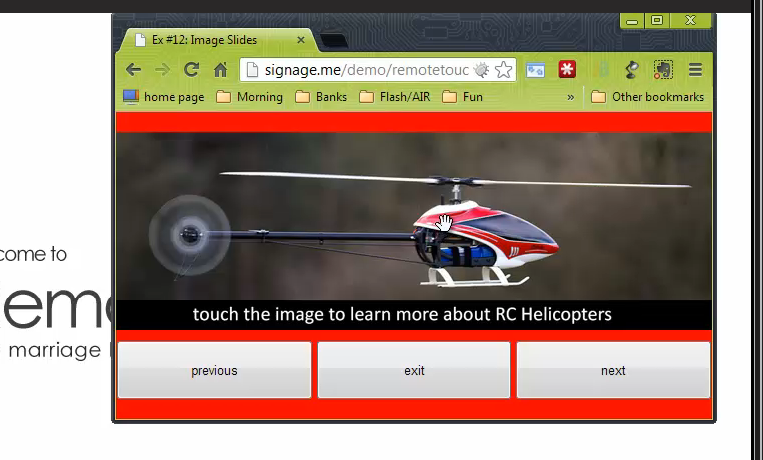
What you see in the image above is a mobile device. We can make some selection and you can slide through products. If we take the mouse, or the finger, obviously, if this was a phone and we select a particular product, then look what happens.
|
|

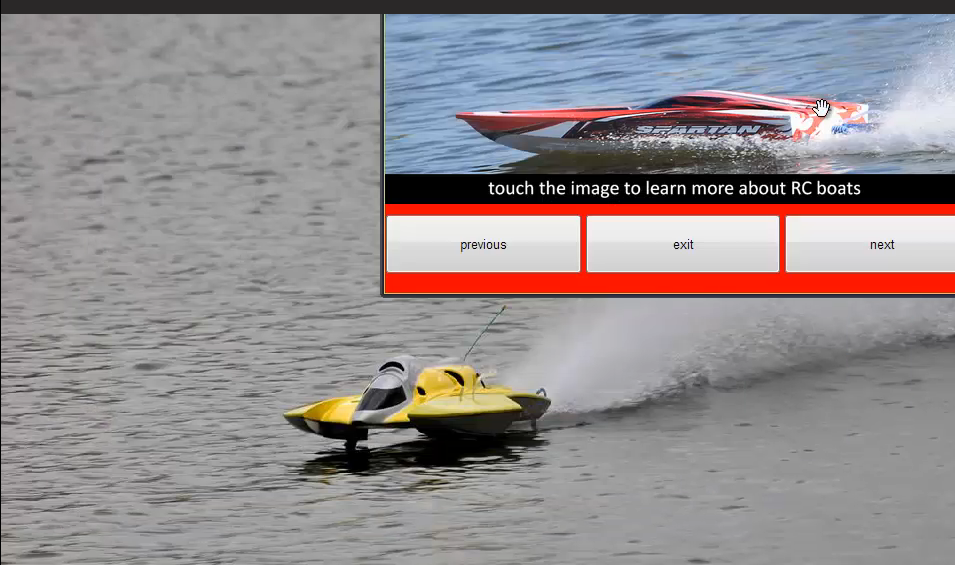
It switched to the helicopter timeline on the media player's screen. We can go and select a different product, which is going to be the boats. Again with your finger on the phone, select it and it switches over to the next timeline.
|
|
To proceed, you can see our timelines switching is working beautifully. You will also notice right on the banner that we have the previous and the next buttons.
|
|
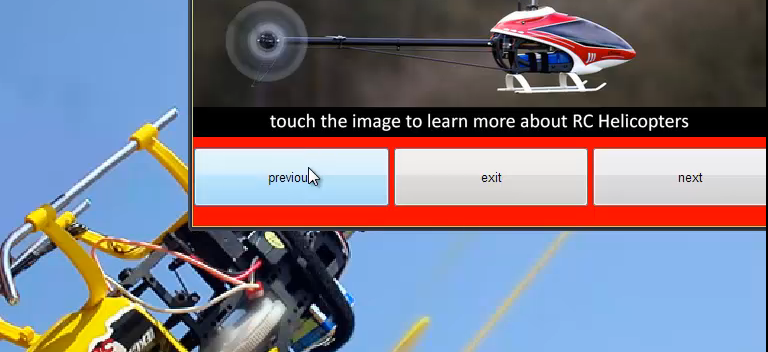
That is where the collection comes into play. Therefore, we will first select the helicopters and then click on next. You can see now that we can actually flip through the collection of the actual product.
|
|
|
|
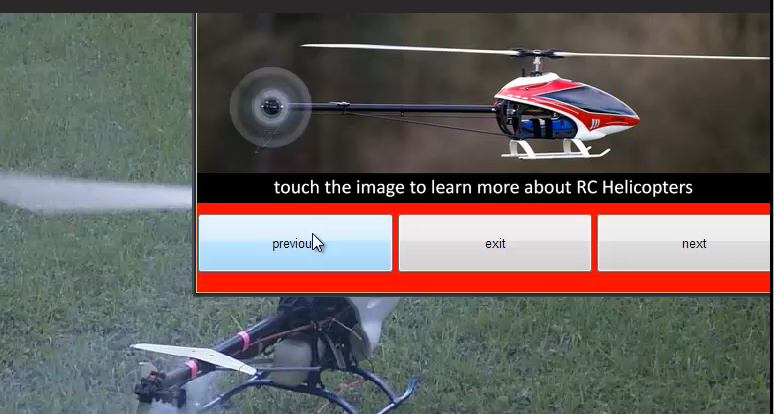
Again, we are accomplishing this from a cellphone. This is powerful. Customers can do the same thing. If we switch over to boats and click on next, nothing will happen, because we did not setup a collection for the boats. We only setup a collection on the "helis" and on the "RC cars". Remember, once you switch to a product you have to select it with your finger and then use the collection, next and previous buttons. Additionally, we added the exit button.
|
|
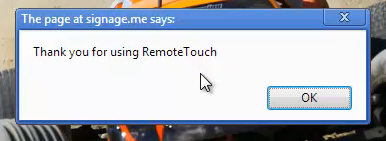
Keep in mind; we made an event for that as well. Therefore, as soon as we click on that exit button, we get, thank you for using remote touch. You will notice the presentation goes back to default timeline. We then click on OK, and then we are redirected to the homepage. All this can easily be figured in JavaScript. We will show you this further progression in this Chapter.
|
|
|
|
Note that every time the timeline loads, even if you stop the player and restart it, what happens is QR regenerates. It has unique identifiers for both the screen running, and a unique identifier making sure this QR was never previously generated. This allows your customers to take control of the screen and make sure no one else can take control of the screen at the same time. For example, if you go ahead and scan the QR you would receive dedicated control over the screen and no other customer in the store would be able to get access to the same screen at the same time. No other customer would interfere with your work. This is an intelligent, completely transparent system. You do not need to configure any of it. It comes embedded inside the QR itself. In addition, if you have multiple screens in your store, the QR is smart enough to embed the screen ID. Again, you can have multiple QR's completely transparent. Consider the advantages; you have nothing you must configure. Yet customers can control screen A while other customers can control screen B using the same QR, the same timeline. Thus far, we showed you how to configure the enterprise studio, adding the QR component, and demonstrated to you how to configure the limited account. We also showed you how to setup signage studio with both the remote touch and the collection, and we showed you the presentation and how it actually works as it is controlling from different mobile devices. However, there is still one missing part and that is the most exciting part, which is the front user interface, the user that interacts with JavaScript or the HTML. Consequently, next we will show you the last part of this Chapter. With these tools, you will be able to simply follow same steps and deploy remote touch in your business. Now we are looking at the file that actually loaded on the client's site or the mobile device. This is the file the customer is able to slide through when he or she is sliding through different images of the helicopters and the boats.
|
|
In our demo, the source code is hosted on our server. However, it doesn't have to be because, remember, if we go back to the signage studio you see you can use different addresses.
|
|
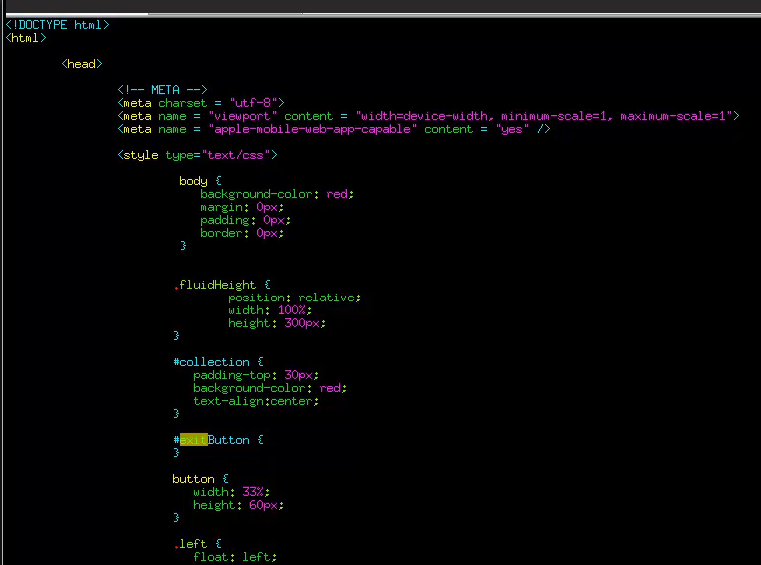
You can use our source code for demo purposes, to play around with it, and to experience the system for yourself. Once you are ready to deploy --use this copy of the file and create your own code. We will explain to you how to do this too, and you can host it on Go Daddy and grab it from there and then. Your customer's can have completely different JavaScript and HTML file. They can have a different navigation system, different menu system, they can order food, and they can do everything and anything you want through the mobile device. You can simply create it through the HTML or JavaScript. Let us talk about our demo file and see how it is constructed. The first portion of the file is mostly CSS and that is just presentational and layout. Therefore, you really do not need to worry about it too much, nothing that you need to concern yourself with, because you created your own file. Consequently, this is simply all layouts.
|
|
One important file is Jquery.You need to make sure you have JQuery 1.4 or newer version loaded. You can grab JQuery from everywhere online and you can also point to Google's repository using