Components
ABOUT COMPONENTS
The SignageStudio uses Components to help you build a powerful signage presentation to enhance your viewer's experience. You can use most of the Components directly on a Timeline, but you can also use them in a Scene. You can add multiple Components to a Timeline or to a Scene.
LABEL COMPONENT
|
|

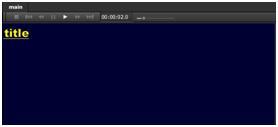
You'll use the Label Component to add text to your Signage presentation. To add a Label component in a Scene, use your mouse to drag and drop it inside the Main viewing area.
|
|
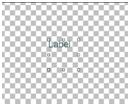
After you've dropped the Label Component in the Main viewing area, you'll be able to modify it and apply setting to it.
Tip: When you use a Component inside a Scene, most of the settings are available only through the properties panel, but you can modify the position and the size of a Component also directly in the main viewing area using your mouse. To modify the position of any Component click and hold your mouse and position it inside the Scene. To modify the size of a Component directly in the Main viewing area, use the handles you see on its margins after you click on the Component to select it.
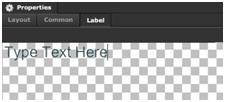
PROPERTIES PANEL FOR THE LABEL COMPONENT
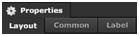
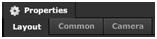
If you select a Label component after you dropped it into the Main viewing area, you'll be able to apply different settings and effects to it using the properties panel located on the right side of the user interface. The properties panel has three tabs: Layout, Common and Label.
|
|
LAYOUT
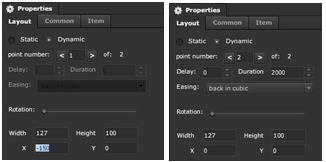
If you select a label component and you click on the Layout Tab you have the option to choose either for a Static layout or a Dynamic one. This section is similar to the Layout of Scene as discussed in a previous Chapter.
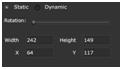
STATIC LAYOUT
You can set different values for the rotation, position, as well as the size of the Label component.
|
|
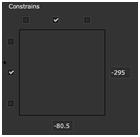
Another key feature is the Constrains section, located below in the Static Layout section.
|
|
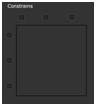
After you select a Label component or any other item for that matter and drop it to a scene, you can anchor it so it will maintain its position even when the scene is resize (i.e.: scene is bound to a screen division that's different in). Using constrains you can anchor a component inside a Scene by selecting the anchor points.
|
|

DYNAMIC LAYOUT
Just like in the case of a Scene Layout or any other Component's layout, in this Section you can set different values for Rotation, Size, and Position of the Label component by using the point numbers.
|
|

THE COMMON SECTION
After you select a Label component in a Scene and click on the Common tab, you access:
- Appearance
- Border
- Background
- Glow
- Blur
- Shadow
LABEL TAB
If you select a Label component in a Scene and click on the Label tab in the properties panel you will be able to edit the text of the Label component.
In the upper area you can type the Text that you want to appear on the Scene.
|
|
You can type any number of characters, but when typing always keep in mind the size of the Label. You may need to increase the size of the label component to show all the text you typed.
In the lower area of the Label section in the properties panel you'll find settings you can use to format the text you typed above.
|
|
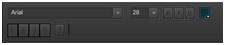
FONT FACES
The SignageStudio includes hundreds of dynamically loaded font faces. To use a certain font face you select the text in the type area and use the font selector. You can also use the scrollbar located on the right side of the font selector and to navigate to other font faces.
|
|

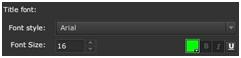
FONT SIZE
To control the size of the text you use in a Label component, you can either enter a value in the designated field or use one of the preset values from the drop down list.
|
|

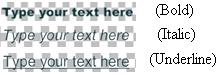
FONT EFFECTS
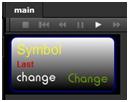
In the Label section of the properties panel, choose the selected text and set the Bold, Italic and underline. Select the text and use your mouse to click on the desired option (not all fonts support these properties).
|
|

Examples:
|
|
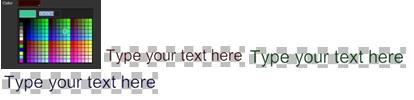
FONT COLOR
To change the text color you use the color picker. It works like any other color picker in the SignageStudio. To change the color of a text, first you select the text. Next, click on the default color and use the color picker to change the font color. Here are some examples of different text colors:
|
|
TEXT ALIGNMENT
To change the alignment of text you use the alignment options.
- Align text to the right
- Align text to the left
- Align text to center
- Justify
Select the text and click on the specified icon:
|
|

BULLETS
Additional to text formatting, you can also choose to add bullets at the beginning of text rows. To add a bullet you select the text and click on the "Add bullet" icon:
|
|

EXTERNAL SWF / IMAGE COMPONENT
The external swf/image component is a powerful feature that enables you to link a certain swf file or an image that resides on the web (outside the MediaSignage server farm). To use this Component in a Scene, you drag and drop it to the scene, select it and load its Properties panel.
In the properties panel, the first two sections, Layout and Common, contain the same settings as any other Component.
|
|

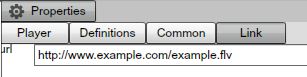
LINK IMAGE / SWF RESOURCE
Here you insert the designated URL web address of the file you link to the external swf/image. Press enter after the URL to preview it in the main viewing area of the Scene.
|
|

EXTERNAL VIDEO COMPONENT
The external video component works in a similar manner as the external swf/image component. It enables you to link a video file that resides on the web, to your SignageStudio presentation. To use this Component in a Scene, you drag it to the scene using, select it and access its properties panel.
|
|

LINK VIDEO RESOURCE
Here you must insert in the designated URL field the complete web address/path of the video file you need to link to the external video component. After you typed the complete root of the file you'll be able to preview it in the main viewing area of the Scene.
|
|
HTML COMPONENT
The HTML component is one of the most versatile components in the SignageStudio. This component allows you to embed in your presentation anything viewed in a web browser. This can be an HTML5 Web page, a pdf file, a swf and other content.
You can also use the HTML component as a mini SDK (software development kit) where you can make different settings to an application or swf file that can be accessed through a web address, directly within the SignageStudio. To use the HTML component in a Scene you first drag and drop it with to scene's main viewing area, select it and load up the properties panel.
|
|

After you click on the HTML tab, you'll see two fields. The first one is the URL field and the second is the configuration field.
|
|

Any content can be accessed using the web address from the URL field, which will be displayed in the Main viewing area of the Scene.
|
|

CROPPING AN HTML WEBPAGE
If you want to show a certain part of a Web page in a scene while masking other areas of a page, follow these steps:
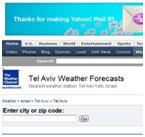
Step 1: Enter the location of the page in the URL field. We will use for our example the Yahoo weather forecast. On the Yahoo weather page we search for examples for Tel Aviv and Israel. We copy and paste the URL address in the URL field.
|
|

|
|
the actual weather forecast is not in the main view so we first need to change the X and Y position of the HTML component.
Step 2: Having a Scene with a default weight and Height of 400 X 400 pixels, enter 0 in the X field and -400 in the Y field of the HTML component.
|
|

Note: These values are relative and refer to this example. Using other Web pages may require entering different values.
|
|
Step 3: Increase the size of the Scene in weight and height and position the HTML component properly using the handles.
|
|
Step 4: Anchor the HTML Component in the Scene so it will remain in this exact position when played.
|
|
Step 5: Make sure that the Screen Division you want this scene to be assigned to matches the size of the Scene.
THE CONFIGURATION FIELD
Under the URL field is the Configuration field, enter the path of a remote web page you will use to configure your component. Any content can be accessed using the web address from the Configuration field.
REFRESHING A WEB LOCATION
Next to the URL and Configuration fields is a small button you can use to REFRESH the address you entered in the respective field.
|
|

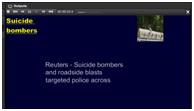
RSS NEWS COMPONENT
The RSS, stands for Really Simple Syndication. The RSS News component is used to display RSS feeds in the SignageStudio. To use the RSS News component in a Scene you first drag and drop it into the Scene, select it and load up its properties panel.
|
|

|
|
RSS DIRECTION
After you've dropped an RSS News component into a Scene, notice the default direction of the RSS is Vertical, which means the RSS news is scrolling upwards.
|
|

Using the RSS News direction option, you can change the RSS direction from vertical to horizontal making the RSS to scroll horizontally instead of vertically.
|
|

TEXT DIRECTION
The Text direction can also be changed from the default Left to Right into Right to Left. This feature is useful when using RSS News feeds using a certain Right to Left written language; like Hebrew.
|
|

SCROLLING SPEED
You can control the Scrolling speed of the RSS News component using the speed field.
|
|

TITLE FONT
The RSS News component contains two sections of text: Titles and the Description. Title Font represents the section where you apply different settings to the RSS news feeds Titles.
|
|
FONT STYLE
To change the Font of the RSS Title, you need to select the font from the fonts list.
|
|

FONT SIZE
To increase or decrease the size of the Font used in the Title of the RSS, enter a value in the assigned field or use the UP and DOWN arrow keys.
|
|

FONT COLOR
To change to Font color of the RSS Titles, use the color picker form the Title font section.
|
|

TEXT EFFECTS
You can choose to make the text of the RSS Titles Bold, Italic or Underline if the selected font supports it.
In the Description Font section, you'll have access to the same settings as in the Title Font section described above. The only difference is the settings you make in this section will affect the description of the RSS news feeds, instead of the RSS Titles.
RSS NEWS SOURCE
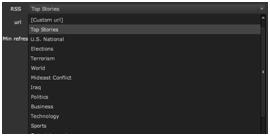
To function, the RSS News Component needs to have a source from which it will grab the news feeds. This can be a preset news category, a custom URL address, or a Custom RSS created manually by the user.
RSS NEWS PRESETS
SignageStudio has many preset news categories you can choose from. Choose a news category from the drop down list:
|
|

When you choose a news category, notice the URL field under the presets dropdown list shows the web address related to that specific RSS feed.
RSS CUSTOM URL
If you click on the RSS presets dropdown list, you can choose [Custom URL].
|
|

Enter a URL address in the field to load your own RSS content.
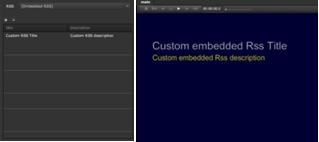
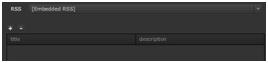
EMBEDDED RSS
If you click on the RSS presets dropdown list, you will notice [Embedded RSS]. This option allows you to create a Custom Embedded RSS by writing text in the Title and Description fields and have it scroll; instead of binding to an external source feed.
|
|

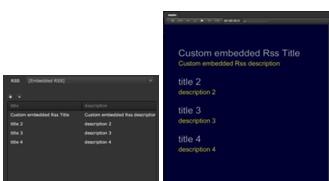
Use the + and - icons to add or delete message entries.
|
|

In the following example we clicked on the + sign once and wrote text in Title and Description sections. We also changed font settings for the Title as well as for the Description.
|
|
|
|

icon and write the text in the specific fields.
|
|
To delete an embedded custom RSS feed you select it and press the DELETE button.
|
|

There is no restriction as to how many entries you can have. However, keep in mind that if your scroll is set to horizontal, the Description data will not appear in the presentation; only vertical scroll supports it.
MINIMUM REFRESH
Min Refresh option sets the period of time between RSS polls to the source aggregator. You can set the Minimum Refresh either by entering a value in the designated field or by using the UP and DOWN arrow keys.
|
|

Tip: If you decide to use an embedded custom RSS, you've written the text for it, and afterwards you change your mind and choose a different RSS source, note the Text you've entered for the embedded RSS will be lost and you'll need to write it again. You can copy and paste the RSS component to an unused timeline for "backup".
MEDIA RSS / PODCAST
The Media RSS / PODCAST component is used to embed RSS media feeds and podcasts into your presentation. To use the Media RSS / PODCAST component in a Scene, you first need to drag and drop it, selected it, and load up its properties panel.
|
|

Just like the RSS news component, here you can select the source of the RSS feed from a dropdown list of preset feeds or you can choose the [Custom] option and enter the location of the xml file manually.
|
|

Choose a source for the RSS feed, notice in the Main viewing area of the Scene how immediately the RSS video begins to load and the media starts playing.
|
|
The Media / Podcast RSS feeds are actually short videos which will play sequentially and update often by the aggregator. MRSS video list plays in random to give off a more unique playback experience.
The Media files being are downloaded and cached in the SignagePlayer Desktop version, if the connection between the server and the player will be interrupted, the feed will continue to play; and updated as soon as the connection is restored.
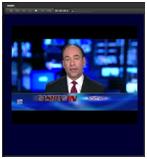
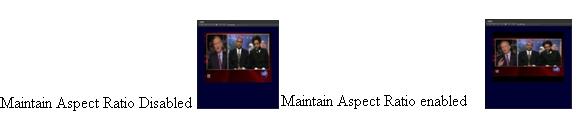
MAINTAIN ASPECT RATIO
The Maintain Aspect Ratio option allows you to maintain the width and height ratio of media files. Here are some examples of the Maintain Aspect Ratio option when disabled and enabled.
|
|
CUSTOM RSS ITEM
The Custom RSS Item Component is a more complex version of the RSS news component. This Component allows you to have custom control of all the sections of the RSS.
For example, if you want to build a scene and position the Title of the RSS on the left corner of the Scene, the Description of the RSS on the Right corner of the Scene and the Resource/image of the RSS someplace else on the Scene, and also mix in custom animation and transitions, you can only accomplish this using the Custom RSS Item component. To use the Custom RSS Item component in a Scene, you first drag and drop it into the main viewing area of the Scene, select it and load up its properties panel.
|
|

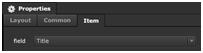
If you click the Item tab, you'll select the item you want this section of the RSS to represent. Choose from the dropdown list Title, Description or Resource from the properties panel.
|
|
If you choose Title for example, the Custom RSS Item component you dropped into the Scene will be the Title of the RSS. Description will correspond to the Description of the RSS and the Resource will be the Image displayed in the RSS feed.
After selecting an Item, you have several options to format the Text in the Properties panel.
|
|
We discussed these options earlier so you should be familiar with the settings. You can set the font face, the font size, the font color and apply font effects.
The Custom RSS Item Component is created only within a Scene and that Scene need to be added to a Scene player in the Timeline. It cannot be added directly to a timeline.
USE A CUSTOM RSS ITEM COMPONENT - BY EXAMPLE
Step 1: Create a new Scene and name it Custom RSS. Set the Background color Blue.
|
|

Step 2: Add a new Custom RSS Item Component to the Scene and select the "Title" Item in the Field dropdown list from the properties panel.
|
|

Change the font to Arial Black, the font size to 25, the font color to a dark yellow and underline it. After this, position the Item at the top left corner of the Scene.
|
|
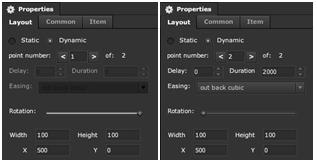
Step 3: With the Custom RSS Item component selected, click on the Layout tab in the properties panel, choose Dynamic, and set the x value to -150 at Point number 1 and 0 at Point number 2. You can also choose an Easing option.
|
|
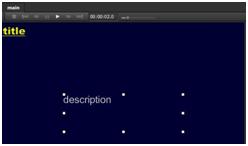
Step 4: Add another Custom RSS Item to the Scene. Select the "Description" item this time in the Field dropdown list in the properties panel.
|
|

Change the font to Arial, the font size to 20 and the font color to White. Next, position the Item in the middle of the Scene.
|
|
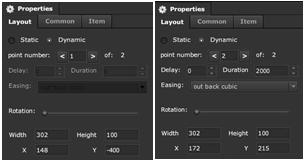
Step 5: With the Custom RSS Item component selected (Description), click on the Layout tab in the properties panel, choose Dynamic, and set the y value -400 at Point number 1 and leave the default value at Point number 2. You can also choose an Easing option.
|
|
Step 6: Add another Custom RSS Item to the Scene. Select the "Resource" item this time in the Field dropdown list in the properties panel.
|
|

Position the Resource Item at the top right corner of the Scene.
|
|

Step 7: With this Custom RSS Item component selected (Resource), click on the Layout tab in the properties panel, choose Dynamic, and set the Rotation at 360 degrees (drag the Rotation slider to the right end) at Point number 1. Leave the default values at Point number 2. You can also choose an Easing option.
|
|
Tip: Always remember to Anchor every component in the Scene so it will preserve its position when played in a Timeline .
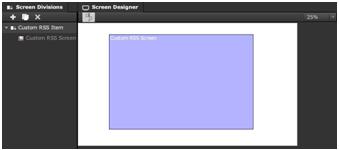
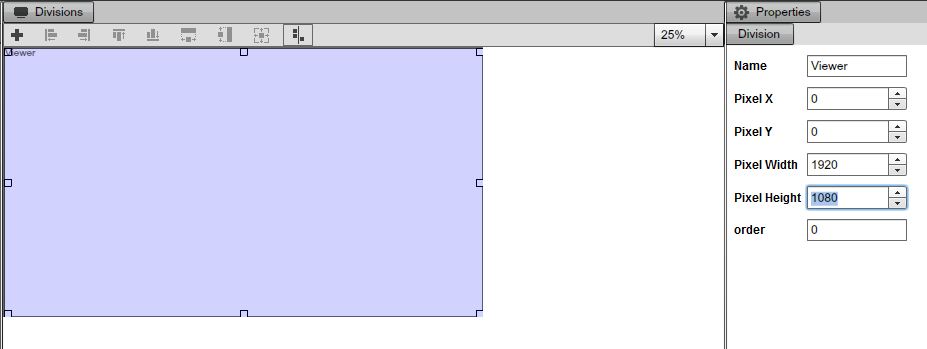
Step 8: Click on the Screens Tab in the main Navigation menu and draw a new Screen Division. Name it Custom RSS Screen. Make sure the size of the Screen Division matches the size of the Scene with the Custom RSS Item in it.
Tip: Always remember to SAVE the project when you make changes to your presentation.
|
|
Step 9: Click on the Campaign tab in the main Navigation menu. We will discuss more on Campaigns in another Chapter, but to demonstrate how to use the Custom RSS Item Component, we need to place it on to a Timeline using a Custom RSS Player.
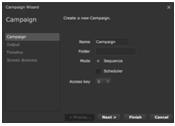
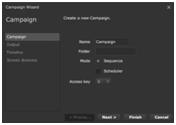
To accomplish this, after you clicked the Campaign tab in the main Navigation menu, click the plus sign (+) in the Left panel to add a new Campaign.
The new Campaign wizard will appear. We will discuss more about this wizard in another Chapter, but for now click NEXT in the first window.
|
|

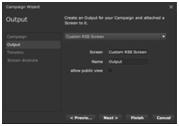
Choose "Custom RSS Screen" from the dropdown Screens list and click Finish.
|
|
Now you have a Timeline with a single Chanel (CH0) which is the Screen Division you created earlier. We will talk more about channels in another Chapter.
|
|

Step 10: To link the Scene which has the Custom RSS Items to this Chanel in the Timeline, you select the Toolbox tab, located below the Timeline and access the Components and Players panel. It is almost the same as the Components panel in the Scene section, with a few exceptions.
Now drag and drop the Custom RSS Player on the Timeline, next to the Chanel (CH0).
|
|
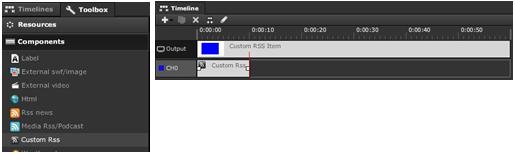
Step 11: Double click the Custom RSS Player from the Timeline.
|
|

You can now access its Proprieties panel, select the RSS tab.
|
|

Here you can drop the Scene you've just created. First, click on the Scenes tab in the Toolbox. Drag and drop the Custom RSS Scene we created earlier in the Scene field of the Properties panel.
|
|

Step 12: Click on the PLAY button of the Outputs viewing area to preview the Custom RSS.
|
|
Step 13: You can apply different settings after you dropped a Weather Scene into the Weather Player.
|
|
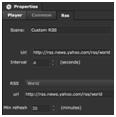
- You can set the Interval, which represents the time which will pass until a new feed is displayed.
|
|

- You can select [Custom URL] from the RSS dropdown list and manually type a web address.
|
|

- You can select [Embedded RSS] from the RSS dropdown list and manually type Titles and Descriptions for a Custom RSS, as explained earlier in this Chapter, like in the case of the RSS News Component.
|
|
- You can select a different preset RSS source from the dropdown list.
|
|
- You can set the Refresh rate of the RSS feeds.
|
|

THE WEATHER ITEM COMPONENT
With the SignageStudio you either use prebuilt Weather Scenes or can build your own with the Weather Item.
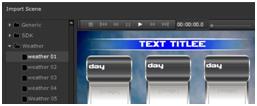
IMPORTING AN EXISTING WEATHER SCENE
If you click on the Import Scene icon from the Scenes panel, you will be able to search for a pre-made Scene in the MediaSignage library. Click OK to import the Scene.
|
|
BUILDING A NEW WEATHER SCENE
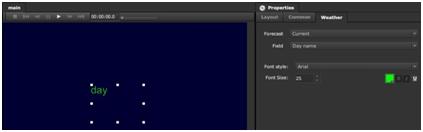
In the Scene editor Section of the SignageStudio you can select from the Components panel the Weather Item Component. The Weather Item Component has a different implementation compared to the Custom RSS Item Component, but works in a similar manner. You first need to create a Scene, add the Weather items, and customize them, and then use that Scene with a Player in a Timeline.
To use the Weather Item Component in a Scene, you first drag and drop it into the main viewing area of the Scene. Drag the component and select it to load up its properties.
|
|
|
|

The first setting of the Weather section is the Forecast. With the Weather item selected here, you can choose the day the Weather item will predict the weather.
|
|

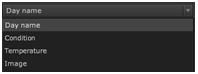
The next section is the Field. With the Weather Item selected here, you can choose what the selected item represents. It can be:- The name of the Day
- The Condition
- High and Low Temperatures
- The Temperature in Degrees- An image illustration of the weather forecast
|
|
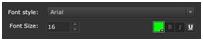
Next, you apply formatting settings to the text of a selected item. Except for the Image, for all the other fields you can set a Font face, a Font color, a Font size and apply text effects like the Underline option.
|
|

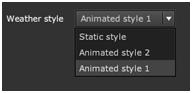
If you select "Image" from the Field dropdown list, you can select a Weather style for the Image.
|
|
BUILDING A NEW WEATHER SCENE - EXAMPLE
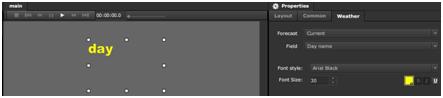
Step 1: Create a Scene and name it Weather Scene. Change the Background color to a light Grey or any other color. Drag and drop a Weather item into the Main viewing area of the Scene.
|
|
Step 2: With the Weather item selected, click on the Weather tab in the Properties panel and make the following settings:- Select Current for the Forecast
- Select Day Name for the Field
- Select Arial Black for the Font Style
- Enter a Font Size of 30 Pixels
- Choose for the Font Color a Light Yellow
|
|
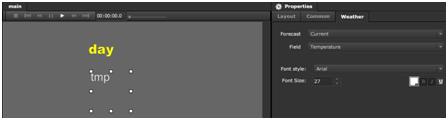
Step 3: Add another Weather Item Component. Place the new item beneath the previous one in the Main viewing area of the Scene. With the new Weather item selected, click on the Weather tab in the Properties panel and make the following settings:
- Select Current for the Forecast
- Select Temperature for the Field
- Select Arial for the Font style
- Enter a Font size of 27 pixels
- Choose for the Font color White
|
|
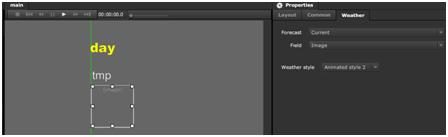
Step 4: Add another Weather Item Component. Place the new item beneath the other two in the Main viewing area of the Scene. With the new Weather item selected, click on the Weather tab in the Properties panel and make the following settings:
- Select Current for the Forecast
- Select Image for the Field
- Choose Animated Style 2 for the Weather Style
|
|
Tip: When you position a resource or a component in a Scene, you'll notice some green guides appear. Use the guides as a reference so you can correctly align and position an item in a Scene.
Step 5: Anchor all the items in the Scene and click on the Campaign tab in the Main Navigation menu. From the Toolbox, click on the Components tab. Drag and drop the Weather Player on the Timeline next to the Custom RSS Player (from our previous example). If you created a new Campaign, just drop it anywhere on the Timeline. Double click the Weather player to access its Proprieties panel.
|
|

Step 6: We will discuss more on the Player and the Common properties in another Chapter, but for now, click on the Weather tab
|
|

to continue with our example.
Here you can drop the Weather Scene you've just created. First, click on the Scene's tab in the Toolbox. Similar to the way we completed the Custom RSS example, drag and drop the Weather Scene in the Scene field of the Properties panel.
|
|

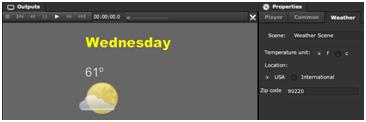
Step 7: Next, choose a Temperature unit and a Location. The Location may be either in the USA in which case you need to provide a Zip code for the area you wish to display the weather for or International, in which case you need to provide a City. We will choose for our example Fahrenheit, USA and 90220 Zip codes. This should be the result in the Outputs viewing area:
|
|
STOCK ITEM COMPONENT
The Stock item component works in a similar manner as the Weather and the Custom RSS Components, to use it you first need to build a Scene, add Stock items to the Scene and customize them, and then use the Stock Player to play the Scene on a Timeline.
To use the Stock Component in a SignageStudio presentation you have two choices:
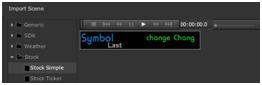
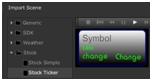
1. You import a pre-existing Scene from the Media Signage library. To do this, you need to click on the Import Scene icon located in the Scenes panel on the left side of the application's interface.
|
|

After you click on this icon, you need to open the Stock Folder from the library and choose one of the available prebuilt Scenes. Click OK to import the Scene. We will discuss later in this Chapter how you can customize, ADD, or DELETE Stock items.
|
|
2. Create a new Scene and add Stock Components to a new Scene and customize them.
USING THE STOCK ITEM COMPONENT - EXAMPLE
After you have imported a pre-existing Stock Scene you can customize the Stock Components in it. This also applies to the case when you prefer to create a new Scene from scratch and add Stock Components to it.
To customize a certain Stock Component you select it so you can access its properties panel. You can use the Layout and Common sections to apply different settings or you can use the last tab, which is the Stock tab.
|
|

THE STOCK FIELD
To define the field represented by the selected Component, you need to select one from the dropdown list of the Stock Field.
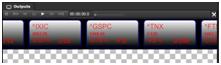
Examples of stock fields:
|
|

ADDITIONAL SETTINGS
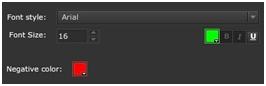
Since the Stock Fields are actually text fields that display different information, you can also use the available formatting options to customize the text.
The formatting settings are:- Font Style
- Font Size
- Font Color
- Font Effects (underline)
- Negative Color (for values with minus -)
|
|
In the following example we will customize a pre-existing Stock Scene and then we will add this Scene to a Timeline using the Stock player. This process is similar the Weather Scene example as we discussed earlier.
Step 1: Import a pre-existing Stock Scene by clicking on the Import Scene icon
|
|

and choose the Stock ticker template from the Stock folder.
|
|
Step 2: Apply different colors to the Stock items. You can also select an item and assign a different stock field. For this example, we will keep the default fields of the pre-existing scene.
|
|
Step 3: Click on the Campaign tab in the main navigation menu and open the Components panel from the Toolbox.
Drag and drop the Stock player on the Timeline. You can place it anywhere on the timeline.
|
|

Step 4: Double click the Stock player you just added on the timeline and you will access its properties panel. Click on the Stock tab to access the settings of the Stock component.
|
|
Step 5: To insert a Stock Scene on a Timeline, you need to add it to the Stock player. To do this, you drag and drop the Scene from the Toolbox into the "Scene" field.
|
|

You'll see, instantly, in the Outputs viewing area a preview of the Stock Scene. Click the PLAY button to preview the Scene.
|
|
Step 6: You can now set the scrolling direction to horizontal or vertical and the scrolling speed.
|
|

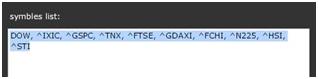
Step 7: In the symbol's list you can ADD or DELETE the Stock symbols which will be displayed.
|
|
WEBCAM COMPONENT
The Webcam Component is used to insert a playback device into the SignageStudio presentation. This can be any USB Web camera.
To use a Webcam component into a Scene, you need to drag and drop it from the components panel into the Main viewing area of the Scene.
You can add multiple Webcam components to a Scene and apply different settings to them. After you add a Webcam Component, you select it to access its properties panel.
|
|
When you load its properties, you'll be able to define an Input number. An input number represents a playback device connected to the computer.
|
|

If you have multiple playback devices connected to the computer, you need to select different input numbers for each Webcam component added to the Scene or directly on the Timeline.
WEBCAM COMPONENT - EXAMPLE
After you customized and positioned the four Webcam Components in a Scene you need to assign different inputs numbers for each component.
Select each Webcam component in the Scene and assign a different input number in the properties panel.
|
|

This way, the system will play the data simultaneously as it receives it from each individual Web Cam.
Note that the Web Cam needs to be connected to the computer that is running the SignagePlayer Desktop version and not to the PC running SignageStudio.
THE GRID/ CHART COMPONENT
The Grid / Chart Component can be used to create various Grids and Charts so you can use in your Presentation. Not that current release is preliminary and additional enhancements are on the road map.
To use the Grid/Chart Component in a Scene, you need to drag and drop it into the Main viewing area of the Scene.
|
|
|
|

|
|
The first field in the Chart section of the properties panel is the Chart Type.
|
|

Here you may select different types of Charts which will illustrate the data you entered in the sections below the Chart type field.
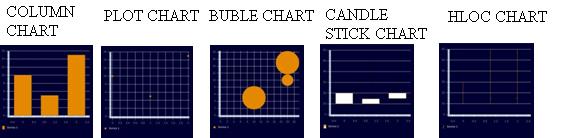
The following are the types of chart / grid you can choose from:
|
|
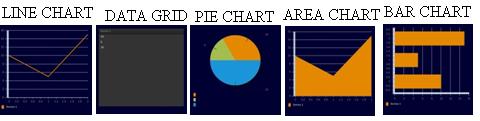
More types of chart / grid you may choose from:
|
|
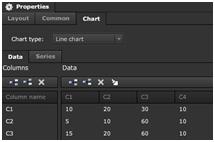
GRID / CHART DATA SECTION
In the Data sections you set values which will get applied to the Grid / Chart Component.
The Data section is split into two categories:
- Columns
- Data
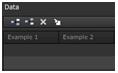
COLUMNS
In the columns area you'll enter the columns of the Grid / Chart component and you can name them accordingly.
|
|

A Grid / Chart component may have an unlimited number of Columns.
You can also choose to insert or delete columns. You can insert a new Column either above or below an existing column. You'll accomplish this by using the two assigned icons.
|
|

If you want to delete a Column you need to SELECT it and click on the DELETE icon.
|
|

GRID / CHART DATA
In the Data Section you can set values for the Column you inserted. The illustration of the Grid / Chart will update according to these values.
You can insert a new Data field either above or below an existing one by using the insert icons.
|
|

If you want to delete certain rows of values you need to SELECT it and click on the DELETE icon.
|
|

Another option you have available in the Data section is the Edit CSV feature. This feature allows editing of the data table manually.
|
|

SERIES
When you click on the Series Tab you will have the Option to add more fields to the Grid / Chart. The Series section is split in two categories:
- Display Text
- Y Field
|
|
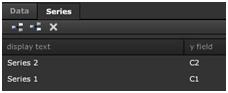
DISPLAY TEXT
In the Display Text section you can type a new name or a description of the illustration. The default name is Series.
Y FIELD
In the y field you'll define a new category, a new field which will assign to a new Series. This field corresponds to the Columns field we discussed earlier.
In the Series Section, you can insert new Sections either above or below an existing one using the two assigned icons. You may also choose to delete a field using the DELETE icon.
|
|

A Grid / Chart component may have an unlimited number of Series.
USING A GRID / CHART COMPONENT IN A SCENE - EXAMPLE
In the following example we demonstrate how to create and customize a Line Chart in a new Scene.
Step 1: Create a new Scene and name it: Line Chart.
|
|

Change the Background of the Scene into a dark Blue or any other color or gradient.
Step 2: Drag and drop the Grid / Chart component into the Main viewing area of the Scene and increase the size of the Component so it matches the size of the Scene.
|
|
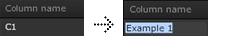
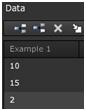
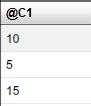
Step 3: Select the Grid/ Chart Component and click on the Chart tab in the properties panel. In the Data Section, change the name of the C1 Column to Example 1 and the name of the C2 Column to Example 2.
|
|
You'll notice as you change the names in the Columns section, the names of the columns in the Data section will also change.
|
|
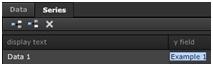
Step 4: Click on the Series Tab. In the Display Text area, change the name of the Series 1 to Data 1, and the name of the C1 Y field into Example 1.
|
|
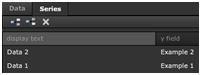
Step 5: Click on the insert below icon and add a new Series.
|
|

Enter in the Display Text area "Data 2" and also in the Y Field type "Example 2."
|
|
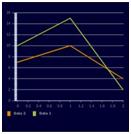
Notice in the Scene, Data 1 and Data 2 series appeared.
|
|
Next, we enter some values for these fields to build and further customize the Component.
Step 6: At this point our Grid / Chart Component do not show any illustration because we did not entered any values for the new created Series. To so, you need to click on the Data tab and enter some values in the Example 1 and Example 2 columns.
Remember you can add as many fields as you want in the Data field. Each field inserted will represent a value for the line trajectory in the Grid / Chart Component.
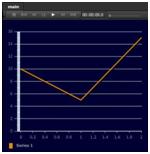
In the first field of Example 1 Column in the Data Section enter the value 10. In the second field enter the value 15 and in the third one enter the value 2.
|
|
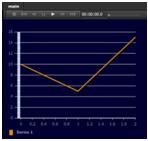
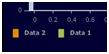
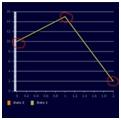
Notice how three different points appeared on the Example 1 line of the Data 1. Each point or position of the Graph line corresponds with the value you entered in the data section.
|
|
Step 7: In the first field of Example 2 Column in the Data Section enter the value 7. In the second field enter the value 10 and in the third one enter the value 4.
|
|
Notice how the graph line of Data 2 appeared in the Scene with three different point positions. Each point of the Graph line corresponds with the value you entered in the data section of the Example 2.
|
|
* Tip: We recommend you try different options and features of the Grid / Chart Component to fully understand how to use it in your SignageStudio Presentations.
THE CLOCK COMPONENT
You can use the Clock Component to show the time and / or the current date in a presentation. You can choose between:
- Creating a New Scene
- Adding
- Customize the Clock Component
- Choose to Import a Preexisting Clock Scene from the Media Signage Library
IMPORT A PREEXISTING CLOCK SCENE
To import e preexisting Clock scene, you need to click on the Import Scene icon located on top of the Scene's panel
|
|

From the MediaSignage library open the Clock folder and choose one of the prebuilt Clock Scenes and click OK to import the Scene.
|
|

After you imported the Clock Scene you have several options to customize the Scene.
WORKING WITH A PREEXISTING CLOCK SCENE
A preexisting Clock Scene contains SWF Components built outside the SignageStudio. When you import a Clock Scene, notice the corresponding SWF files appear in the Resource's panel.
There are several options you can customize:
1. You can change the background of the Clock Scene.
|
|
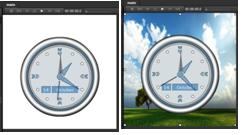
2. You can change the Layout and other common properties. 3. You can select on the SWF tab in the properties panel and apply different settings to the SWF file.
|
|
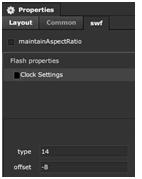
Under the SWF tab, you set a maintain aspect ratio as well as the clock and the offset according to the GMT.
THE TYPE
The type of the Clock is a value which corresponds to a different style or graphics for the clock. Setting this value to a different number will be the same as importing a different clock Scene from the Media Signage library.
For example the scene we just imported has the type value of 14.
|
|

Let's enter different values in the Type field and see the results.
|
|

|
|
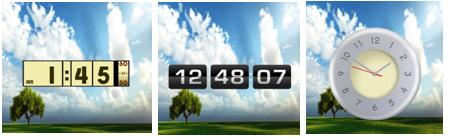
As you can see, there are various clock designs you can choose from.
THE OFFSET
The offset field allows you to change the time as it's been displayed by the clock. To set the clocks to display a different hour, enter a different value in the Offset field which corresponds to GMT.
CREATING A NEW CLOCK SCENE
You can also build a new Clock Scene from scratch, besides the option to import a pre-existing clock scene.
To use the Clock component in a new Scene you drag and drop it from the Components panel into the main viewing area of a new Scene.
|
|
After you dragged the Clock Component you may select it to access its properties panel.
|
|
FORMATTING THE TEXT OF THE CLOCK COMPONENT
You have the option to set the Font style, the Font size, the Font color and also to apply a text effects (underline).
|
|

CUSTOMIZING THE DATE / TIME DISPLAY
After you add a Clock Component to a Scene you can choose what information that particular clock will display. You can set the Clock to show one of the following:
1. Date
|
|

When you select the Date option, the Clock Component shows only the current date.
|
|

2. Time
|
|

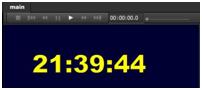
When you select the Time option, the Clock Component shows only the current time
|
|

3. Time / Date
|
|

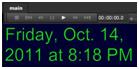
When you select the Time / Date option, the Clock Component shows the current time and the current date.
|
|
4. Custom
|
|
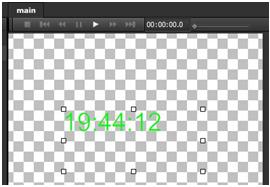
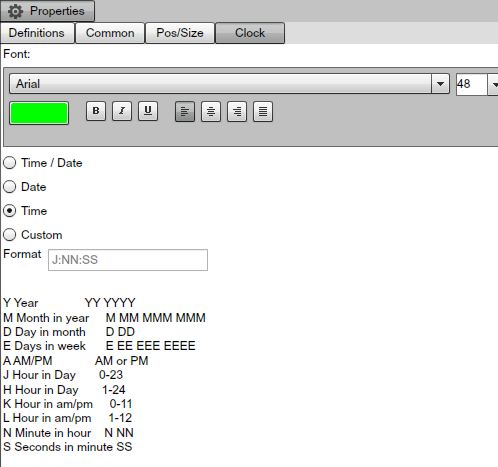
When you select the Custom option, you can customize the information the Clock Component displays.
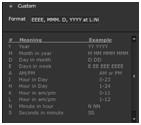
To customize what the Clock Component will display, you enter the information in the Format field, based on the explanation table located below the Format field.
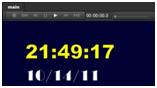
CREATING AND CUSTOMIZING A NEW CLOCK SCENE - EXAMPLE
Step 1: Create a new scene and name it Clock Scene. Drag and drop a Clock Component to the Scene and set the background color of the Scene to a dark blue or any other color or gradient.
|
|

Step 2: Select the Clock Component and click on the Clock tab in the properties panel. Set the Font style to Arial Black, the Font size to 50 pixels and the Font color to yellow.
|
|
Step 3: Add a second Clock Component to the Scene. Select the Clock Component and click on the Clock tab. Choose the Font style Broadway, set the Font size to 40 pixels and the font color to white.
Enable the Date option for this Clock Component.
|
|
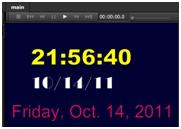
Step 4: Add a third Clock Component to the Scene. Select the component and click on the Clock tab in the properties panel. Choose the Font Arial, set the Font size to 40 pixels and the Font color to a light pink.
Enter in the Format field the following data:
|
|

This should is the final result:
|
|
Tip: We recommend you try different settings available for the Clock component so you may use the full features of this Component in your presentations.
CATALOG ITEM COMPONENT
The Catalog Component is an advanced feature of the SignageStudio. It allows you to go through a sequential number of items or products.
Because this is an advanced feature of the software, if you're just getting started with the SignageStudio, you first need to understand how the software works. After you are comfortable working with the software you should be able to take advantage of the Catalog component.
To use the Catalog Component you drag and drop the Catalog items directly into a Scene, customize it and use the respective Scene on a the timeline, binding it to the Catalog Player.
We will discuss more on the Catalog Component in the "Catalog" Chapter.
EXTERNAL APPLICATION / CAPTURE COMPONENT
In this section we will cover the External Application component. The Component allows you to run a binary file, an external application into a particular Screen Division. If you want to run a Firefox, a Point of Sale or even a VLC media player inside a Screen Division, the external application component will allow you to do this.
The External Application component is an advanced feature. For most users you can accomplish most objectives with native components, including the video players, the swf players, RSS / Video podcast and others. However, if you do need to integrate additional capabilities you can use the External Application to achieve that.
In this introductory part of the External Application Component we will cover the basics of using the external components, later in this Chapter we will be focusing on demonstrating its functionality.
Let's create a new campaign.
|
|
Now choose any Screen from the dropdown Screens list and click FINISH.
|
|
Now you have a Timeline with a single Chanel (CH0). We will discuss more on Timelines and Channels in another Chapter.
In the Campaign section, under the Toolbox, open the Components panel. Drag and drop the ExtApp/Capture Component to the Timeline.
|
|
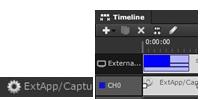
Double click the ExtApp/Capture component from the Timeline to access its properties panel, select the ExtApp tab. You can now configure the ExtApp Component.
THE EXTERNAL APP OPTION LIST
The SignageStudio has several predefined application settings which are commonly used with the Ext App.
|
|
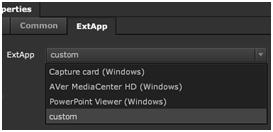
Select the Custom option from the ExtApp dropdown list.
|
|

After you selected the Custom option, you will manually enter data in the "app name" and "command line" fields located below.
|
|
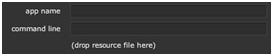
APP NAME FIELD
In the app name field you enter the full execution path of the binary file which is the application you installed on the SignagePlayer PC. You must enter the full exact path to execute the application.
For example, if you want to run the Firefox browser, you first need to install the Firefox.exe on the computer which has the SignagePlayer running on it, and enter the full path to the .exe file in the "App name" field.
If you are not using Microsoft Windows, you are will need to enter a different path as per the OS of the SignagePlayer is running on.
COMMAND LINE
The Command line field is where you write certain arguments you want to pass to the application you'll execute. Arguments are specific commands controlling certain settings of an application.
For example, if you want the Firefox browser to open cnn.com web page, you'll enter in the "Command line" field the following argument: cnn.com
|
|

Next, we will configure several commonly used applications to demonstrate the advanced features of the ExtApp / Capture Component
CAPTURE / LIVE HDD / MEDIATV
Now we are going to review the installation of the SignagePlayer with a Capture device (also known as the mediaTV). The Capture Card will allow you to connect full High Definition to a specified Screen Division.
This input can be an S-VIDEO, a Composite, a Component, and HDMI and will allow you to connect any device to a specified Screen Division.
This means you can take any type of device, like a Cable Box or Satellite Box (such as dish network or Direct TV, or even Security Cameras or Streaming Server). You can take any type of device which outputs on any of the inputs we support. You can show in a specified Screen Division any type of live video HD format.
First, we will cover how to configure the SignageStudio with the Capture card support. Afterwards, we will cover the Windows Operating System showing you how to install the driver and how to configure the device. The final step will be the physical connection of the Capture device / mediaTV.
SIGNAGESTUDIO SETUP FOR CAPTURE
The first thing you should do is decide in what type of Screen Division you want to play the Live TV. We will use a Full Screen for our Screen Division example.
|
|
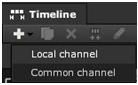
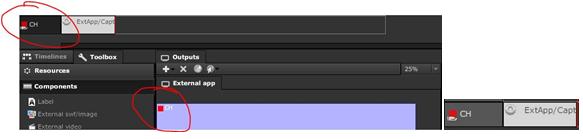
After you set the type of Screen Division you want to use you go to Campaign, SET a new Campaign, and ADD the ExtApp / Capture Component to the Timeline. Let's add a Common channel to the Timeline by clicking the ADD button on the upper left corner of the Timeline.
|
|
Any type of resource or Component which will be inserted into a Common channel will play continuously throughout all the Timelines.
Next, drag the Common channel on the Output Screen Division of your choice, drag and drop the ExtApp / Capture Component onto the Common Channel.
|
|
Double click the ExtApp / Capture component to access its properties panel and select from the dropdown list of the ExtApp fields the Aver MediaCenter HD options
|
|

Everything is preconfigured for you. You don't need to manually type any data; however you do need to check the Aver Media file path from the SignageStudio, making sure it matches the path on your SignagePlayer PC.
INSTALLING THE CAPTURE CARD DRIVER
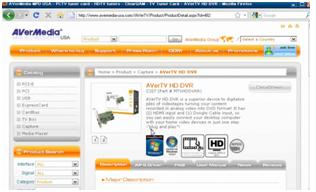
For the Next step, let's configure the Windows Aver to support the Live capture. To do this you need to log into the windows platform at the Computer which has the Signage Player installed. We do support the XP and Windows 7 Operating Systems for the SignagePlayer desktop version running with HD capture card. Note: you can order the mediaTV device from the MediaSignage web site.
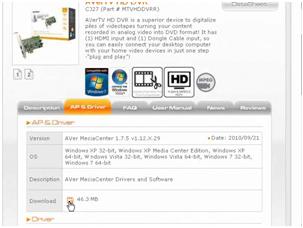
We support the Aver Media Device for the Capture Card and you need to visit the official website located at www.avermedia-usa.com and search for the Aver TV capture Device.
|
|
|
|
If you do have a small factor player and you cannot put the PCI inside because maybe you don't have enough empty slots or no extra room, we do have our own PCI express version of this Card.
Therefore, if you are interested in getting the external version, please check this link for more information: Go to MediaSignage
After you've downloaded the driver you need to install it by going through the standard installation process.
|
|
After the installation click on the TV icon and select the source: Composite, S-Video, Component or HDMI.
|
|

One thing to know about the HDMI is, most providers streaming HDMI over the cable or satellites (dish network or direct TV); also transmit an additional protocol called HDCP. An HDCP is actually an encryption protocol which prevents you from using a Capture device with HDMI. This is so you don't rip content like movies and other copyright content. If you use one of these providers and they do use HDCP, you will have to use a Component type connection (it will still give you great HD quality). So if you do see the HDCP error, go ahead and revert to Component instead HDMI.
After you selected the Source you can check to see if everything else is working properly according to the Aver Media installation manual.
CONNECTING THE CAPTURE DEVICE
In this Section we will cover how to connect the source feed which can be a DVD player, a Camera, a tablet, Satellite TV, and so forth to the capture card device.
|
|
The capture device has two connections: One is a Dongle Input and the other is the HDMI Input. If you are using the HDMI, you need to connect the device directly to the HDMI Input.
If you are going to use a Dongle you are going through Component, S-Video or Composite. So the Video input source will connect either through the Dongle or the HDMI input to the Capture device. The capture device is connected to the motherboard via PCI and you can connect any type of Screen to the motherboard.
Unlike the case of the video source, whereby you transmit though the HDMI, the sound has separate cables you'll use.
|
|
You need to connect the green connection from the back of the motherboard from the back of the PC; use the green connection and connect the RC Audio to the TV. So the Video will come through the HDMI/DVI/VGA, but the Audio will actually come over the RCA left right Stereo cable.
For the Audio in, you need to connect the Left Right cable from the input device (DVD player for example) to the pink connection input at the back of the PC.
|
|
The benefit of this type of audio configurations is that if the capture device is not used on a particular timeline, the audio will get muted (in addition to hiding the video input.
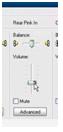
You'll also want to make sure the audio back port or the input port (which in our case is the pink port), is enabled. To check this under Windows, you need to go to the Control Panel and under Sounds --> Advanced make sure the Rear Pink In is not muted.
|
|
If you followed the installation correctly you'll have a great high quality image with no interlacing.
FIREFOX AND THE EXTERNAL APPLICATION
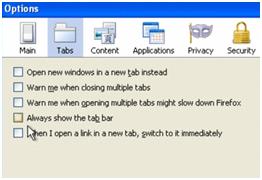
MediaSignage supports the latest version of WebKit; the open source standard for HTML decoding, as a native HTML component that can be dragged directly onto the timeline or inside a Scene. However in some instances you may want to use Firefox (for example if you want to take advantage of a Firefox native plugin). Firefox as an external application allows you to run the Firefox browser inside a Screen Division.
The first thing you must do is to install the Mozilla Firefox browser on the computer which will have the Signage Player installed.
Next you configure a Campaign and add to the Timeline the Ext / App component. To execute the Firefox application you need to type the exact path of the .exe file. Under Windows, the default path will be:
|
|

The next step is to go to the SignagePlayer Desktop version and apply settings to the Firefox web browser. Our goal is to have a clean window of the browser, without any buttons or toolbars or panels surrounding the browser. To do this you first need to install a plug-in called Hide menu bar. You can download this plug-in from this location: Go to Mozilla plugin site
After you've downloaded and installed the Hide Menu plug you need to restart Firefox and start changing some settings.
1. Click on the View tab and then uncheck the Status bar.
|
|

2. Click on the View tab --> Toolbars and uncheck the Menu Toolbar. At this point the Menu Toolbar is gone so you need to click on the Alt key to access it.
3. Click again on the View tab --> Toolbars and uncheck the Navigation toolbar and the Bookmarks Toolbar.
At this point we have a clean window, without any panels or toolbars.
|
|
4. The next thing you want to do is to configure the Firefox browser so it will not use the Tab system (so there's no extra tabs on top, and also because you must apply some settings). This is so the Firefox browser will not prompt you with any messages on startup.
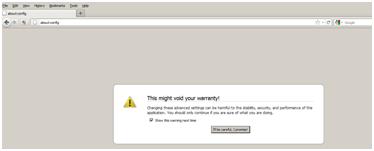
You must press on the ALT key on your keyboard once again, go to view and check the menu toolbar temporarily. Now, go ahead and type about: config in the search field of the browser.
|
|
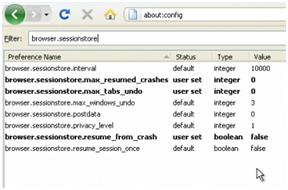
After you access the back settings area of the Firefox browser, you check the settings from the next snapshot to make sure the configuration matches what you have on your setup.
|
|
Having these settings assures you the browser will not prompt you with any dialogs.
Next, go to the main toolbar and uncheck all these checkboxes:
|
|
Now disable the Navigation toolbar. You are done with configuring the Mozilla Firefox browser (running in a particular Screen Division you assigned for it). When the browser plays in your presentation it will have no buttons or extra toolbars comp
USING THE VLC APPLICATION WITH THE EXTERNAL APPLICATION
In this section we will review the Video Lan or VLC external application and how it can be used in your presentation; along with the ExtApp component.
VLC is a very flexible open source application used for playing audio-video files. It supports many types of Video formats like .avi / .mov / .mpeg / and many other formats. Using the VLC you can play content directly form a DVD, you can use the VLC server to stream content and much more.
Let's explore how to use VLC both on the Windows platform. We will cover different Command line arguments you can pass to the VLC application (so you can interact with it and embed it inside a particular Screen Division).
The first thing you must do is install the VLC application on the computer which runs your SignagePlayer.
The official website of the VLC application is here:Go to Videolan
After you have installed the VLC application on the Windows SignagePlayer PC, go ahead and create a new Campaign and add the Ext/App Component to the Timeline.
Enter the path to the application in the app name field.
|
|

Regarding arguments, you can use thousands of different arguments and parameters which you can pass to VLC. In this Go to Videolan you can find most command lines you can use with the VLC application.
|
|
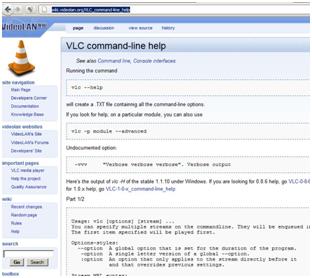
We will cover a couple of arguments as an example. Visit the VLC web page so see what other parameters are available.
RUNNING A DVD PLAYER WITH THE VLC APPLICATION
The first thing we will cover is running a DVD player with the VLC application. If you have a DVD inserted in your DVD drive and want to play the DVD in a particular Screen Division.
In the command line of the VLC application, type the following:
|
|
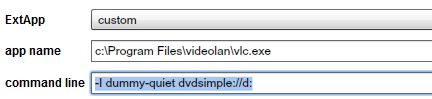
These arguments will allow you to use the DVD player as the primary source of the DVD.
The "dummy-quiet" will allow you to run the VLC without any buttons or any chrome. A clean window will be embedded into a Screen Division. You don't want to see any buttons or any File menus. This is what "-I dummy quiet" argument will allow you to do.
The "dvdsimple:\d: argument will open up the DVD drive, which is the DVD player you are going to use to play the media file. It will automatically start playing the DVD. You can review the help file from the VLC website and search through many other arguments you can use.
If you want to use the VLC application to play a file located in a different place on your computer, you must replace the "dvdsimple:\d:" argument with the file path of the respective video file.
For next example let's play an .avi which is not natively supported.
|
|

In this example, the movie.avi video file will play as soon as the VLC external application loads. The video file must reside in the exact location you entered in the command line of the ExtApp component.
Another powerful feature is the ability to play a resource from the Resource's panel directly in the VLC player. This means you will not have to copy a file to the remote SignagePlayer manually when using VLC. Instead, the file can be uploaded just like any other resource in the SignageStudio, and it will be copied to the remote SignagePlayer and passed as an argument to VLC.
To play a resource with the VLC player, you drag the Resource right after the "- I dummy-quiet" argument. The system will use a macro to identify and play this particular file with the VLC. You can use these macros with any kind of application.
As you can see, just under the command line field there is a text line saying: Drop resource file here.
|
|

This means you can drag and drop a Resource from the Resources directory directly in the command line field and play the file automatically with the application you are going to use; in our case the VLC application.
The macros will tell the VLC application to open up and play the respective file located in the Resources directory.
Another useful command line argument is this: "- -mouse-hide-timeout 1"
|
|

The "mouse hide" argument will force the mouse cursor to disappear within 1 millisecond. This is a useful command since in a Digital Signage presentation you don't want the mouse cursor to be present.
RUNNING THE VLC AS A SERVER
Here are some more command line arguments useful with the VLC application. These arguments will allow you to use the VLC application as a server.
|
|

Let's assume at your business you have 10 Signage players and you want to Stream DVD content to all of the players. You don't have to install the DVD player on every single Device or every single player. What you can do is install a single server and run VLC as a server to stream down the content.
In the command line arguments listed above, we have on the server side the dedicated machine running the server within your business. You'll run vlc.exe, which is the executable, the "dvdsimple" argument we discussed earlier, and a few other command arguments like:
|
|
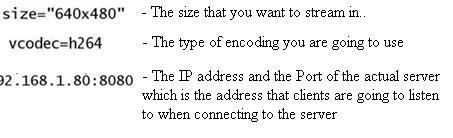
You'll need to replace this address with the IP address and the access port of your Signage player or Windows platform.
For the SignageStudio, you will run the VLC client and set the same IP address as the server. Then set to deinterlace mode and set the aspect ratio.
|
|

So, if you want to use the connect to a VLC server, instead of suing a local file type with a long command line with all the arguments, including the IP address, aspect ratio and so on.
POWERPOINT AS AN EXTERNAL APPLICATION
In this section we are going to demonstrate how you can use PowerPoint with the External Application, so you can embed a PowerPoint presentation inside a Screen Division. To play a PowerPoint presentation, you first need to download and install the PowerPoint viewer on the computer which runs the Signage Player. Afterwards you create a Campaign and add the ExtApp to the Timeline.
You can download the PowerPoint viewer for free at this web address: Go to Microsoft
Or here Go to Signage
After you've downloaded and installed the PowerPoint viewer, you enter the entire path to the application in the "app name" field of the External application Component.
You can type it manually or if you use the default installation path. You can select the Power Point Viewer option from the dropdown list of the ExtApp field:
|
|
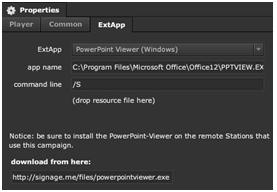
For the Command line, you can enter: /A/S
|
|

The "/A" argument is telling the PowerPoint viewer to automatically slide from one slide to another.
The "/S" argument will tell to skip the splash screen when first loads.
Next we're going to configure the PowerPoint Presentation so the slides will automatically switch from one slide to the next and will automatically loop. All this can be configured and saved into your .ppt file so the settings will propagate from where you run them in the Signage Presentation.
We used PowerPoint 2007 for this example.
In the PowerPoint application you set up the slide show so it will have the following settings:
|
|

Next, select all the slides and check the "automatically after" option from the Animation menu. Choose timing in seconds, which will represent the period between slides.
|
|

In our example, each slide will show for 5 seconds before moving to the next slide. And when the last slide is reached, it's going to go back and play the first one. Save the settings and go back to the SignageStudio.
Import the .ppt file as a Resource and then drag and drop it in the command line field of the ExtApp / Capture Component (after the other arguments you entered).
Note that .pptx are not supported so save your PowerPoint slides as .ppt
|
|

This will tell the PowerPoint Viewer application to play the file located in the Resources directory and show it in your presentation embedded in the Screen Division you assigned to it.
To play the slides at the native size you must use the ExtApp Component in Full Screen, or if you want a different size to match a certain Screen Division, you'll need to resize the slides from the PowerPoint application.
The PowerPoint component also supports Macros just like the VLC component. To use it, upload a ppt file just like any other file; onto the resources library. Continue br dragging and dropping the .ppt right after the path of ppt viewer under its properties panel (same as we've done with the VLC). This process will allow you play .ppt files without having to copy each PowerPoint file to any of your remote SignagePlayers.
If you are going to use the ExtApp Component with the PowerPoint Viewer application, you might experience some clipping, and you might find it difficult to follow all the steps you need to take to use the PowerPoint Viewer as an external application. There is a better way to get a .ppt or .pptx file into our system, convert it to a native .swf file.
You can find many PowerPoint converters online, but one easier to use is called Flashpoint PowerPoint to Flash Converter. You can buy it from this website:Go to Flashdemo
|
|
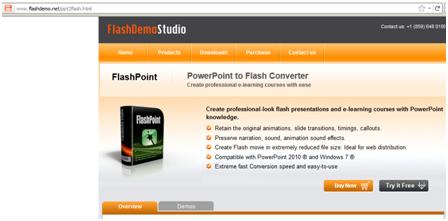
This Converter will install as a plug-in to your PowerPoint application and will convert all your .ppt or .pptx files into pure vector based SWF files. These can be natively imported into the SignageStudio.
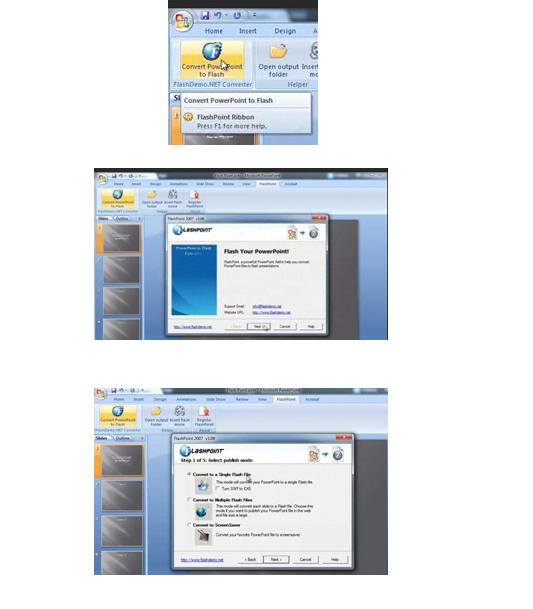
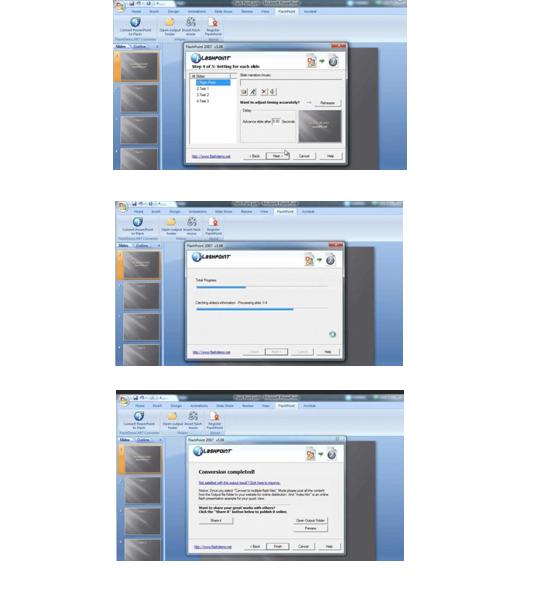
Once installed, it will be very easy to follow some easy steps to convert a PowerPoint file to a SWF file.
CONVERTING A .PPT OR .PPTX FILE TO SWF USING FLASHPOINT CONVERTER
|
|
|
|
Either choose to use the PowerPoint Viewer with the ExtApp Component, or convert the PowerPoint presentation to SWF. The SignageStudio will support embedding your PowerPoint presentation and use them in your Signage Presentation.
Copyrights MediaSignage© Inc