Campaigns
INTRO TO THE CAMPAIGN
The campaign is a global configuration which holds your entire digital signage presentation. Having the ability to configure multiple campaigns allows you to easily switch your SignagePlayers from one presentation to another (i.e.: assigning a single campaign to a single player and easily switching between campaigns).
A campaign in its most basic format is a sequential list of timelines. A timeline is comprised a screen template with each screen division holding a single channel. A channel holds a list of resources and components. The resources and components can each be set to its own playback length.
And so a campaign is the place where timelines are sequenced to playback a list of components and resources that are placed inside channels which are bound to specific screen division; your brain smoking yet? Don't worry we will explain it all.
|
|
CAMPAIGNS AND TIMELINES
A Campaign can have an unlimited number of Timelines played sequentially; one timeline after the other on your output screen. In a campaign, you can also decide which timeline will play before or after the other ones, and you'll be able to accomplish this using the sequences section of the campaign. In the Campaign area you'll be able to use timelines to manage your presentations.
Each campaign you create can have a different name. It can be assigned to a specific folder, which is useful, especially when you have a large network with hundreds or even thousands of campaigns.
CAMPAIGNS AND STATIONS
A Campaign is what is assigned to a Physical station out in the field. Each Station represents the Computer where you have installed and configured a SignagePlayer. A Station is directly connected to an output Screen.
You can add an unlimited number of campaigns in the SignageStudio. Each campaign will be able to manage an unlimited number of timelines.
You can decide which Campaign will be connected to one or several stations, and you can always switch between the campaigns assigned to a particular Station.
CAMPAIGN SCHEDULER
There are two ways to manage how timelines are played back in campaigns. The first one is the Sequences we discussed earlier. You'll use the sequence mode to set the timelines order list; play sequentially one after the other.
|
|
The second mode is the Scheduler. The scheduler allows you to schedule the date and time when you want a certain timeline to playback within a campaign that is assigned to one or more stations (notice how one campaign can be assigned to any number of remote stations).
The Scheduler option allows you to have complete control over the timing of your presentation.
KIOSK MODE
In the Campaign section you can also decide whether your presentation will run in KIOSK mode. Kiosk mode allows you to use touch screen displays and allow users to interact with you Signage Presentations.
We'll discuss more about enabling the Kiosk mode and other Kiosk related topics like the Kiosk builder in another Chapter.
CAMPAIGN - USER INTERFACE
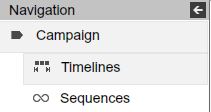
To access the campaign section, you select the campaign tab in the main Navigation menu.
|
|

After you click on the campaign tab, you'll have access to all the panels and directories within the campaign. In the Campaign you can add, delete, and duplicate a campaign. You can also assign a campaign to a different folder and create subfolders if you like. You can change the name of the Campaign and add Timelines to it.
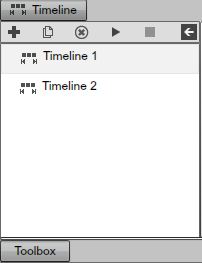
CAMPAIGNS PANEL
On the left side panel you'll be able to view all your created Campaigns. You'll access the Timelines built in a Campaign by selecting the Campaign with your mouse. If you assign different folders and subfolders to your Campaigns, this is where you'll see the folders and subfolders listed.
|
|
In the Campaign Section, you'll see the Timeline located in the center of the user interface. Here you will drag and edit your Resources, Components, and Scenes and assign them to different Channels to build your presentation.
|
|
TIMELINES PANEL
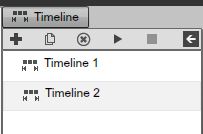
In the Timelines panel, you can add, rename, delete, or duplicate Timelines. In this directory you'll see listed all Timelines created.
|
|
THE TOOLBOX
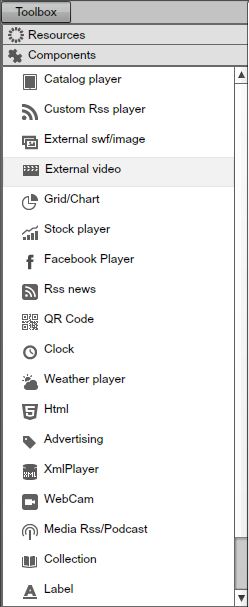
When you access the Campaign Section you'll also be able to use the Toolbox. It contains Resources, Components, and Scenes. You can also access from the Toolbox, the Screen Divisions you created, and you can assign more than one Screen Division to a Timeline.
|
|
THE OUTPUTS AREA
Another work area in the Campaign Section is the Outputs. The output is the Configuration of your Screen. It matches the layout of the Screen Divisions you created in the Screens Section of the SignageStudio.
In the Outputs area you'll drop and assign Channels to embed in your Screen Divisions. Here you'll also be able to preview the Presentation; either using the SignagePlayer Web or Desktop version.
The output allows you to create a variation of a timeline for different resolution screens or, if you wanted to run a slightly modified version of a timeline. For example, you have 2 Stations, one in Los Angeles and one in New York. You want both to play the same campaign (thus same timelines). However you wish to have the Weather component be unique for each of the 2 locations. With multi output you can assign all screen divisions and channels to be identical while for both locations, while keeping a single channel (in this case Weather component) unique per location. This will reduce the amount of work needed to create a new presentation per location.
You can add or delete outputs. You can have an unlimited number of outputs in a Campaign, and also more importantly, you can switch between different Outputs inside a campaign when you assign it to particular stations.
|
|
PROPERTIES PANEL
When you select a Campaign or a Timeline, a Resource or a Component, or any other element in the Campaign Section, you can access its properties panel on the right side of the user interface (after selecting the respective component).
|
|
Campaigns are an essential part of any SignageStudio presentation. Managing a Campaign properly helps you build your network and have complete control over your Station (and the content they display for your viewers).
CAMPAIGNS - TIMELINES AND CHANNELS
A Campaign consists of any number of Timelines. A Timeline can have any number of Channels and Outputs. In the previous Chapter we discussed a Campaign representing what is assigned to a Station. A Station is the computer where you have installed the SignagePlayer Desktop version.
You can build any number of Campaigns and assign one campaign to one remote station. You can also choose to Play one Campaign for a certain period of time and switch to another Campaign at any point.
Before you begin building your first Campaign, you should check to make sure you've completed the flowing steps; as it is necessary to prepare your presentation before you start building your Campaigns. We'll explain later in this Chapter all the steps of creating a presentation and define a Campaign for it. For now, make sure you don't skip one of these steps before starting to build a Campaign.
- 1. Check if you imported all the necessary files in the resources directory and assigned folders to them for organization
- 2. You defined one or more Screens, set the desired resolution, and draw the Screen Divisions in the Screens section of the SignageStudio
- 3. Check the position and size of your Screen Divisions
- 4. Check the layering order of your Screen Divisions
- 5. Check the Orientation of your Screens
- 6. Check if you properly set the width and height for any scene you may want to include in your presentation ;
To access the Campaign section of the SignageStudio you select the Campaign tab from the main Navigation menu.
|
|

BUILDING A CAMPAIGN
Start building your first Campaign by following the Campaign wizard.
THE CAMPAIGN WIZARD
Click on the ADD icon located in the Campaign's panel.
|
|

a new dialog window appears on your Screen.
|
|
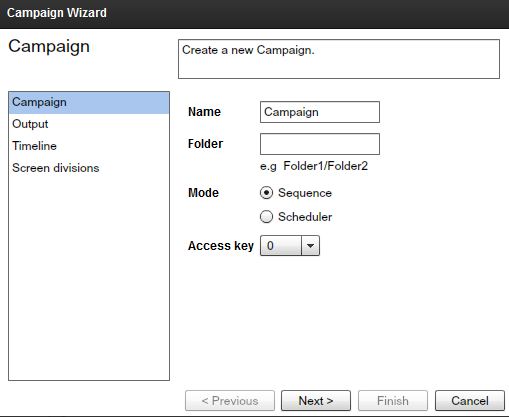
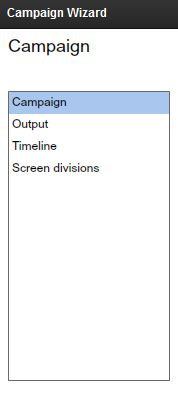
The Campaign wizard will allow you to build a Campaign by going through several steps. As you can see in the left side of the wizard, there are four sections:
- 1. Campaign
- 2. Output
- 3. Timeline
- 4. Screen Divisions
|
|
You can navigate to a different sections of the wizard directly by clicking on its name, or you can use the Next and Previous buttons.
|
|
Step 1: Set a name for your Campaign.
|
|

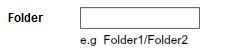
Step 2: Assign a new or existing folder or subfolder for the Campaign. You can assign a folder by entering the name/path of the folder in the "Folder" field. You can leave this field empty and decide later if you want to assign a folder / subfolder.
|
|
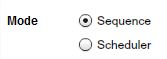
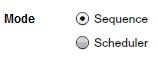
Step 3: Next you can choose to set the Campaign mode. You can set the mode either to Sequence or Scheduler.
The default mode is the Sequence mode. It will set the Timelines to play one after the other in a sequential order; while the Scheduler mode will allow you to set the Timelines to Play at certain periods of time (days, hours, minutes).
|
|
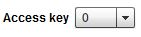
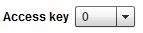
Step 4: Check the access key provided by the network administrator.
|
|
Step 5: Click the Next button
|
|

to access the settings from the Output section.
|
|
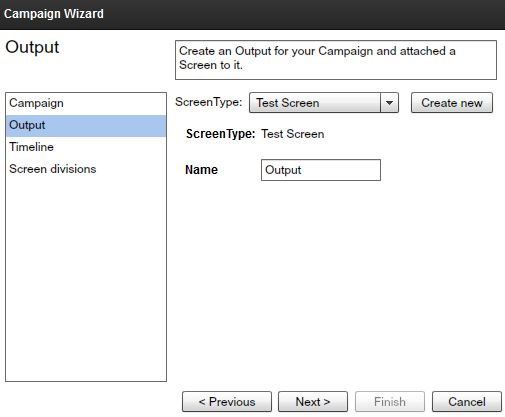
Step 6: Choose a Screen from the Screens dropdown list.
|
|

In this dropdown list you can select a Screen you've created in the Screens section of the SignageStudio.
In the next illustration, we created two Screens: My new Screen 1 and my new Screen 2.
|
|

We will choose the Screen named "My new Screen 1" from the Screen's dropdown list.
|
|
Step 7: Next let's set a new name for the Output. A Campaign can have more than one Output. You can add additional Outputs at any point.
|
|

Step 8: Click the Next button
|
|

to access the Timeline section of the Campaign wizard. In this section, you will add a Timeline to your campaign. You can add an unlimited number of Timelines to a Campaign after you've created it.
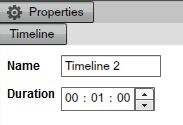
Step 9: Set the name for the Timeline in the "Name" field.
|
|
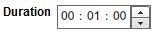
Step 10: Also in the Timeline Section of the Campaign wizard you can set the duration of the Timeline. The default duration is 00:1:00 minute. You can set the duration of the Timeline either by entering numeric values in the corresponding fields (hours, minutes, and seconds), or by using the UP and DOWN arrows keys.
|
|
After you've created a Campaign, you can change the duration of a Timeline.
Step 11: Click the Next button
|
|

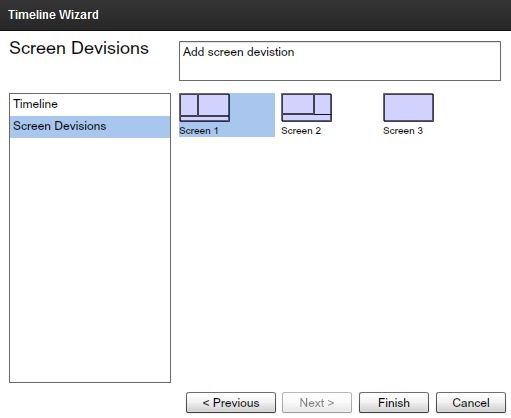
to access the Screen divisions section of the Campaign Wizard. In this section you'll choose a default Screen Division for the Timeline.
You can add multiple Screen Divisions to a Timeline after you've created the Campaign. For our example, we created in the Screens section three different Screen Divisions. We will choose Screen Division 1 by selecting it.
|
|
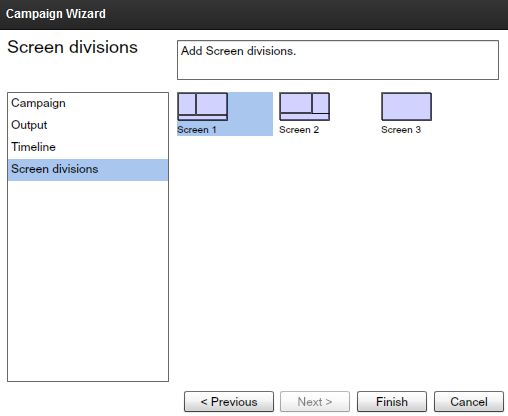
Click the Finish button to complete the Campaign Wizard or Cancel to abort all settings.
|
|
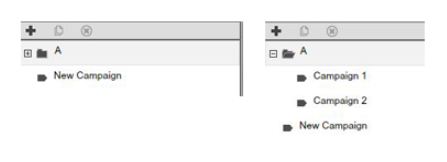
Congratulation, you just created a new Campaign, not so hard after all. In the Campaign's panel, check on the left side of the user interface and search for the Campaign you just created. In the next illustration we have a folder containing two Campaigns and the New Campaign we've just created.
|
|
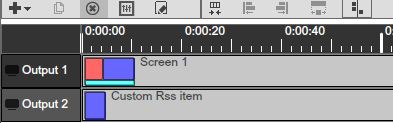
After you've created the New Campaign, several components of the Campaign were automatically created.
- 1. The Timeline containing the Screen Division for the Output.
|
|

- 2. The Output containing the viewers or regions you drew in the Screen's section; each Output different
|
|

- 3. Channels appeared on the Timeline. Each Channel has a different color corresponding to the colors of the regions in the Output section.
|
|
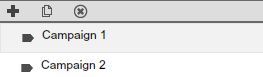
In the Campaign's panel, besides the option to ADD a new Campaign, you can also duplicate or DELETE a Campaign.
DUPLICATING A CAMPAIGN
If you wish to duplicate a Campaign you'll have to select it, and then click on the duplicate icon located next to the Add icon in the Campaigns panel.
|
|

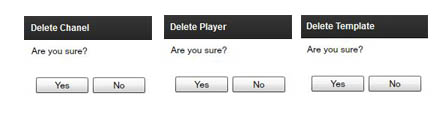
After you click on the Duplicate icon, a dialog box appears on your screen. You have the option to choose YES, and duplicate the Campaign, or to choose NO and CANCEL the operation.
|
|
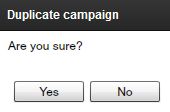
If you click on YES, a new Campaign will be listed in the Campaigns panel. It will have the same settings as the duplicated one. It will be an exact copy of the Campaign you chose to duplicate.
DELETING A CAMPAIGN
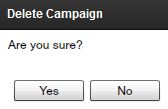
If you want to delete a Campaign, you need to click on the DELETE icon,
|
|

located next to the Duplicate icon in the Campaigns panel.
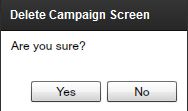
If you click on the Delete icon, a dialog box will appear on your Screen. You have the option to choose YES and DELETE the selected Campaign, or choose NO to CANCEL the operation.
|
|
You can access the Add, Duplicate or Delete options by right clicking on the name of an existing campaign in the Campaign panel, then choose the desired option.
THE PROPERTIES PANEL OF A CAMPAIGN
You can access the Properties panel of a Campaign by selecting the Campaign name in the Campaigns panel. The Properties panel of a campaign is located on the right side of the user interface.
|
|

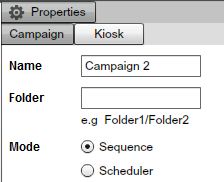
The Properties panel of a Campaign has two tabs which include Campaign and Kiosk.
CAMPAIGN SECTION OF THE PROPERTIES PANEL
In the Campaign section of the Properties panel you can apply different settings to a Campaign. These settings include:
- 1. Changing the name of the Campaign
- 2. Assigning a folder or subfolder to a Campaign
- 3. Selecting the Mode of a Campaign to either Sequence or Schedule
- 4. Verify the access key
CHANGING THE NAME OF A CAMPAIGN
To change the name of a Campaign you enter the new name of the Campaign in the "Name" field of the Properties panel.
|
|

ASSIGNING A FOLDER OR A SUBFOLDER TO A CAMPAIGN
If you didn't assign a folder or a subfolder using the Campaign wizard when you created the Campaign, than you'll be able to do so in the Folder field of the properties panel of a Campaign.
|
|
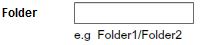
Enter the name of the folder in the field. You can also assign a subfolder to a Campaign by using the "/" key on your keyboard.
CAMPAIGN MODE
You can change the mode of a Campaign by selecting either Sequence or Scheduler.
|
|
The Sequencer is essentially a simple and effective way to serially set the play list order of all the timelines. This is accomplished by using a drag and drop operation.
The Scheduler allows you to set your timelines to play at any day and at any time. Use the scheduler to set the exact start and stop times. A graphical user interface is used to get a summary of all future playlists and to easily resolve conflicts.
You can always switch between the two modes directly from the Properties panel of a Campaign.
ACCESS KEYS
You can view what access keys have been assigned to you by the network administrator. However, only an administrator can modify the access key value through the Enterprise studio.
|
|
KIOSK SECTION OF THE PROPERTIES PANEL
You may enable the Kiosk mode for a Campaign from the Kiosk section of the Properties panel. The Kiosk mode allows you to interact with your Presentation using your mouse, keyboard, or finger gestures using a touch screen.
|
|
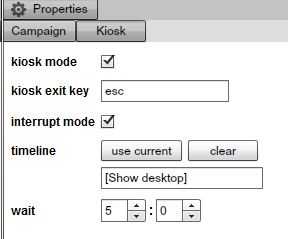
In the Kiosk section of the properties panel of a Campaign, you have several options, like enabling the Kiosk, setting up the Escape / exit key and more.
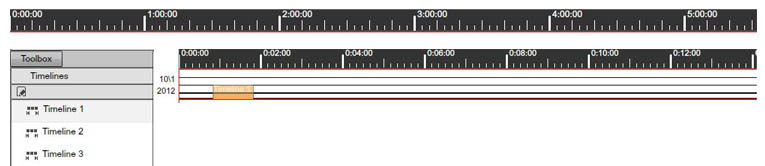
TIMELINES
After you access the Campaign Section of the SignageStudio, you will gain access to the Timelines Section. The other subsection is Sequences.
|
|
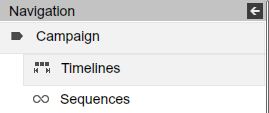
We will talk more about Sequences later in this Chapter, but for now we will cover what are Timelines and how we can use them to build a SignageStudio presentation.
THE TIMELINES
A timeline is a visual representation of the sequential play list of your media resources. A collection of all your timelines make up the final output of your digital signage presentation.
A Timeline is the place where you set and add channels. Channels contain all your media content (resources, scenes, and components), and where you'll define when content starts and ends. Channels are a visual playlist that you place the content within.
Timelines are an important element of a Campaign and you can create any number of Timelines and any number of channels within a single timelines.
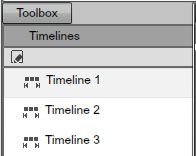
THE TIMELINE PANEL
After you added a New Campaign to your presentation using the Campaign wizard, you will see that a Timeline was automatically created for you. You can choose to add additional Timelines to the Campaign, or duplicate existing Timelines.
|
|
You'll see all the Timelines you created listed in the Timelines panel. You can access their properties by selecting each timeline.
ADDING A NEW TIMELINE TO A CAMPAIGN
To add a new Timeline to a Campaign, click on the Add icon from the Timeline panel.
|
|

After you click on the Add button, you will gain access the Timeline wizard.
|
|
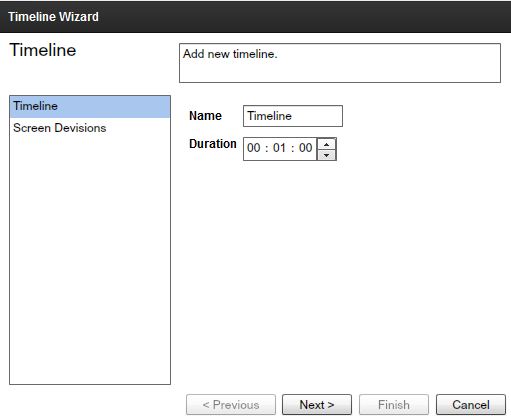
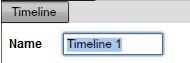
To add a new Timeline to a Campaign, you'll have to go through several steps in the Timeline wizard. The Timeline wizard has two sections: "Timeline" and "Screen Divisions."
Step 1: In the Timeline Section of the wizard, create a name for the new Timeline. Enter the new name in the "Name" field. Remember you can always change the name of a Timeline at any time if you choose to do so.
|
|
Step 2: Set the Duration of the Timeline. You can change the duration of a Timeline any time after you've create it.
|
|
Step 3: Click on the Next button
|
|

and choose a Screen Division. You can select the same Screen Division you chose for the previous Timeline(s) or a different one.
|
|
Click Finish to create the new Timeline.
After you've created a new Timeline, it will appear in the Timelines panel.
|
|
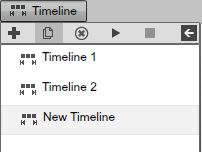
Besides adding a new Timeline, you can also Duplicate and Delete a Timeline from the Timeline's panel.
DUPLICATING A TIMELINE
If you want to duplicate a certain Timeline, you select it and click on the duplicate icon
|
|

located next to the Add icon in the Timeline panel.
After you clicked on the Duplicate icon, a new dialog box appears on your Screen.
|
|
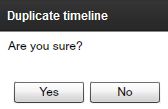
You can choose YES and duplicate the selected Timeline, or you can choose NO to CANCEL the operation.
If you choose YES, a new Timeline will be listed in the Timelines panel. It will have the same settings as the duplicated one.
DELETING A TIMELINE
If you would like to delete a Timeline, you'll click on the Delete icon
|
|

located next to the Duplicate icon in the Timelines panel.
After you click on the Delete icon, a new dialog box appears on your Screen.
|
|
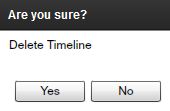
You'll have the option to choose YES and permanently DELETE the selected Timeline, or you can choose NO and CANCEL the operation.
You can also access the ADD and the DELETE options by right clicking on the name of a Timeline within the Timelines panel.
THE PROPERTIES PANEL OF A TIMELINE
Whenever you select a Timeline from the Timelines panel, you'll be able to access its Properties panel. In the properties panel you can change the name of the Timeline and also set the Duration of a Timeline.
|
|
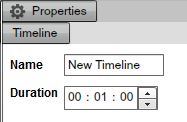
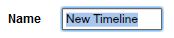
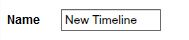
CHANGING THE NAME OF A TIMELINE
To change the name of a Timeline you enter the new name in the "Name" field of the Properties panel.
|
|
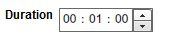
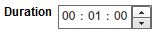
CHANGING THE DURATION OF A TIMELINE
After you've created a Timeline, you can change its duration at the timeline using the "Duration" option in its Properties panel. Enter the numerical values in the corresponding fields (hours, minutes, and seconds), or use the small UP and DOWN arrow keys.
|
|
THE TIMELINE SECTION
The Timeline Section is a key component of the SignageStudio. You'll use a Timeline to set up your entire Presentation. In a Timeline you will:
- Drag your Scenes, Components, or Resources
- Define which Component will play in your Presentation
- How long it will play in your Presentation- Where it will play in your Presentation
TIMELINE SECTION - OVERVIEW
After you created a Campaign, a new Timeline was automatically created. The Timeline is located by default in the middle of the user interface next to the main Navigation menu.
|
|
A Timeline is comprised of several tools including:
- 1. Toolbar
- 2. Output
- 3. Channels
- 4. Time Markers
- 5. Scale Feature
THE TIMELINE TOOLBAR
In the top left area of the Timeline section, you'll see a toolbar containing several icons.
|
|

THE ADD ICON
The Add icon
|
|

is used to ADD Channels to a Timeline. Channels allow you to embed resources within them and then assign them to Screen Divisions. A region or division of a Screen can have only one Chanel assigned to it, but you can assign the same Channel to multiple Screen Divisions if you wish to have the same content play multiple times.
|
|
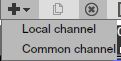
The "Add channel" icon allows you to add either a Local Channel or a Common Channel to the Timeline.
We will cover common channels later and explain the difference between local and common Channels.
THE DUPLICATE ICON
The Duplicate channel icon
|
|

is used to duplicate a certain Channel. To duplicate a Channel, you must select it and then click on the Duplicate Channel icon.
After you click on the Duplicate Channel icon, a dialog box appears on your Screen.
|
|

You can choose YES to duplicate the Channel or NO to CANCEL the operation. If you click YES, a new identical channel appears in the Timeline.
THE DELETE ICON
The Delete icon
|
|

is used to DELETE Channels from a Timeline, and any Output template Component, Resource, or Scene you previously added to the Timeline.
To delete something from a Timeline you select it and click on the Delete icon. After you've clicked on the Delete icon, a dialog box appears on your Screen
|
|
You can click YES to delete the selected component, or click NO the cancel the operation.
THE REMOVE SPACING ICON
The Remove Spacing icon
|
|

is used to remove the spacing between the Resources, Components, or Scenes added to a particular Channel. You can manually drag a component added to a Timeline using the mouse, but clicking on the Remove Spacing icon will do the same thing (and will save time).
In the following example, we added three Components to a Timeline.
|
|
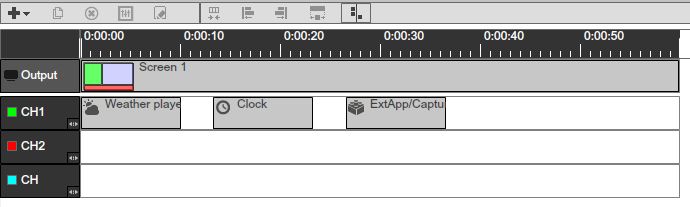
To remove the spacing between the components we added to the Timeline, you must click either on the Chanel's name, or on any of the Components residing in the respective channel followed by clicking on the Remove Spacing button.
|
|

As you can see from our example, after we clicked on the Remove Spacing icon all the Components from the respective channel aligned one next to the other, leaving no spaces between them.
|
|
THE EDIT PLAYER ICON
You'll use the Edit Player icon
|
|

to access the Properties panel of a particular Component, Resource, or Scene you previously added to a Timeline. As an alternative to the use of the Edit Player option, you can also double click on a Component and access its properties panel to apply different settings to it.
THE OUTPUT AREA
The Output of a Campaign includes:
- Timeline area
- Main Output area
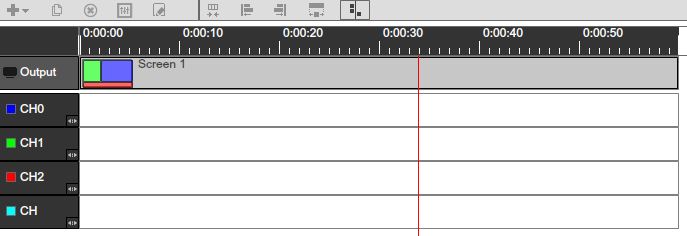
THE TIMELINE AREA OF THE OUTPUT
The Timeline area of the Output is located at the top of the Timeline. It represents the Template containing the Screen Divisions you assigned to the respective Output. Each Screen Division needs to have one Channel assigned to it.
|
|

The Output area of the Timeline includes:- 1. Output Name
- 2. Output Preview area
The Output name is located in the left side of the Timeline above the Channel names.
|
|

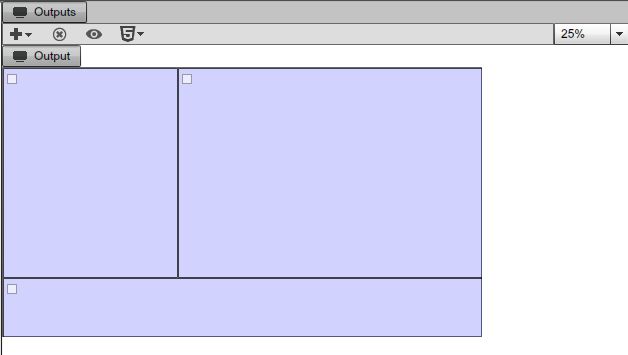
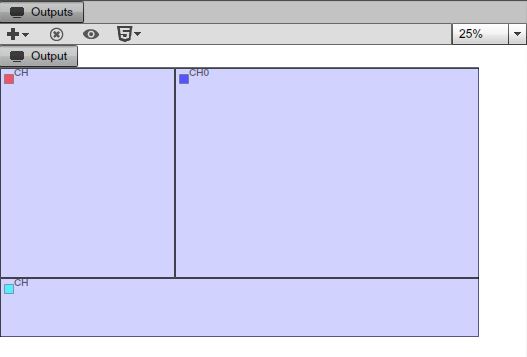
The Output preview area shows you a small graphic representation of the Template and the Screen Divisions assigned to the Output. Whenever you assign a particular Channel to a division of your Screen, you'll see its color filling the corresponding section of the Preview area.
If you didn't assign any Channels to the Output, the output would look hollow:
|
|

If you drag a Chanel into the Main Output area, the color of the respective channel fills the section of the template in the Preview. This way, you'll easily know which parts of your Screen Division have Channels assigned to them.
|
|

ADDING MORE TEMPLATES TO THE SAME OUTPUT
You can add additional screen division templates to add more diversity to your Signage Presentation; thus allowing you to change the screen division if your presentation in real time.
Step 1: Shorten the time length of the existing Output by dragging its end with your mouse.
|
|
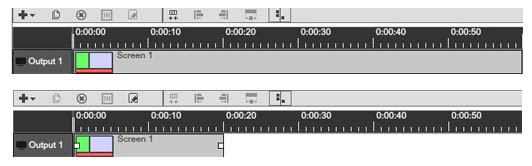
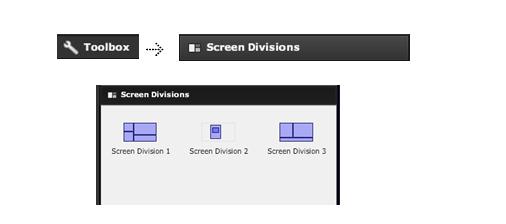
Step 2: Open the Toolbox panel and click on the Screen Divisions tab.
|
|
Step 3: Choose a Screen Division you previously built and drag it to the Timeline; next to the existing one. Now, you'll have two Templates on the same output Section.
|
|

Having the configuration from our example, the Screen Division 1 will play first on your Station, and after 30 seconds the Screen Division 3 will take over.
THE MAIN OUTPUT AREA OF A CAMPAIGN
The main output area of a Campaign is the place where you'll assign Channels to a certain Output Screen, and also the place where you can Preview any Resource, Component or Scene added to a Timeline.
|
|
Here you can add more Outputs to a Campaign delete outputs, preview outputs; among other things.
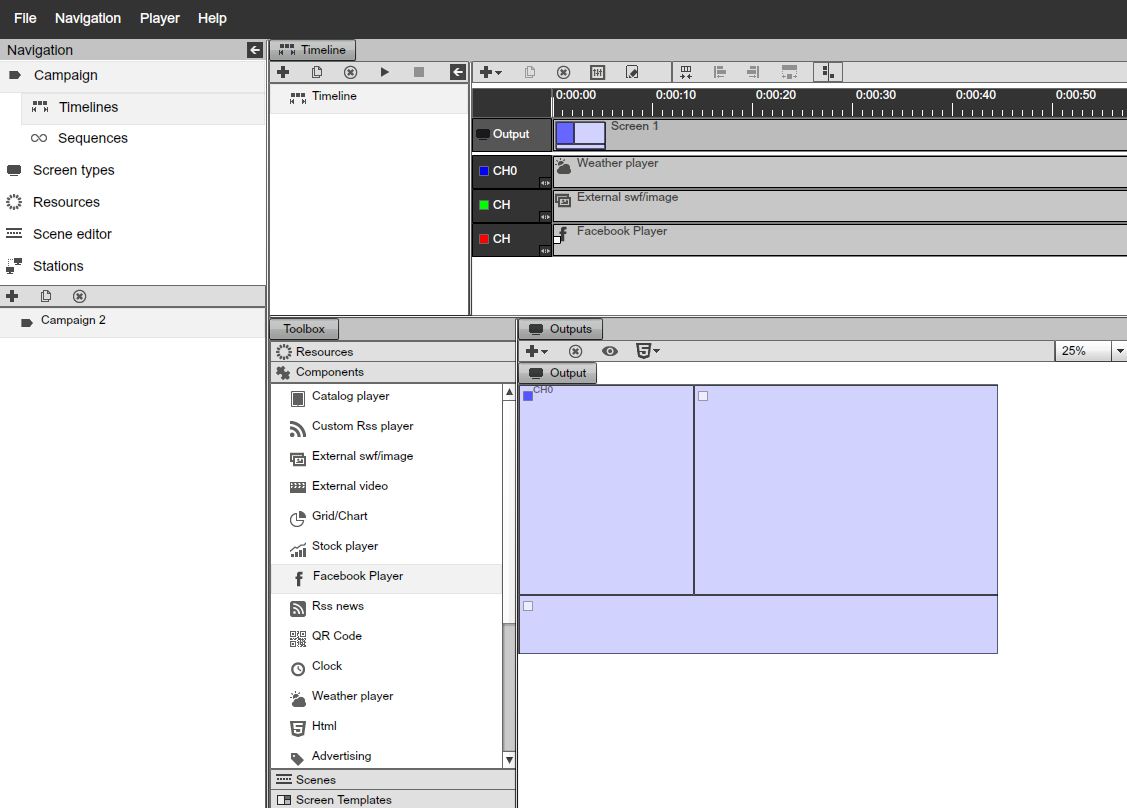
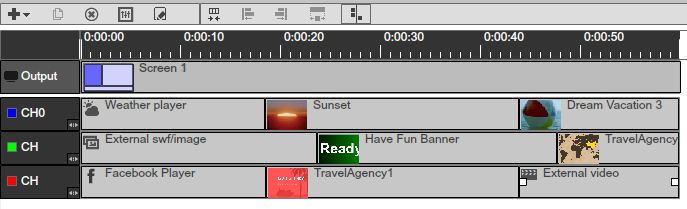
THE TIMELINE CHANNELS
Channels allow you to embed resources within them and assign them to Screen Divisions in the Main Output area. A Screen Division can have only one Channel assign to it, but you can assign the same Channel to multiple Screen Divisions templates.
There are two types of Channels:
- Local Channels
- Common Channels
LOCAL CHANNELS
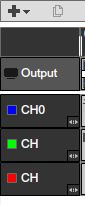
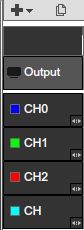
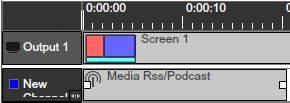
When you create a new Campaign, the system will automatically create a local Channel for every division of the screen. The Channels have a predefined color and you can change it from the properties panel. The Screen Division has four viewers which we previously drew in the Screen's section of the SignageStudio.
|
|
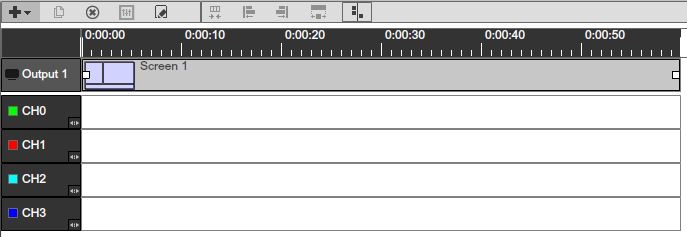
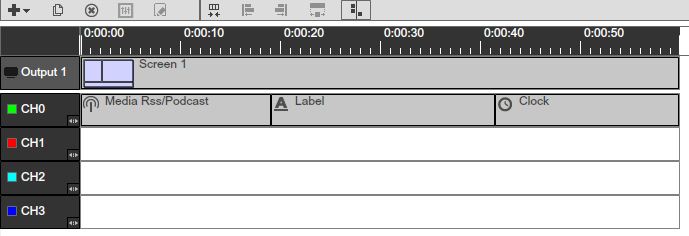
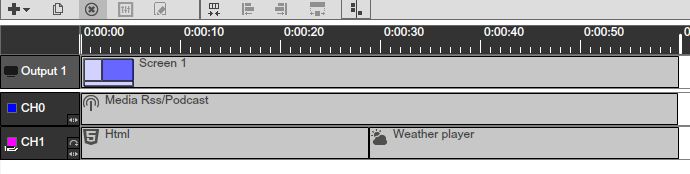
The four Channels from our example have the default names of: CH0, CH1, CH2, and CH3
Let's add some Components to the first Channel, which is CH0. We will add the Media RSS Component, the Label Component, and the Clock Component.
Drag the Components from the Components panel into the Timeline, on the first Chanel which is CH0.
|
|
ASSIGNING A CHANNEL TO A REGION FROM THE SCREEN DIVISION
To assign a particular Channel to a region or viewer in your Screen Division:
- 1. Drag the Channel from the Timeline.
|
|

- 2. Drop the Channel into a region of the Output, where you'll embed the content added to the Channel in the Timeline.
|
|
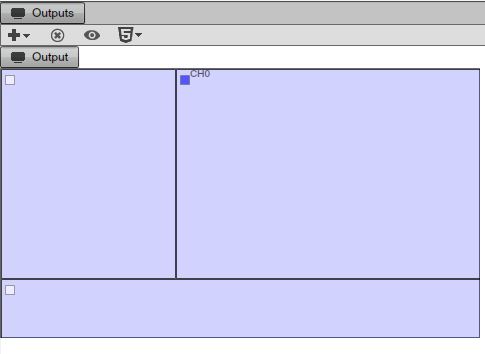
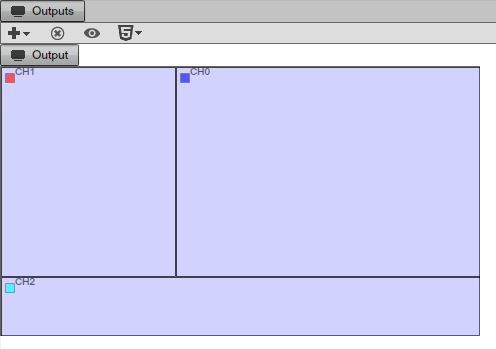
As for our example, all the Components added to the blue local Channel (CH0), will be embedded in the region located in the top right side of the Screen Division. Three more regions remain unassigned; therefore, you can add a Channel to each region.
|
|
ADDING A NEW CHANNEL TO THE TIMELINE
To add a new Channel to the Timeline you need to click on the Add icon.
|
|

After you've added a new Channel to the Timeline, you can add Resources, Components, or entire Scenes to it, you can assign the Channel to a particular division of your Screen, and you can apply settings to it.
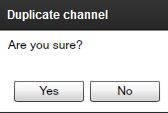
DUPLICATING A CHANNEL
To duplicate a Channel you select it and click the duplicate button from the Timeline's Toolbar.
|
|

After you click on the Duplicate button, a dialog box appears, click YES to duplicate the selected Channel.
|
|
A new identical Channel is created on the Timeline. It includes the same Resources, Components, or Scenes you added to the previous one.
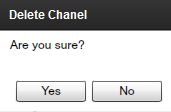
DELETING A CHANNEL
If you want to delete a Channel from the Timeline, you select the Channel and click on the Delete icon
|
|

from the Timelines Toolbar. After you've clicked on the Delete button a dialog box appears, click YES to permanently delete the selected Channel.
|
|
THE PROPERTIES PANEL OF A CHANNEL
To access the Properties panel of a certain Channel, first select it in the Timeline.
|
|

The Properties panel of a Chanel is located by at the lower right section of the user interface.
|
|
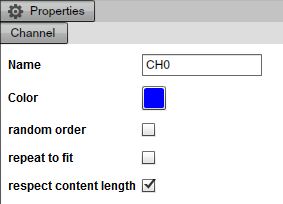
CHANGING THE NAME OF A CHANNEL
To change the Name of a Channel, select the Channel in the Timeline and then type the new name for it in the "Name" field of the Properties panel.
|
|

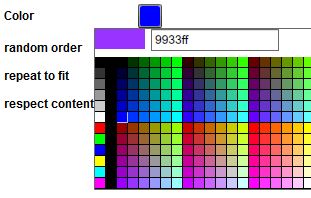
CHANGING THE COLOR MARK ASSIGNED TO A CHANNEL
Every Channel, either created with a new Campaign or added later to a Timeline, has a certain color assigned to it. This color is important as it will help you visualize the different Channels assigned to a Screen Division.
You can change the color of a Channel using the Color picker from the Properties panel. You can either enter a value in the hexadecimal field or choose a color manually.
|
|
THE RANDOM ORDER OPTION
The Random Order option is located below the Color picker in the Properties panel of a Channel.
|
|

If the Random Order, option is unchecked, all the Resources, Components or Scenes added to the selected Channel will play sequentially, one after the other, in the exact order you set within the Timeline.
If the Random Order option is checked, then all the Resources, Components, or Scenes added to the selected Channel will play randomly; making the presentation seem more unique.
THE REPEAT TO FIT OPTION
You'll use the Repeat to fit option when you want the first Component added to a Channel to play after the last one.
|
|

Example 1: We have three Resources added to a Channel, and the last one is a video file set to play in a continuous loop. With this configuration, when the video file ends, the system will automatically play it again in a loop. If you click on the first Resource from the Timeline and enable the Repeat to fit option, the system will play the first Resource right after the video file ends.
Example 2: Let's add two External Video Components to the Timeline and leave some distance between them.
|
|

If the Repeat to fit option is disabled, the gap between these files will remain and the second video will begin to play only after the gap and only for the length we previously set.
If the Repeat to fit option is enabled, both video files will play until completion, looping one after the other within the length of the Timeline.
THE RESPECT CONTENT LENGTH OPTION
The Respect Content Length option works only on videos and video related components like Media RSS. By default it's enabled. Which means the system respects whatever length you set the video to play, within the Timeline.
|
|

If you set a video file to start playing for about 10 seconds on the Timeline and leave the Respect Content Length option enabled, the systems respects it regardless of how long or short the video.
|
|
However, if you uncheck the Respect Content Length option, the system no longer respects the length of the Component you set on the Timeline. In this case, even if you shortened the Component length on the timeline, it will still play the video to completion.
|
|
This feature comes to shine with Media RSS, because you don't always know the exact length of a video with an MRSS feed, or how many videos will play in the RSS feed.
By disabling the Respect Content Length option, all the videos related to the Media RSS will play to completion within the given length of the Timeline.
COMMON CHANNELS
Common Channels allow you to reduce your management time by allowing you to reuse Channels over several Timelines within a single Campaign. We'll talk about different aspects and how to configure Common Channels.
ADDING A NEW COMMON CHANNEL
To add a Common Channel to the Timeline, click on the Add icon
|
|

from the toolbar and choose Common.
|
|
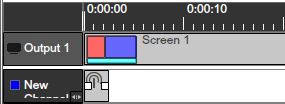
A new Channel is added to the Timeline, but notice it has a small hand over the Channel indicator. This indicates the Channel is a Common Channel.
|
|

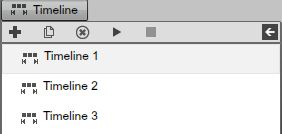
To demonstrate what the Common Channel is, we will add two more Timelines to the Campaign. Now, you have three Timelines added to the same Campaign.
|
|
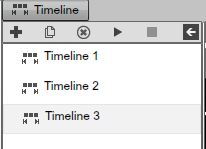
Switch to the second and the third Timeline and notice that each Timeline of the Campaign has the same Common Channel you added, thus all timelines have access to the same "shared" Common Channel.
To use the Common Channel, you'll assign it like a any other local channel to a certain region or viewer of your Screen Division. The real power of a Common Channel is the ability to change a Resource only one time, on that Channel, but have it propagate to all the Timelines.
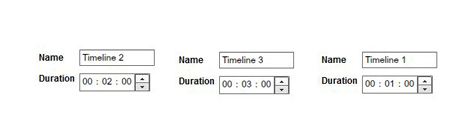
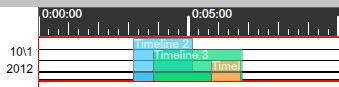
One thing not very obvious with Common Channels is that Common Channels have their own length, independent of the Timeline they reside in. For example, right now we have Timeline 1 which has a total length of 1:00 minute, Timeline 2 which has a total length of 2:00 minutes, and Timeline 3 which has a total length of 3: minutes.
|
|
So what is the total length of our Common Channel?
On our Timeline 1, which has a total length of 1:00 minute, we have a Media RSS Component added to a Local Channel and two other Components added to a Common Channel.
|
|
If you try to drag the Media RSS Component outside the length of the Timeline, you'll not be able to do so, because local Channels are limited to the boundary of the Timeline they reside in.
However, if you try to increase the length of a Resource, Component or Scene added to a Common Channel, you'll notice no limitations by the boundaries of the Timeline, because Common Channels are independent of any single Timeline.
Therefore, if you click and drag a Resource from the Common Channel to the right, you'll see it go beyond the boundaries of the Timeline, because the Channel is Common.
|
|

Common Channels are useful especially when you have multiple Timelines that are almost identical. They run the same content and the same Channels. You only want one or two different Channels. You can use your Common Channel throughout your Timelines so everything will be almost identical. You will use the local Channel only for the places you are going to have different content which doesn't appear in the rest of the Timeline.
So local Channels and the content you add to them will be limited to the Timeline they reside in, and the Common Channels will play the Content added to them throughout all the existing Timelines.
THE TIME MARKERS
Time markers (also known as Time Scale) are guides set to help you position Resources, Components, or Scenes on the Timeline.
Time markers are located at the top of the Timeline. They have vertical lines to illustrate the measurement related to the duration of a Timeline in seconds and minutes.
The shorter vertical lines represent seconds and the longer ones represent minute indicators.
|
|

THE SCALE FEATURE
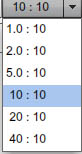
To have a clear view of the entire Timeline, especially when you are working with longer Timelines, you'll use the Scale feature.
The Scale feature is located at the top right side of the Timeline and allow you to zoom in or out from the Timeline.
|
|

To demonstrate how the Scale feature works, set the length of one of the timelines to 2:00 minutes.
|
|

You might not see the entire Timeline, depending on the size of your monitor. In this case, you'll need to use the scroll bar located beneath the Timeline and drag the slider to the right (so you can also see the end of the Timeline).
|
|

|
|
To save Time and have a complete visual control over the entire Timeline, you'll need to drag the Scale slider to the right and zoom out from the Timeline.
|
|
|
|
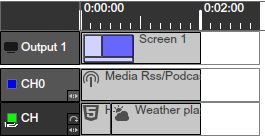
The Timeline section has decreased in size allowing you to have more control over the timing of your Timeline.
THE OUTPUTS OF A CAMPAIGN
We discussed Outputs briefly earlier. In this section we'll better understand how to use them and how to apply different settings to Outputs.
CONFIGURING THE OUTPUT
An Output is a representation of a Screen Division created in the Screen's section of the SignageStudio. The Output allows you to assign Channels in the different areas of a Screen Division, and also allows you to have visual control over the positioning of your content in a Screen Division.
MAIN OUTPUT AREA
The main Output area is located below the Timeline section.
|
|
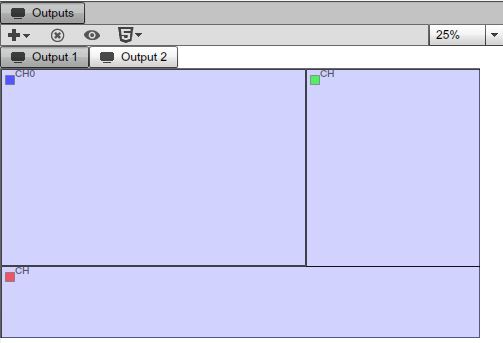
The output area is used to assign Channels and embed your content. In the image above, we added four different local Channels to the Output.
OUTPUT TOOLBAR
|
|
ADDING AN OUTPUT
You can add a new Output and use it in the same Timeline along with other Outputs. If you add additional outputs to a Timeline, after you've built your Campaign and assigned the Campaign to a Station, you'll have to select which one of the multiple Outputs you would like the Station to bind to for a particular Campaign.
To add a new Output to a Campaign, you select the first icon of the toolbar, which is the Add button.
|
|

After you click on the Output icon and on Output, a new window appears on your screen. This is the Output Wizard that guides you through the process of adding a new Output to your Campaign.
|
|
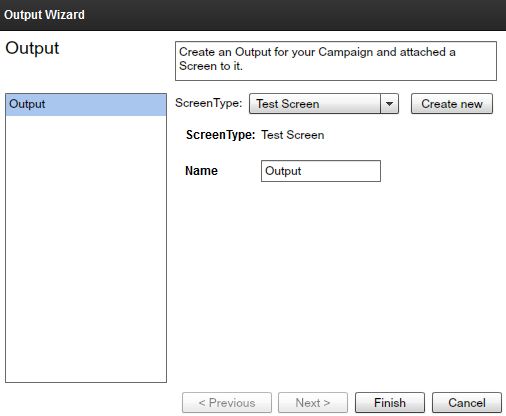
Step 1: Attach a Screen to the newly created Output.
After you open the new Output Wizard, you select a Screen, which attaches to the respective Output. You'll select a Screen from the Screen dropdown list.
|
|

Step 2: Enter a name for the Output.
To assign a name for the new Output, type the name in the Name field.
Step 3: Finish.
To exit the wizard and finish creating a new Output, click on the FINISH button.
After you've completed the Output Wizard, you'll notice a new Output was created in the Output area. You'll also notice a new Output channel appeared on the Timeline, beneath the other existing Outputs.
|
|
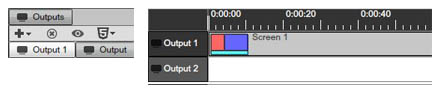
The new Output channel from the Timeline has no template assigned to it like the existing Output.
ASSIGN A SCREEN DIVISION TEMPLATE TO AN OUTPUT
After you create a new Output, you assign a Screen Division to the particular Output. You may assign one or more Screen Division Templates to the same Output channel.
To assign a new Screen Division Template to an Output, you follow three simple steps:
- 1. Open the Toolbox panel and select the Screen Divisions tab.
- 2. Drag and drop a Screen Division onto the Timeline.
- 3. Adjust the length of the Screen Division
|
|
To assign certain Channels to the Output, you need to first select the channel on the Timeline and then drag the Channels into the corresponding regions of the Screen Division.
DELETING AN OUTPUT
|
|
You have the option to click YES and delete the Campaign Screen (which is the Output), or choose NO and cancel the operation.
Deleting an Output from the main Output area results in the loss of all your configuration and settings you made on the Timeline regarding a particular Output screen.
PREVIEW IN EXTERNAL BROWSER OPTION
You can preview any Output Screen anytime by select it,
|
|

located next to the Delete icon in the Main Outputs area toolbar. To preview an Output configuration, first select the Output from the main output area and then click on the Preview in External Browser icon
|
|

After you click on the preview icon, your default browser immediately opens and the SignagePlayer web version plays the Signage Presentation associated to the Output screen.
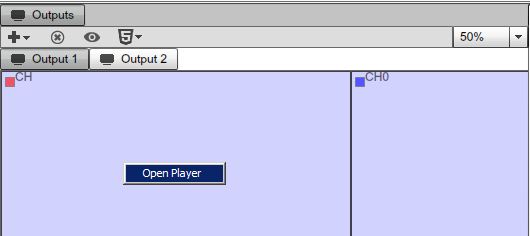
As an alternative, you can also right click on the Output viewing area and click on the Open Player option.
|
|
The SignagePlayer Web version loads the content inside a web browser. The content played can be accessed virtually from any computer. That said; the SignagePlayer Desktop version standalone application which needs to be installed on the Station/ Computer connected to your Screen.
SIGNAGEPLAYER OPTIONS
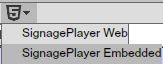
The last icon from the toolbar located in the main Outputs area is the SignagePlayer icon
|
|

- SignagePlayer Web version
- SignagePlayer Embedded version
|
|
THE SIGNAGEPLAYER WEB OPTION
After clicking on the SignagePlayer icon,
|
|

if you choose the SignagePlayer option, you'll see a new window appear
|
|

In this window you'll see the preview URL for the Presentation associated with the selected Output Screen. You can copy this URL to your clipboard and send it to others so they can preview the presentation on their PC; inside any web browser.
You can copy the Preview URL in two ways:
- 1. Click on the Copy to clipboard button
|
|

- 2. Select the Text and then click on Ctrl (Cmd) + C on your keyboard.
You can close the window by clicking on the CLOSE button.
SIGNAGEPLAYER EMBEDDED OPTION
After clicking on the SignagePlayer icon, if you choose the SignagePlayer Embedded option,
|
|

|
|
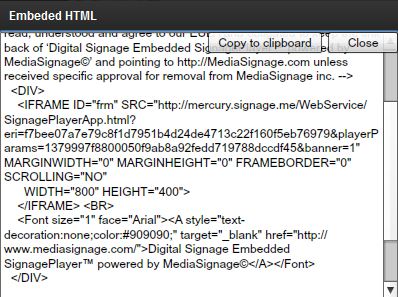
A snippet with the Embedded HTML code of your Signage SignagePlayer Embedded version can be can be copied and pasted to an HTML page.
You can copy the Embedded HTML code in two ways:
- 1. Click on the Copy to clipboard button.
|
|

- 2. Select the Text and click on Ctrl (Cmd) + C on your keyboard.
You can close the window by clicking on the CLOSE button.
OUTPUTS AREA AND ZOOM
The zoom feature allows you to have a clear view of the main Outputs area. To zoom in or out from the Outputs area, you use the drop down list containing the zoom percentage.
|
|

In the above illustration, the zoom option is set to 25%, which means the Outputs area was scale down by 75%.
|
|

|
|
PROPERTIES PANEL OF AN OUTPUT SCREEN
If you select an Output screen from the main Outputs area, you'll access its Properties panel.
|
|

The properties panel of an Output screen is located by on the right side of the application's user interface. You have two fields in the Output properties panel:
- 1. Screen Field
- 2. Name field
THE SCREEN FIELD
In the Screen field you'll see the name of the Screen you'll choose for the selected Output.
|
|

THE NAME FIELD
You can use the Name field to change the name of the selected Output screen. You can change the name of an Output screen at any time by typing the new name in the Name field.
|
|

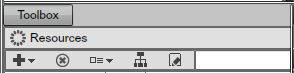
TOOLBOX
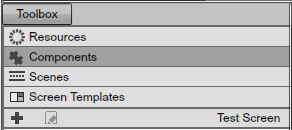
The Toolbox panel is located next to the Timelines panel. From the Toolbox panel, you can access the Resources directory, the Components directory, the Scenes directory, Screen Division directory and more.
|
|
You can drag a Resource, Component, or a Scene directly to the Timeline and assign it to a particular Channel. You may also use the Screen Divisions tab to access Screen Division Templates and drag them to the Output channels on the Timeline. After you drag a Screen Division to an Output channel you can double click on it to access its properties panel.
|
|
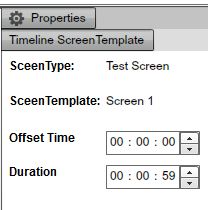
In the Properties panel of a Timeline Screen Division, you can control two properties:
- Offset Time
- Duration
The two options are available in the properties panel of any Player added to a Timeline. If you select any Resource, Component or Scene added to the Timeline, you'll also access these properties
OFFSET TIME
Using the Offset Time option, you can set a delay for a starting point of a particular item added to the Timeline. You can control the exact time in hours, minutes, and seconds when timeline item will begin playing. You can either enter numerical values in the corresponding fields, or you may also use the UP and DOWN arrows keys.
|
|

A more commonly used alternative to using this feature is done simply by dragging an item added to the Timeline, so it will start playing at a certain selected offset. Let's say you'd like the first Resource (which resides within a particular Channel), to start playing with a delay of 10:00 seconds after the Timelines began. To accomplish this, you will either set the Offset time to 10:00 seconds, or drag the item until it reaches the 10:00 seconds time marker.
|
|
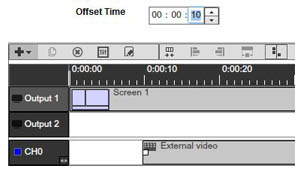
You'll notice while you're dragging the item on the timeline, the Offset changes accordingly.
In our example, all the Resources, Components, and Scenes added to the Timeline played normally; except the Video file which will start playing after a delay of 10:00 seconds.
DURATION
The second option in the Properties panel is the Duration.
|
|

You can change the duration of any item you added to a Timeline, either using the Duration feature or using your mouse and dragging the item to the left or right to increase or decrease its length.
PLAYER PROPERTIES PANEL
Each time you add a Component, Resource, or Scene to a Timeline, the System will interpret it as a player; a player which will play the content within it.
By selecting a Player, no matter if it's a video, a picture, a Weather Component and so on; you'll access its Properties panel. The Properties Panel of a Player contains the options of Offset Time, Duration, and enable KIOSK inputs for a particular timeline item.
|
|
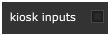
By enabling the Kiosk inputs, you let the system know the selected Resource may be accessed by a Kiosk machine and users can interact with it.
DIRECT ACCESS TO RESOURCES
When you click on the Resources tab from the Toolbox in the Campaign section, you have access to all the options related to Resources (as in other Sections of the SignageStudio). Here you can add new Resources, delete Resources, and search for a particular resource using the search feature and more.
|
|
ADDITIONAL OPTIONS WITHIN THE TIMELINE
- THE RIGHT CLICK / CONTEXT MENU
After you've added something to the Timeline, either a Component, Resource, Scene, or Screen Division Template, you can right click your mouse on it the item and access the context menu. You can also access the same menu by right clicking on an empty area of the Timeline.
The menu contains the following options:
- 1. Copy
- 2. Paste
- 3. Delete
- 4. Add Local Channel
- 5. Add Common Channel
- 6. Edit Player
|
|
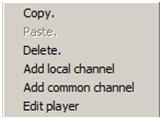
If you right click on an Output, the Copy, Paste and Delete options are not available from the right click menu.
In the case of Channels and Screen Division Templates, the Copy and Paste options are not available.
COPY / PASTE FUNCTIONS
To save valuable time, if you want to use the same Resource, Component, or Scene you already added to a Channel with other Channels, you can COPY the item from a Channel and PASTE it to another Channel.
DELETE OPTION
You can use the DELETE option from the right click menu as an alternative to other Deleting procedure we've covered, which is done by selecting the item you want to delete and clicking on the delete icon from the toolbar.
|
|

Another option to delete an item from the Timeline is to select it, and then press on the DELETE key on your keyboard.
ADD LOCAL CHANNEL / COMMON CHANNEL
Instead of using the ADD icon
|
|

to add a local or common Channel to a Timeline, you can choose to right click on an empty area (as an alternative, or an item from the Timeline), and choose to add either a local or a common Channel to the Timeline.
EDIT TIMELINE ITEMS
If you want to edit the Properties of a certain item you added to a Timeline, you can use the Edit player option from the right click menu.
Additionally, you can also click on the Edit icon,
|
|

or double click the respective item to edit its properties in the Properties panel.
A Timeline consists of one or more local or common Channels you'll use to build your Campaign. You assign Channels to an Output Screen, each Channel to a certain region or viewer, and then you add items to you Channels. These are the basic principles of building a Campaign, but to keep things organized you need to pay attention to certain details.
OVERLAPPING ITEMS
When you add multiple items to a Channel, you must avoid overlapping them. When you grab one of the sides of a certain item and drag it to the left or right to control its length, make sure you don't accidentally cross over other items on the Timeline.
For example, let's add two items to a single Channel, one External Video Component and one Picture.
|
|

Both our items cover the full length of the Timeline. If we want the External video to play for a longer period we must drag its right end, but this way, we'll overlap the picture.
|
|

To avoid this, either you increase the length of the Timeline, or you shorten the length of the picture so both items can play correctly on the same Channel. You can also click on the "Remove spacing" to align items on a channel.
|
|

Continuing with the same example from the above section, let's assume we want to shorten the length of the External Video Component.
|
|

If we drag the end of the External Video Component to the left, it shortens its length, but it will leave an empty area between the two items. In this case either you add a third item to the channel between the two existing ones, or you drag the picture item to the left and fill the empty area. Always make sure not to leave empty spaces between items added to the Timeline.
CHECK TIME MARKERS
When you add different items on a Timeline always check the Time markers (time scale) so it will assist you in setting and positioning the content at the right place on the Timeline.
VIDEO FILES AND THE TIMELINE
As we discussed earlier in this Chapter, Timelines are used as a host for your Resources, Components, Scenes, and bind into Screen Templates where channels are assigned.
When you're adding items on a certain Channel, you can set their length and change properties. You can add multiple items to the same channel. Those items can play sequentially or randomly inside your Campaign.
Having a diversity of items added to the same Timeline also require some attention as for the type of items you are using, therefore, you need to make sure when you build your Campaign you don't create any conflicts between the items you add to the Timeline.
For example, if you add a Video resource to a Channel and another Video file to a different Channel, you'll have a sound conflict, since both files play the sound associated with one video file will interfere with the sound associated with the other video file.
|
|

To avoid this kind of sound conflict, you must adjust some of the properties of one of the video files, like setting the volume to mute for one of the two video files.
PROPERTIES PANEL OF VIDEO FILES
When you access the Properties panel of a Video file, you can click on the VIDEO tab
|
|

and apply additional settings to the selected video file.
|
|
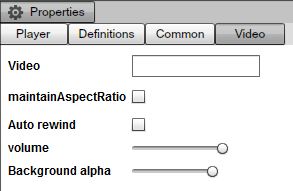
MAINTAIN ASPECT RATIO
If the maintain Aspect ratio is set to off, a video will occupy and fill the entire screen division; of course this may result in skewed content if the video's dimensions do not match those of the screen division. Turning the feature on, will keep the videos ratio of width to height, but may result in an added black stripes around the videos content box.
|
|

AUTO REWIND
The auto rewind option is only available in the case of Video files.
|
|
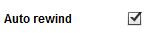
If you enable the Auto rewind option, when the Video file completes playing on the Timeline, it will automatically rewind and play again in a loop (within the length of the respective Timeline).
Enabling the Repeat to fit option
|
|

for the Channel wherein the respective video file resides, overrides the auto rewind option and the video file will not loop.
VOLUME OF A VIDEO FILE
In the properties panel of a Video file is the ability to control the sound of the video file. To increase or decrease the sound of a video file, you'll use the Volume slider.
To control the volume of the video file, drag the slider. Having the volume slider at 0 will mute the selected video file.
|
|

BACKGROUND ALPHA
You can control the visibility of the Background associated with the selected Video file by using the Background Alpha option. Use the slider to control, the Background Alpha option. Only videos produced and compiled with a background Alpha value of 0 can be set transparent.
|
|

SEQUENCES AND THE SCHEDULER
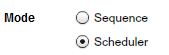
In the Campaign section of the SignageStudio you can set a Campaign mode to either Sequence or Schedule.
SEQUENCES
The sequencer is essentially a simple and effective way to serially set the play list order of all the timelines. This is done using simple drag and drop operation.
If you select a particular Campaign and go to its properties panel, you can set its mode to Sequence.
|
|

Sequencing is a Timeline playlist order you can use to control which Timeline plays and in what order. To demonstrate how the Sequencer works, we need to add a few Timelines to our Campaign. Earlier in this Chapter we demonstrated how to add multiple Timelines to a Campaign.
Let's add three Timelines to our campaign. Each Timeline can be configured differently, can a have a different length (which is the duration of playtime), different resources, and can be configured at a different screen resolution.
|
|
Next, to control the Sequencing order, select the Campaign mode to Sequence, and then click on the Sequences tab, located under the Campaigns and Timelines tabs in the main Navigation menu
|
|
When you click on the Sequences Tab,
|
|
you'll gain access the Sequences section of the SignageStudio.
|
|

The Sequences section contains three panels:
- 1. Toolbox Panel
|
|

- 2. Sequences Panel
|
|
- 3. Properties Panel
|
|

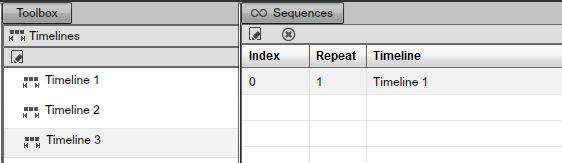
TOOLBOX PANEL
In this Toolbox panel, you'll see a list of all the Timelines you've created.
|
|

SEQUENCES PANEL
The Sequences panel represents the playlist of your Timelines. To control the order of Timelines, you need to select a Timeline from the Toolbox panel, then drag and drop it into the Sequences area. We will drag all our Timelines, one by one to the playlist.
|
|
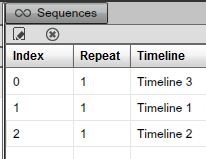
In our configuration, the playing order of the Timelines will be as follows:
- Timeline 1 (which plays on the Output Screen)
- Timeline 2
- Timeline 3
If you want to change this configuration, for example, you want Timeline 3 to be the first Timeline to play followed by the other Timelines; you must click on the Timeline 3, and drag it on top of the other within the play list.
|
|
SEQUENCES PANEL
The Sequences panel has three columns:
- Index
- Repeat
- Timeline
INDEX
The Index directory contains numerical values for each Timeline added to the Playlist.
|
|
Timelines with lower values play before Timelines with higher values. Value 0 represents the first Timeline to play on your Output Screen; value 1 represents the next one and so on. The Index indicates the playing order. You'll organize the Timelines better after you've dragged them into the Playlist.
REPEAT
After you set the order the Timelines play in, you can choose to repeat one or several Timelines before the other starts playing.
|
|
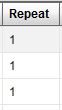
The default numerical value for the Repeat feature is 1, meaning a Timeline plays once and then the next Timeline starts playing.You can change this value in the Properties panel of a Sequence
SEQUENCE PROPERTIES PANEL
If you select a Timeline in the Sequences panel, you can access the Properties panel of the Sequence.
|
|
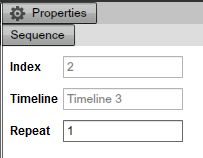
The Properties panel contains three fields:
- Index
- Timeline
- Repeat
These fields correspond to the columns located in the Sequences panel.The Index and the Timeline fields are non-editable fields. You can use them to check the index order and the name of a particular Timeline.
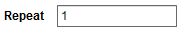
REPEAT FIELD
To set the repeat value for a certain Timeline you enter the corresponding number in the Repeat field of the Properties panel.
|
|
If you want Timeline 1 to repeat playing for three times and Timeline 2 and Timeline 3 follows in the playing order.
First, you select Timeline 1 and change the repeat value from the default 1 to 3.
|
|
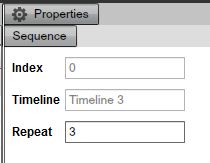
After you've typed the value 3 in the Repeat field of the Properties panel, you'll notice in the repeat column of the Sequences panel, the repeat number corresponding to the Timeline 1 has been updated accordingly.
|
|
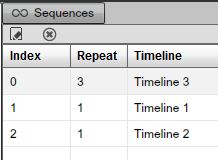
In this case, the first Timeline in the playing order will be Timeline 1, which will play three Times before Timeline 2, and then Timeline 3 will follow.
ADDING TIMELINES TO PLAYLIST
In the example below we used three Timelines and set the index order to Timeline 1, then Timeline 2, and Timeline 3 in the playlist.
|
|
Having this configuration, after Timeline 3 finishes playing, Timeline 1 will start playing, Timeline 2, and Timeline 3; again and so on in a continuous loop.
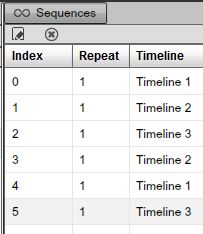
Now, let's assume you would like to configure the playlist to look like this:
Timeline 1Timeline 2Timeline 3Timeline 2Timeline 1Timeline 3
You only have three Timelines added to the playlist now. You can only change the order of these Timelines. To configure this example, you need to drag the same Timelines first to the playlist, and then set the playing order for each Timeline.
|
|
If we have three Timelines in the Toolbox and add Timeline 1 to the playlist, but not the other two, only Timeline 1 will play on your output screen. Thus it is important you remember to add your Timelines to the Sequence playlist.
|
|
DELETING A TIMELINE FROM THE SEQUENCER PLAYLIST
You have two options if you want to delete a Timeline from the sequencer playlist.
- 1. Select the Timeline and then click on the DELETE icon.
|
|

- 2. Right click on the Timeline and choose DELETE.
|
|
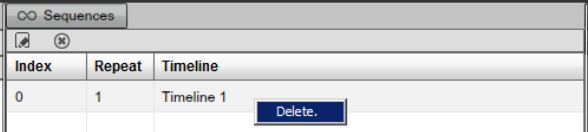
After you choose Delete, a dialog box appears on your Screen.
|
|
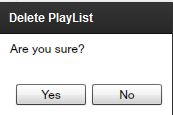
Click on YES to DELETE the selected Timeline from the playlist, or click on NO to CANCEL the operation.
THE SCHEDULER
The Scheduler allows you to set your timelines to play any day and play anytime. Use the scheduler to set the exact start and stop times. A graphical user interface is used to get a summary of all future playlists and easily resolves conflicts.
The Scheduler allows you to build a programming guide for your Digital Signage Presentation. You can use a Scheduler instead of using the Sequencer. You must choose between these two options available for your Campaigns.
The Sequencer is simpler than the Scheduler. It allows you to play your Timelines one after the other in a sequential order.
The Scheduler is more flexible as it allows you:
- Flexibility of playing each Timeline only once
- Playing each Timeline on a repeat daily scheduler
- Playing each Timeline on a repeat weekly basis
- Set priorities on the Timelines to resolve schedule conflicts
To use the Scheduler instead of the Sequencer, you change the mode of a Campaign. Click on the Campaign and set the mode to Scheduler.
|
|
After you set the Campaign mode to Scheduler, you'll notice under the Campaign tab in the main Navigation menu, the Sequences tab has been replaced by the Schedules tab.
|
|
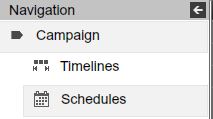
If you click on the Schedules tab, you'll access the Scheduler user interface.
|
|
SCHEDULER USER INTERFACE
The Scheduler user interface contains the following sections:
- 1. Schedule Area
- 2. Toolbox Panel
- 3. Rules Area
- 4. Properties Panel
SCHEDULE
The Schedule area is where you define the days you want your Timelines to play. It has two sections:
- Calendar
- Schedule Playing Area
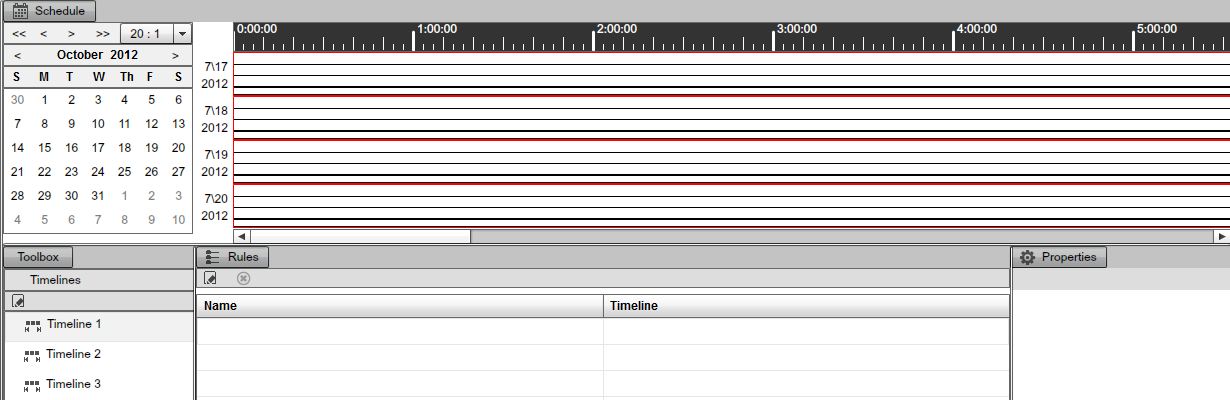
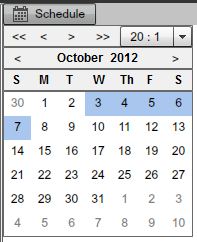
THE CALENDAR
The calendar is a useful tool which will help you organize your scheduler. Before we demonstrate how to use the calendar, let's take a look at its user interface.
|
|
ZOOM OPTION
At the top left of the Calendar user interface is the zoom option.
|
|
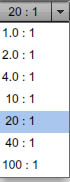
You'll use this option to zoom in and out from the Schedule playing area, which is located on the right side of the Calendar.
|
|
DATE NAVIGATION
|
|

To navigate day-by-day in the Calendar, use the single arrow icons.
|
|

Click on the left single arrow to navigate backwards one day, or click the right single arrow to navigate forward one day.
To navigate week-by-week, use the double arrow icons.
|
|

Click on the left double arrow to navigate one week backward, or click the right double arrow to navigate forward one week.
When you open the Scheduler, you'll notice the calendar is set to the current date.
|
|
By holding down the control key, you can select additional days. You can set days anytime within the month, and you can set date ranges. Hold the CTRL key and use your mouse to click the days you'd like your presentation to play. As you select more days, you'll notice they're added to the Schedule.
|
|
You can also hold the shift key on your keyboard, click on the first day of the month, for example, and on the last day of the month to select the whole month.
This is a convenient way for you to select particular days within a month, and to have a good graphical view of what's happening within a specific month.
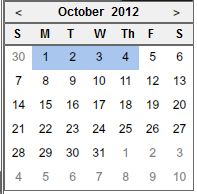
Another neat feature in the calendar is the ability to set a particular pattern when selecting days. Let's demonstrate this feature by selecting four days within the first week of the month. Hold down the CTRL key on your keyboard and use your mouse to select four days.
|
|
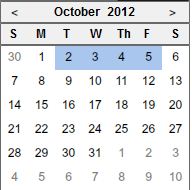
If you want to keep this selection, move it one day ahead with the selection, click on the right single arrow from the daily navigation, and you'll notice the whole selection moves one day forward.
|
|
The pattern is still consistent. It's jumping one day, but it's moving forward. You can click on the left single arrow to see the pattern is still persistent, but it moves one day backward.
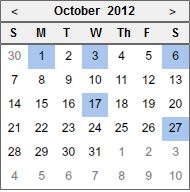
This is a useful feature which also allows you to keep the same pattern of random selected days. For example, hold down the CTRL key on your keyboard and select a few random days.
|
|
Now navigate one day forward or backward using the single arrow key. You'll notice the pattern is still persistent.
You can also use the weekly navigation buttons to navigate one week ahead, or one week backward, and still keep the selected pattern.
Using the pattern feature, you can set up elaborate schedulers and use this mechanism to move back-and-forth to view a particular pattern.
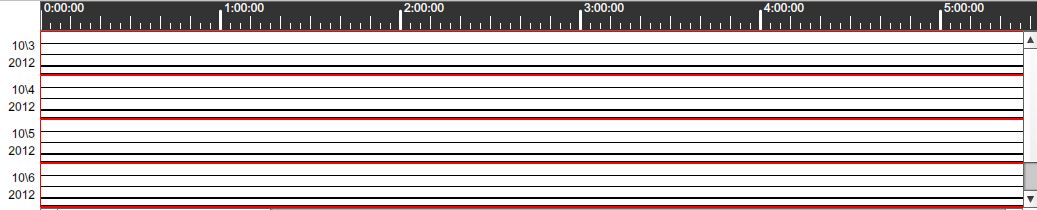
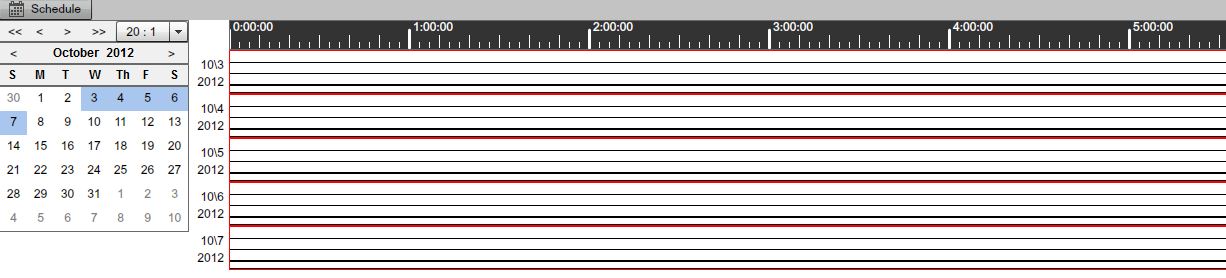
SCHEDULE PLAYING SECTION
The Schedule Playing section (located next to the Calendar user interface), is where you'll drag your Timelines and set them to play at specific times within the days you selected using the calendar.
In the next illustration, we've selected from the calendar the 25th day of month. Therefore, this day is automatically added to the playing schedule.
|
|

If we want to zoom out on the schedule, drag the zoom slider all the way to the left and use the scroll bar to navigate to different hours.
|
|

If you want Timeline 1, for example, to play on this particular day, the 25th, starting at 9:00 AM, drag it from the Toolbox and drop it on the Schedule playing section. Position the Timeline at the 9:00 AM time marker.
|
|
TOOLBOX
The Toolbox contains a directory list of your Timelines. To add a Timeline to the Schedule, you must drag it from the Toolbox to the Schedule playing section.
|
|
RULES
Whenever you add a Timeline to the Schedule playing section, you create a Rule. You can see a directory of all your Timelines in the Rules panel, located next to the Toolbox panel.
|
|
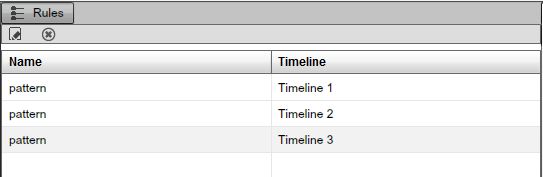
The Rules section has two columns:
- Name
- Timeline
The default name of a Rule is Pattern.
TIMELINE
In the Timeline column, you'll see a directory of all the Timelines added to the Schedule playing section.
DELETING A RULE
If you wish to delete a Rule, first you select it and then you can either click on the DELETE icon,
|
|

or right click on any rule listed and choose DELETE.
SCHEDULER PROPERTIES PANEL
If you click on any Timeline from the Rules panel, you'll gain access to the Scheduler properties panel (located by default on the bottom right side of the user interface).
|
|
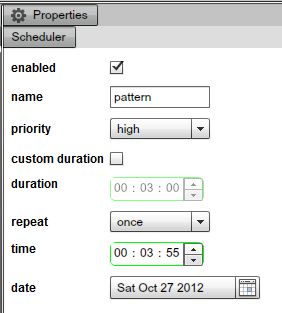
ENABLING A RULE
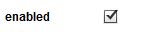
After you set up a rule, you can decide to temporarily DISABLE it or ENABLE it. This is a useful feature, as it allows you to control the schedule playing of a Timeline without the need to delete and recreate a rule each time you want to remove it from playing in a particular time.
To enable / disable a selected Timeline, use the enabled checkbox.
|
|
RENAME RULE
The default name of a rule is pattern, but you can change it anytime. To change the name of a pattern type the new name in the name field from the properties panel.
|
|

PRIORITIZING RULES
If you have multiple Timelines playing on the same day and in the same interval of time, you can use the priority feature to prioritize one Timeline over another.
Let's assume you have Timeline 1 and Timeline 2 playing at almost the same time, on the same day, overlapping each other.
|
|

In this case, you'll want to choose which Timeline will play prior to the other. We'll use the priority feature to set different priority levels for the two Timelines.
We will set, for example, the priority level for Timeline 1 to: high
|
|

And for Timeline 2, we'll set the priority level to: low
|
|

In case you have 3 or more Timelines overlapping, you may also choose the medium priority option.
|
|

When you select a Timeline and choose a certain priority level, you'll notice in the schedule playing section the color and the size of the Timeline graphical interpretation is changing as follows:
|
|
If you select a Timeline and change its priority level to high, its graphical representation will change its color to a light orange and its size will decrease.
|
|

If you select a Timeline and change its priority level to medium, its graphical representation will change its color to a light green and its size will be bigger than in the case of the high priority level.
|
|

If you select a Timeline and change its priority level to low, its graphical representation will change its color to a light blue and its size will be bigger than in the case of both high and medium priority levels.
|
|

Having different colors and sizes for your Timelines will help you better organize your priority levels in your schedule and avoid schedule conflicts.
DURATION OF A RULE
The default duration of a rule is 1:00 minute. To control the duration of a rule you have two options:
- 1. Use the default duration of 1:00 minute
- 2. Set a custom duration
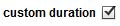
To set a custom duration for a particular Timeline, first you must select it in the Rules panel and then enable the custom duration option in the properties panel.
|
|
After you enable the custom duration option, you can do the following:
- 1. Set the new duration in the designated fields. You can either type numerical values for the hours, minutes and seconds, or you can use the small UP and DOWN arrows.
|
|

- 2. Drag the sides of the Timeline to the either LEFT or RIGHT to control its length.
|
|

REPEAT RULES
If you select a Timeline in the Rules panel directory, you can choose from three different repeat options.
- 1. Repeat Once
- 2. Repeat Daily
- 3. Repeat Weekly
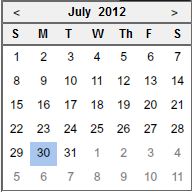
The repeat once option allows you to set a particular Timeline to play only once, at a specific date and time. You can set the date by clicking on the default date and using the calendar.
|
|

In the above illustration, the Timeline we selected will start playing on 10/01/2011 at 08:28:58 hours, and after its duration ends, it will stop playing because we set it to play only once.
The repeat daily option allows you to set a Timeline to start playing daily, at a certain time and between specific two specified dates.
Let's say for example we want to play the selected Timeline throughout the whole week, from Monday to Sunday, starting 10/01/2011 and set the start hour to be 08:25:58. This will be the correct configuration:
|
|

With this settings applied, the selected Timeline will play every day starting with the specified time, until the weekends.
The repeat weekly option will allow you to set a Timeline to play on certain days between two specified dates, starting with a defined time.
Let's assume we want to play the selected Timeline on every Monday, Wednesday, and Friday, starting with 10/31/2011 and ending with 12/31/2011, beginning with 08:25:58 hours. This should be the correct settings:
|
|

To demonstrate the features of the Scheduler, we'll set up an example where we'll add a few Timelines to the Scheduler and program them so they will play on our output screen on certain days of the week and at certain hours.
SETTING UP A SCHEDULER - EXAMPLE
For this example, we have created one Campaign and added three Timelines to the Campaign, We changed the Campaign mode to Schedule, and we are ready to customize the Scheduler options for the three Timelines.
Step 1: In the Calendar user interface, click on the 1st day of the month, hold down the Shift key on your keyboard, and click on the last day of the month. This operation will select the entire month.
|
|
You'll notice all the selected days are now associated with the Schedule playing section.
|
|
Step 2: Drag Timeline 1 to the Schedule playing section and position it to start playing at 8:30 AM.
|
|

Step 3: Drag Timeline 2 to the Schedule playing section and position it at 8:45 AM mark.
|
|

Step 4: Drag Timeline 3 to the Schedule playing section and position it so will start playing at 9:00 AM.
By now, you should have three Timelines added to the Schedule playing section. The first Timeline will start playing at 8:30 AM, the second at 8:45 AM and the third one at 9:00 AM.
|
|

Step 5: Select Timeline 1 from the Rules panel and let's apply some settings to it in the Scheduler properties panel.
|
|

Step 6: Make sure the Timeline it's enabled and type a new name in the name box.
|
|

Step 7: Set the duration of the Rule to 3 minutes.
|
|

Step 8: Set the Repeat option to weekly.
|
|

Step 9: Set the starting time at 8:00 AM.
|
|

Step 10: Set the start date to be 12/01/2011 and the ending date to be 01/05/2012.
|
|
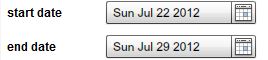
Step 11: Set the rule to play only on Sundays, Mondays, Fridays, and Saturdays of the selected period.
|
|
With the above settings, we have configured a Timeline to play at certain Times, on certain days and to start at a predefined hour.
BUILDING YOUR FIRST CAMPAIGN
By now you should be comfortable with importing resources, creating Screens, building Scenes and using Components, and adding items to the Timelines using local and common Channels and building Campaigns.
In this section we'll build a new Campaign from scratch, and in the same time we'll recap all the Chapters we have discussed up to now in this book.
In the following example, we will cover the following steps necessary to create a Campaign from scratch.
- 1. Defining the general layout, the Background and masks of the presentation
- 2. Importing resources to the server and organize them into folders
- 3. Creating Screens and drawing screen divisions
- 4. Building a Scene and using some Components
- 5. Creating a new Campaign
- 6. Adding items to the timeline and manage them
- 7. Adding another Output the Campaign
- 8. Adding another Output Screen Template to the Timeline
- 9. Using multiple Timelines, local Channels and common Channels
- 10. Appling different settings to items added to a Timeline
- 11. Managing multiple Campaigns
- 12. Previewing the final Presentation
EXAMPLE - BUILDING A CAMPAIGN FROM SCRATCH
Step 1: In this first step, we need to define the layout of our signage presentation; how it will look, what the design will be and where we'll place our resources on the screen. You can use Flash, Photoshop or other software programs to create a Background from scratch, or you can use a prebuilt mask from the Media Signage shared library. We'll use this for the main layout masks we import from the MediaSignage shared library.
Step 2: You know how the general layout of your presentation will look. Now it's time to import files in the resource library. First, we will import the Masks.
Click on the Resources tab from the main navigation menu and choose Add from shared.
|
|

Select two premade mask from the library and click OK.
|
|
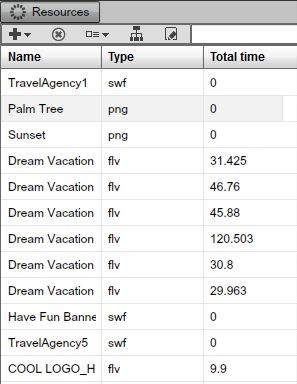
Next, we'll add a few pictures to the Resource library and assign a folder named Pics for all the imported files.
|
|

Now we have all the pictures in their special folder. We need to create thumbnails for each picture.
|
|
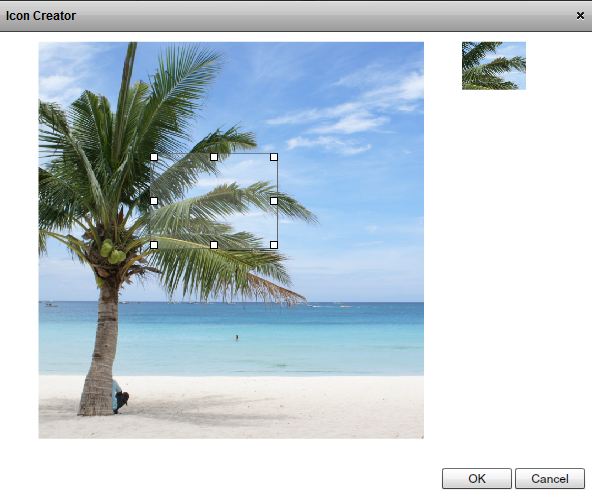
We've imported 8 pictures for our example and named them from Picture 1 to Picture 8.
|
|
At this point, we have imported two Masks and 8 pictures for the Presentation. The next step is to create Screens and setup the Screen Divisions.
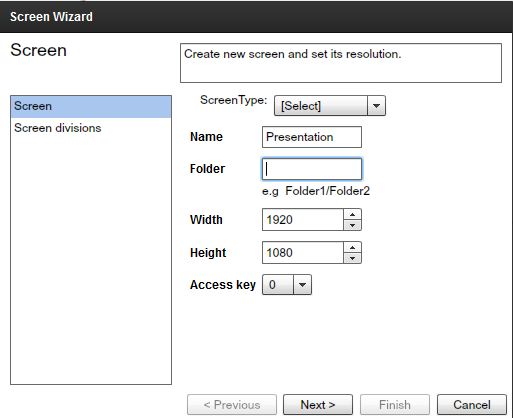
Step 3: Click on the Screens tab from the main navigation menu. Create a new Screen using the Screen wizard, set the resolution to 192 x 1080 pixels, and name it First Presentation.
|
|
Now, take a look at the first imported mask and notice it has 5 transparent areas. You need to draw a region for every empty spot on the mask. We'll name the regions from 1 to 5.
|
|

For the mask, draw a full screen region which will be on top of all the other regions/viewers.
|
|
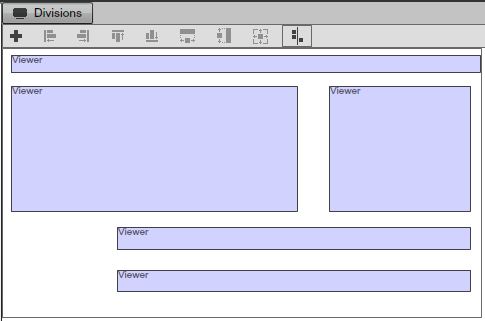
Creating Screen Divisions that will be used with masks can be difficult sometimes, but if you pay attention to the exact position and size of the transparent areas from your masks and use them for the regions you draw, you should have no problems.
For example, if the empty area number 1 from you mask is 1920 x 100 pixels wide, the corresponding region / viewer for the Screen Division should have the same size. Also the x and y positions should be the same.
After you finished the configuration for the first mask, analyze the second mask and define divisions for this mask as well. You'll have four regions, three for the empty areas and one for the mask itself.
|
|
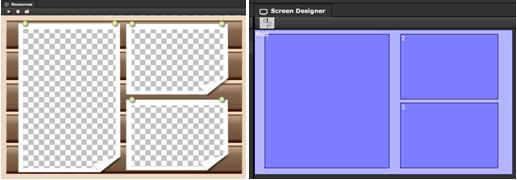
Now, create a third Screen Division and draw only one region which will have 1920 x 1080 pixels.
|
|
Step 4: At this point, we have configured one Screen and three Screen Divisions. We will now use some Components and build a Scene.
First, let's click on the Scene editor tab so you can access the Scenes area of the application. We create a new Scene which has the same width and height with region 2, from the second Screen Division, which are 400 x 400 pixels. Depending on the mask you choose and the design of your layout, the numbers might be different.
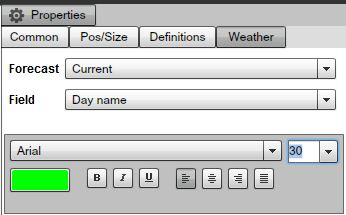
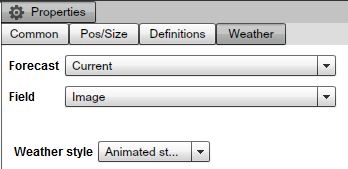
Choose a color gradient background for the Scene and add three weather items.
Apply the following settings to the first weather item:
|
|
Apply the following settings to the second weather item:
|
|
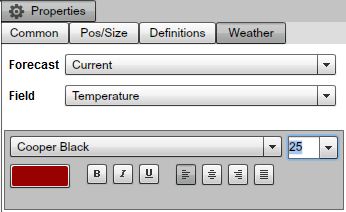
Apply the following settings to the third weather item:
|
|
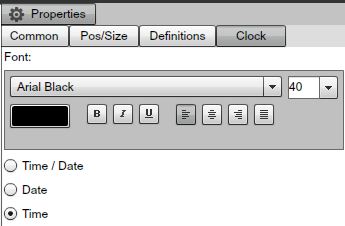
Add the Clock Component to the scene and use the following settings:
|
|
Feel free to experiment and try different settings for the components and for the scene.
We created a simple Scene for this example, containing three Weather items and one Clock Component.
|
|
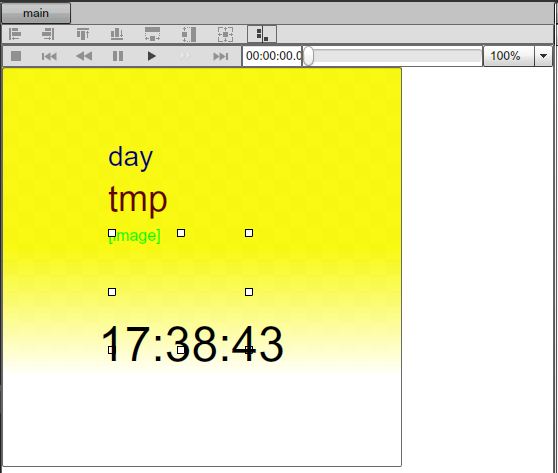
Now we will create a second Scene using a prebuilt Stock component. Simply click in the import Scene icon and import from the Shared library a Stock simple Scene.
|
|
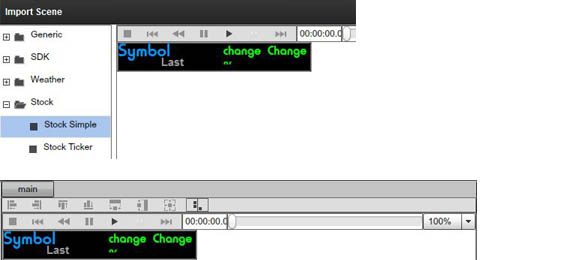
Step 5: Now that we have our Screen, the Screen Divisions are set and we even created a Scene, it's time to build a new Campaign.
Click on the Campaign tab to access the Campaign area and use the Campaign wizard to create a new Campaign and use the following settings.
|
|

Step 6: Remember we've created three Screen Divisions. For the first Timeline of this Campaign, we used the Screen Division 1 as the Output template.
|
|

As you can see, when we created the new Campaign, channels were automatically assigned to each region of the Screen Division. To keep things organized, we will rename all the channels in our example, according to the content we wish to embed in each region. Before renaming the Channels, delete one of the Channels and add a Common channel instead.
|
|
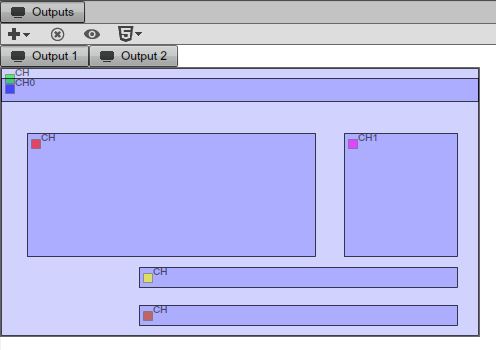
Now we have in our example six Channels:
-Mask
-RSS News
-Media RSS
-Pictures
-Label
Next, we will add items to these Channels and customize them.
MASK
On the Mask Channel, we'll add the Mask 1 we've imported from the shared library. After you drag the Mask to the Timeline from the Resources directory, increase the length of the resource so it matches the length of the Timeline.
|
|

RSS NEWS
On the RSS News Channel, drag the RSS News Component and increase its length so it matches the Timeline.
|
|

|
|
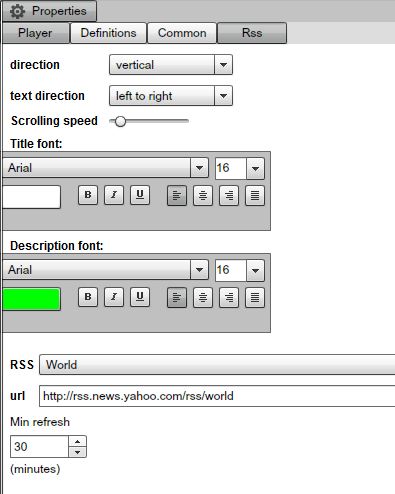
We customized the RSS News Component so it'll scroll vertically and show world news related feeds.
MEDIA RSS
On the Media RSS Channel, drag the Media RSS/Podcast Component and increase its length so it matches the Timeline.
|
|
Double click the Media RSS Component and apply the following settings to it:
|
|

We have now a Media, RSS Component on the corresponding Channel on the Timeline.
PICTURES
On the Pictures Common Channel, drag Pictures 1 to 6 that were imported in the Resource directory and set the duration of each picture at 10 seconds. The Timeline has a total length of 60 seconds.
|
|
After you set the duration of each picture to be 10 seconds long, use the remove spacing feature to arrange the pictures on the Timeline.
|
|

|
|

At this point we set the pictures to play sequentially on the Timeline. Each picture will play for 10 seconds.
LABEL
The next empty Channel is named Label. Drag the Label Component on this Channel and increase its length so it matches the Timeline.
|
|
Double click the Label Component and apply the following settings to it:
|
|
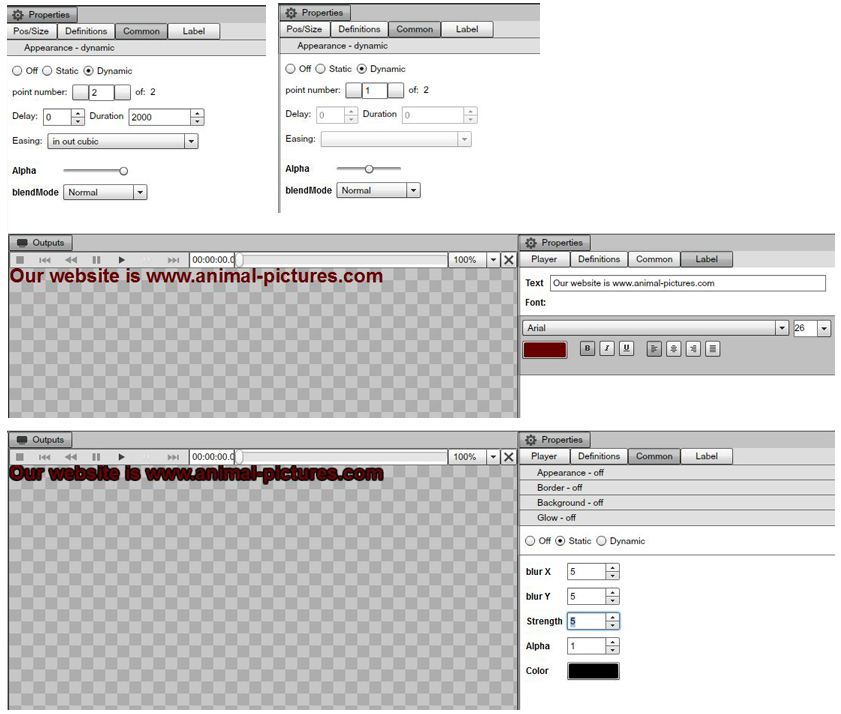
Now we a customized Label component added to the timeline.
STOCK
The fifth and the last Channel of this first Timeline, is named Stock. Drag the Stock player Component to the Timeline and increase its length so it matches the Timeline.
|
|

Double click the Stock player Component and drag the Simple Stock Scene into the Scene field.
|
|

At this point, we added all the items we wanted to the corresponding Channels and we managed to configure our first Timeline.
ADD A SECOND OUTPUT TO CAMPAIGN
Next, we will add a second Output to the Campaign. Use the Output wizard to define a new Output.
|
|
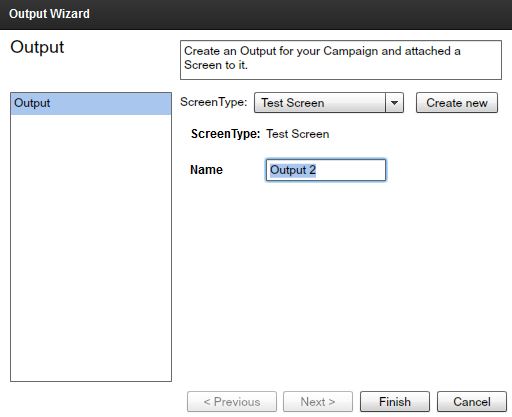
You'll notice a new Output appeared on the Timeline.
|
|

Drag the Screen Division 3 to this new Output Channel.
|
|
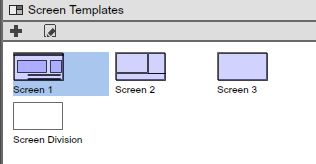
|
|

Next you must assign a Channel to this Output. We will choose the Media RSS Channel which will play in full Screen on this Output, because we only have one region in the Screen Division.
|
|
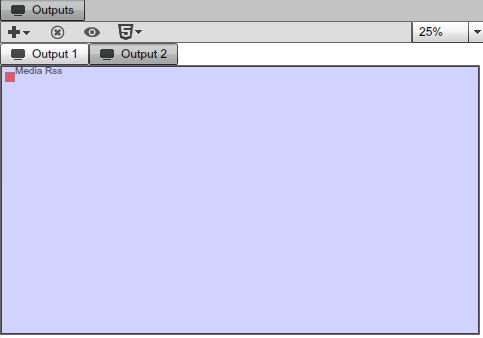
Now we have one Timeline and two Outputs in our first Campaign. We will move a step forward in our example and create a second Timeline, add some items to it, and customize them. Remember you can create as many Timelines as you want within a Campaign.
|
|
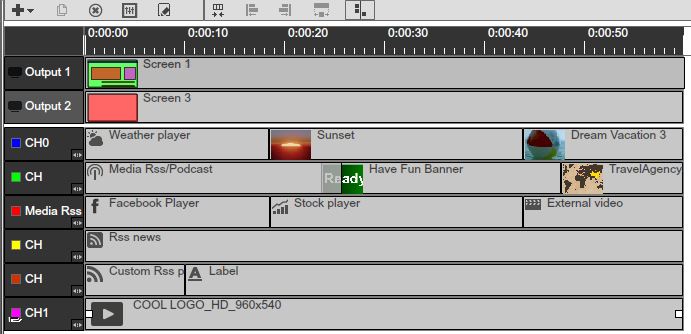
CREATE A SECOND TIMELINE
Use the Timeline wizard to add a new Timeline to the Campaign and make the following settings:
|
|
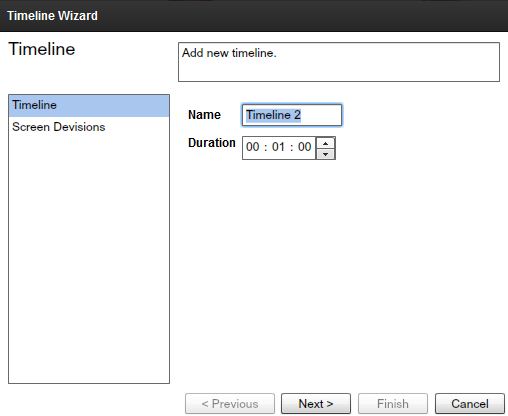
The Screen Division 2 we will use for this second Timeline has four regions, one for the Mask 2, and the other three for the items we'll add to the Channels. We will first rename all the Channels.
|
|
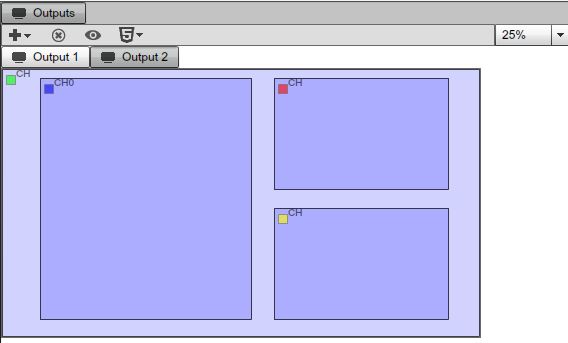
Now, as in the case of the first Timeline of our Campaign, we'll add items to this Timeline and customize them. This Timeline has the fallowing Channels:
- Mask
- RSS News
- Weather
- Pictures
MASK
On the Mask Channel, we will add the Mask 2 we've imported from the shared library. After you drag the Mask to the Timeline from the Resources directory, increase the length of the resource so it matches the length of the Timeline.
|
|

RSS NEWS
On the RSS News Channel, drag the RSS News Component and increase its length so it matches the Timeline.
|
|

Apply the following settings to the RSS news component:
|
|
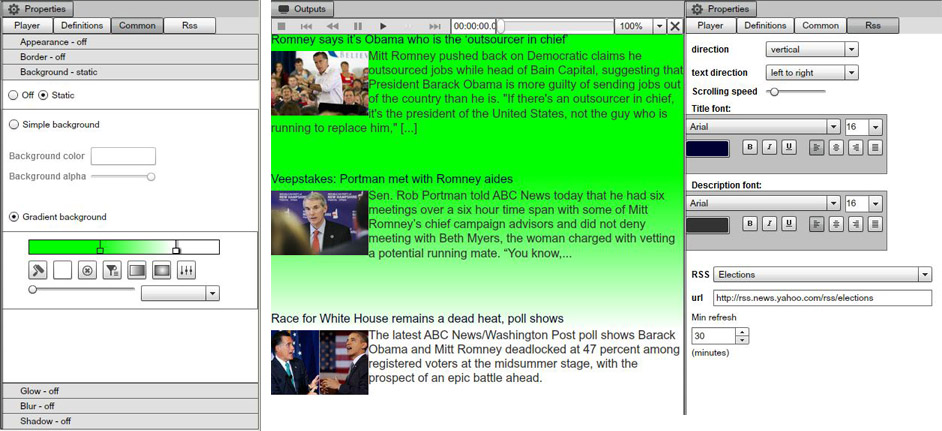
WEATHER
On the Weather Channel, drag the Weather player and increase its length so it matches the Timeline. Now, customize the player.
Drag the Weather Scene we created earlier in the Scene field, and choose a location.
|
|
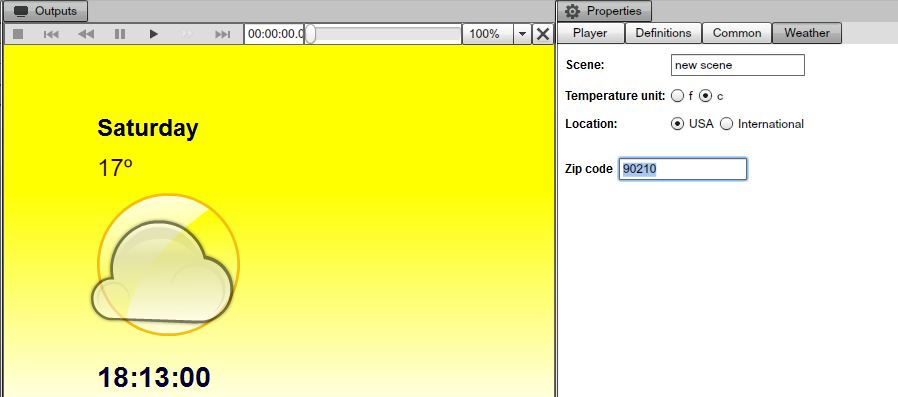
PICTURES
Assign the Pictures common Channel to the bottom right region of the Screen Division. With this operation we've configured the four Channels of the Second Timeline.
|
|
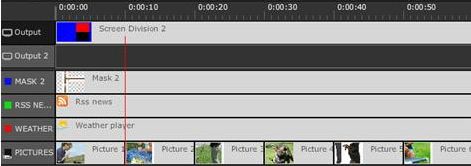
As you can see, the Output 2 Channel of this second Timeline is empty. We will leave it like this for our example, but feel free to add any Screen Division you want.
At this point, you can preview the Campaign in an external browser. If you configured the Timelines correctly and draw the regions of the Screen Divisions according to the dimensions of the Masks, the two Timelines created for this example should look approximately like this:
|
|
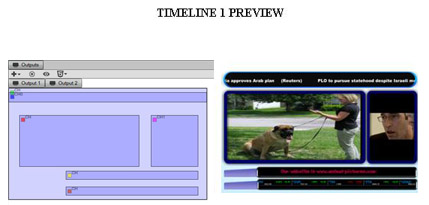
|
|
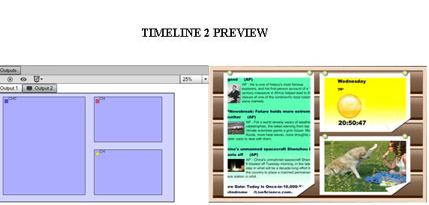
Additionally, you may also change the sequencing order of the Timelines, set the Campaign mode to Schedule, add more Timelines, Outputs or anything you think will enhance your presentation. In the above example, we recap some of the features discussed in this book. We've build a Campaign from scratch; we used multiple Timelines, Outputs, local and common Channels, Components, Resources and Scenes.
Copyrights MediaSignage© Inc