Access Control Lists
INTRO TO ACL
In this Chapter we cover Access Control Lists (ACL).Access Control Lists use Keys to extend the functionality of Privileges.ACL allow finer control on access to specific items you create within the SignageStudio.
PRIVILEGES VS ACL
With Privileges, you have the ability to either show or hide complete sections of the SignageStudio. For example, show or hide the entire Screens module to to specific users.
Access Keys are used to manage specific items that you create such as Scenes or Campaigns, thus allowing finer control on which items to show / hide to specific users.
|
|
So with ACL you can set it up so a user is able to work only on a specific Scene and nothing else. To do this, you assign a specific Scene a key value and assign the user a matching key value.
|
|

DEFINING ACCESS KEYS
In this section we will demonstrate how to bind keys to resources.
Create a new Privilege Group and name it Scene Users.
|
|
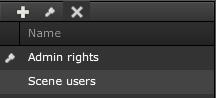
Any user assigned to the Scene Users privilege group will be able to work on specific Scenes.
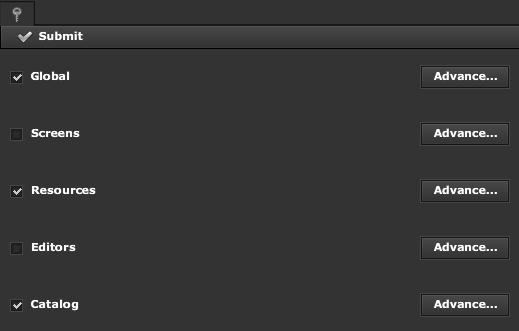
Remove all sections of the SignageStudio privileges except for Editors.
|
|

Next, access the Users module of the EnterpriseStudio and add user Test01 as a member of the Scene Users group.
|
|

Set Test01 with access key #2 by selecting the checkbox next to number 2, under the access keys list. Next click Save to submit your changes to the server.
|
|

Next assign the same access key to a selected resource in the SignageStudio.
Select user Test02 and give it all access keys.
|
|

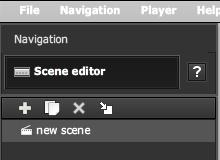
Next launch the SignageStudio as Test02.
Open the Scene editor and create several Scenes.
|
|
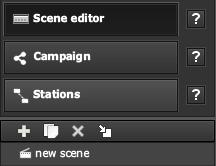
To give Test01 access only to a specific scene (and not to any other scene), select the Config tab under the Scene properties.
|
|
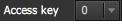
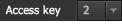
Since we launched the SignageStudio as user Test02,, we are able to set any key value that Test02 possesses (in our example Test02 possesses all keys). Change the selected Scene key from the default 0 to 2 and save your work.
|
|
Go back to the EnterpriseStudio and launch a new instance of the SignageStudio as user Test01 (remember Test01 own only access key 2).
|
|

|
|
Test01 can work on this scene, he can make any changes he wants to it, but cannot view any other scenes, as he was only assigned access key value 2. User Test01 cannot view any other section of the SignageStudio due to his limited privileges set.
To continue with our example, close all instances of the SignageStudio and go back to the EnterpriseStudio.
Now, assign user Test01 both access keys 1 and 2.
|
|

Save the configuration and re-launch the SignageStudio as user Test01. The user can still access only one scene as no other scene was assigned access key 1. However, click on the config tab from the Properties panel of the scene, and you will see that now user Test01 can set access keys 1 OR 2.
|
|

In the previous example, Test01 only had access to key 2, but now he can also select from the drop down menu key 1. Therefore user Test01 can modify the permission to the scene.
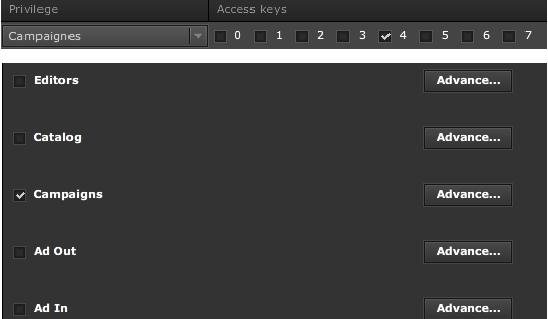
Switch back to the users module of the EnterpriseStudio and assign a new user Test03, an access key 4. Change the privilege group to Campaigns and allow the user to view only the Campaigns section of the SignageStudio.
|
|
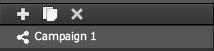
Next, we will launch the SignageStudio as user Test02, (that possesses all keys). Go to Campaigns and select Campaign 1.
|
|
In the Properties panel of the selected Campaign, set the access key to 4.
|
|
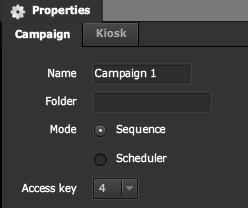
This means that only users with access key of 4 will be able to work on this specific Campaign. We will re-launch the SignageStudio as the user Test03 and select Campaigns.
|
|
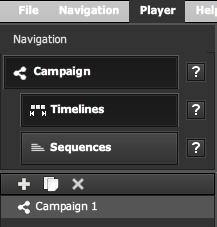
Test03 can view only Campaign 1 as it was assigned access key 1. All other Campaigns are hidden to the user.
Access keys extend the power and flexibility of Privileges, allowing you to create specific show / hide rules for items created in the SignageStudio.
Copyrights MediaSignage© Inc